Blog

Posts written in 2019.

  • Published on
    -
    5 min read

    Generate Code Name For Tags In Kentico

    With every Kentico release that goes by, I am always hopeful that they will somehow add code name support to Tags where a unique text-based identifier is created, just like Categories (via CategoryName field). I find the inclusion of code names very useful when used in URL as wildcards to filter a list of records, such as blog posts.

    In a blog listing page, you'll normally have the ability to filter by both category or tag and to make things nice for SEO, we include them in our URLs, for example:

    • /Blog/Category/Kentico
    • /Blog/Tag/Kentico-Cloud

    This is easy to carry out when dealing with categories as every category you create has "CategoryName" field, which strips out any special characters and is unique, fit to use in slug form within a URL! We're not so lucky when it comes to dealing with Tags. In the past, to allow the user to filter my blog posts by tag, the URL was formatted to look something like this: /Blog/Tag/185-Kentico-Cloud, where the number denotes the Tag ID to be parsed into my code for querying.

    Not the nicest form.

    The only way to get around this was to customise how Kentico stores its tags on creation and update, without impacting its out-of-the-box functionality. This could be done by creating a new table that would store newly created tags in code name form and link back to Kentico's CMS_Tag table.

    Tag Code Name Table

    The approach on how you'd create your table is up to you. It could be something created directly in the database, a custom table or module. I opted to create a new class name under one of my existing custom modules that groups all site-wide functionality. I called the table: SurinderBhomra_SiteTag.

    The SurinderBhomra_SiteTag consists of the following columns:

    • SiteTagID (int)
    • SiteTagGuid (uniqueidentifier)
    • SiteTagLastModified (datetime)
    • TagID (int)
    • TagCodeName (nvarchar(200))

    If you create your table through Kentico, the first four columns will automatically be generated. The "TagID" column is our link back to the CMS_Tag table.

    Object and Document Events

    Whenever a tag is inserted or updated, we want to populate our new SiteTag table with this information. This can be done through ObjectEvents.

    public class ObjectGlobalEvents : Module
    {
        // Module class constructor, the system registers the module under the name "ObjectGlobalEvents"
        public ObjectGlobalEvents() : base("ObjectGlobalEvents")
        {
        }
    
        // Contains initialization code that is executed when the application starts
        protected override void OnInit()
        {
          base.OnInit();
    
          // Assigns custom handlers to events
          ObjectEvents.Insert.After += ObjectEvents_Insert_After;
          ObjectEvents.Update.After += ObjectEvents_Update_After;
        }
    
        private void ObjectEvents_Insert_After(object sender, ObjectEventArgs e)
        {
          if (e.Object.TypeInfo.ObjectClassName.ClassNameEqualTo("cms.tag"))
          {
            SetSiteTag(e.Object.GetIntegerValue("TagID", 0), e.Object.GetStringValue("TagName", string.Empty));
          }
        }
    
        private void ObjectEvents_Update_After(object sender, ObjectEventArgs e)
        {
          if (e.Object.TypeInfo.ObjectClassName.ClassNameEqualTo("cms.tag"))
          {
            SetSiteTag(e.Object.GetIntegerValue("TagID", 0), e.Object.GetStringValue("TagName", string.Empty));
          }
        }
    
        /// <summary>
        /// Adds a new site tag, if it doesn't exist already.
        /// </summary>
        /// <param name="tagId"></param>
        /// <param name="tagName"></param>
        private static void SetSiteTag(int tagId, string tagName)
        {
          SiteTagInfo siteTag = SiteTagInfoProvider.GetSiteTags()
                                .WhereEquals("TagID", tagId)
                                .TopN(1)
                                .FirstOrDefault();
    
          if (siteTag == null)
          {
            siteTag = new SiteTagInfo
            {
              TagID = tagId,
              TagCodeName = tagName.ToSlug(), // The .ToSlug() is an extenstion method that strips out all special characters via regex.
            };
    
            SiteTagInfoProvider.SetSiteTagInfo(siteTag);
          }
        }
    }
    

    We also need to take into consideration when a document is deleted and carry out some cleanup to ensure tags no longer assigned to any document are deleted from our new table:

    public class DocumentGlobalEvents : Module
    {
        // Module class constructor, the system registers the module under the name "DocumentGlobalEvents"
        public DocumentGlobalEvents() : base("DocumentGlobalEvents")
        {
        }
    
        // Contains initialization code that is executed when the application starts
        protected override void OnInit()
        {
          base.OnInit();
    
          // Assigns custom handlers to events
          DocumentEvents.Delete.After += Document_Delete_After;
        }
    
        private void Document_Delete_After(object sender, DocumentEventArgs e)
        {
          TreeNode doc = e.Node;
          TreeProvider tp = e.TreeProvider;
    
          GlobalEventFunctions.DeleteSiteTags(doc);
        }
    
        /// <summary>
        /// Deletes Site Tags linked to CMS_Tag.
        /// </summary>
        /// <param name="tnDoc"></param>
        private static void DeleteSiteTags(TreeNode tnDoc)
        {
          string docTag = tnDoc.GetStringValue("DocumentTags", string.Empty);
    
          if (!string.IsNullOrEmpty(docTag))
          {
            foreach (string tag in docTag.Split(','))
            {
              TagInfo cmsTag = TagInfoProvider.GetTags()
                               .WhereEquals("TagName", tag)
                               .Column("TagCount")
                               .FirstOrDefault();
    
              // If the the tag is no longer stored, we can delete from SiteTag table.
              if (cmsTag?.TagCount == null)
              {
                List<SiteTagInfo> siteTags = SiteTagInfoProvider.GetSiteTags()
                                     .WhereEquals("TagCodeName", tag.ToSlug())
                                     .TypedResult
                                     .ToList();
                if (siteTags?.Count > 0)
                {
                  foreach (SiteTagInfo siteTag in siteTags)
                    SiteTagInfoProvider.DeleteSiteTagInfo(siteTag);
                }
              }
            }
          }
        }
    }
    

    Displaying Tags In Page

    To return all tags linked to a page by its "DocumentID", a few of SQL joins need to be used to start our journey across the following tables:

    1. CMS_DocumentTag
    2. CMS_Tag
    3. SurinderBhomra_SiteTag

    Nothing Kentico's Object Query API can't handle.

    /// <summary>
    /// Gets all tags for a document.
    /// </summary>
    /// <param name="documentId"></param>
    /// <returns></returns>
    public static DataSet GetDocumentTags(int documentId)
    {
      DataSet tags = DocumentTagInfoProvider.GetDocumentTags()
                        .WhereID("DocumentID", documentId)
                        .Source(src => src.Join<TagInfo>("CMS_Tag.TagID", "CMS_DocumentTag.TagID"))
                        .Source(src => src.Join<SiteTagInfo>("SurinderBhomra_SiteTag.TagID", "CMS_DocumentTag.TagID"))
                        .Columns("TagName", "TagCodeName")
                        .Result;
    
      if (!DataHelper.DataSourceIsEmpty(tags))
        return tags;
    
      return null;
    }
    

    Conclusion

    We now have our tags working much like categories, where we have a display name field (CMS_Tag.TagName) and a code name (SurinderBhomra_SiteTag.TagCodeName). Going forward, any new tags that contain spaces or special characters will be sanitised and nicely presented when used in a URL. My blog demonstrates the use of this functionality.

  • Published on
    -
    2 min read

    Changing EXIF Date and Time In Raw Files

    My Fujifilm X100F camera only comes out of hibernation when I go on holiday. Most of the time, I fail to ensure my camera settings are correct before I take the very first snap. This happened on my last holiday to Loch Lomond.

    When it came to the job of carrying out some image processing from RAW to JPEG, I noticed all of my photos EXIF dates were incorrect. I am such stickler for correct EXIF information, including geolocation wherever possible. EXIF information is so useful for cataloging when consumed by photo applications, whether it’s on my Synology or uploaded to Google Photos.

    Due to the high number of photos with incorrect date stamps, I needed a tool that will automate the correction process. After a bit of Googling, I found an application called exiftool by Phil Harvey that allows the EXIF date/time stamp to be modified using a method in the documentation called “Shift”.

    The exiftool has no GUI (graphical user interface) and will need to be run in Terminal on a Mac or command line for Windows users. The command to use is relatively simple and the only complex thing you will have to do is calculate how many days, months, years, hours, minutes and seconds you need to add or subtract.

    In my case, the calculation was a matter of subtracting 3 days from all the photos and the command to do this looks like the following:

    exiftool -AllDates-='0:0:3 0:0:0' -m /Volumes/LochLomond
    

    Lets breakdown the command to get a better understanding what each part does.

    • exiftool: Runs the application and you have to ensure that your Terminal/Command Line is run in the same directory exiftool is housed.
    • AllDates: Modifies all dates in a photo.
    • -=‘0:0:3 0:0:0’: Subtract 3 days off the photos exif date. If you wanted to add 3 days, use “+=” instead. The date time format is presented as “<year>:<month>:<day> <hours>:<minute>:<second>”.
    • -m: Ignore minor errors and warnings (as stated in the documentation).
    • /Volumes/LochLomond: Location to where all the photos reside.

    When making mass changes to files, it’s always recommended to ensure you have a back up of all photos for you too fallback on if you accidentally mess up the EXIF update.

  • Published on
    -
    3 min read

    Kentico 12 MVC: Get List of Widgets Used On A Page

    There are times when you need to know what widgets are being used on a page. In my case, I needed to know this information to render JavaScript code at the bottom of the page that each of my widgets depends on.

    Why don't I just place all the JavaScript code my site and widgets use in one file? Loading one large JavaScript file isn't the best approach for page performance. Instead, I use LabJS to dynamically load scripts in specific execution order without blocking other resources. So if I created a Carousel widget in Kentico, I would only load the JavaScript plugin if added to the page.

    I'll use my JavaScript scenario as a basis for demonstrating the way to list out widgets used in a page.

    If we delve into the CMS_Document table, Kentico uses the "DocumentPageBuilderWidgets" field that stores a JSON structure consisting of a list of all the widgets and their property values. All we are interested in is the type property.

    Let's get to the code.

    Controller - SharedController

    I created a SharedController class containing a GenerateWidgetJavascript() PartialViewResult. This will convert the JSON from the "DocumentPageBuilderWidgets" field into a JSON Object to then be queried (using SelectTokens) to select every iteration of the type field in the hierarchy.

    /// <summary>
    /// Get widget used on a page to render any required JavaScript.
    /// </summary>
    /// <returns></returns>
    public PartialViewResult GenerateWidgetJavascript()
    {
        List<string> widgetTypes = new List<string>();
    
        if (Page.GetStringValue("DocumentPageBuilderWidgets", string.Empty) != string.Empty)
        {
            JObject pageWidgetJson = JObject.Parse(Page.GetStringValue("DocumentPageBuilderWidgets", string.Empty));
    
            if (pageWidgetJson != null)
                widgetTypes = pageWidgetJson.SelectTokens("$.editableAreas[*].sections[*].zones[*].widgets[*].type").Select(jt => jt.ToString().Substring(jt.ToString().LastIndexOf('.') + 1)).Distinct().ToList();
        }
    
        return PartialView("Widgets/_PageWidgetJs", widgetTypes);
    }
    

    Additional manipulation is carried out on the type field using LINQ to return a distinct set of results, as there might be a case where the same widget is used multiple times on a page. Since I name all my widgets in the following format - <SiteName>.<WidgetGroup>.<WidgetName>, I am only interested in the <WidgetName>. For example, my widget would be called "SurinderSite.Layout.Carousel". The controller will simply output "Carousel".

    To avoid confusion in my code snippet, it's worth noting I use a Page variable. This contains information about the current page and is populated in my base controller. It has a type of TreeNode. You can see my approach to getting the current page information in this post.

    Partial View - _PageWidgets

    The most suitable place to add my widget dependent JavaScript is in the /View/Shared/Widgets directory - part of the recommended Kentico project structure.

    All we need to do in the view is iterate through the string collection of widget types and have a bunch of if-conditions to render the necessary JavaScript.

    @model List<string>
    
    @if (Model.Any())
    {
        <script>
            @foreach (string widgetType in Model)
            {
                if (widgetType == "Carousel")
                {
                    <text>
                        $LAB
                            .script("/resources/js/plugins/slick.min.js")
                            .script("/resources/js/carousel.min.js").wait(function () {
                                {
                                    FECarousel.Init();
                                }
                            });
                    </text>
                }
            }
        </script>
    }
    

    Layout View

    The Layout view will be the best place to add the reference to our controller in the following way:

    @{ Html.RenderAction("GenerateWidgetJavascript", "Shared"); }
    
  • Published on
    -
    4 min read

    My Essential iPad Accessories and Applications

    Following up on my previous post about the joy that is using my new iPad Air, I thought I’d write about what I deem are essential accessories and applications. It’s only been a couple of weeks since making my purchase and has surprisingly found the transition from Android to iOS not too much of a pain. It’s fast becoming part of my daily workflow for creative writing and note-taking.

    Here are some applications and accessories I use…

    Accessories

    Keyboard Case

    Apple’s own Smart Keyboard Cover felt very unnatural to use and didn’t provide enough protection for my nice new tablet. The Inateck Keyboard Case is an absolute pleasure to use and the keys have a very nice responsive rebound. I can literally use this anywhere and feels just as stable on my lap as it is when being used on a desk.

    The only downside is the connectivity relies on Bluetooth rather than Apple’s own Smart connector which would normally power the keyboard. Nevertheless, the pairing has no latency and the battery lasts weeks even with daily usage.

    Apple Pencil

    The iPad Air is only compatible with the first generation pencil and has a really ridiculous way to charge using the lightning connector. Apple could have quite easily made the iPad Air work with the second generation pencil. If the iPad Pro was a cracker, then the second generation pencil would be the caviar.

    Regardless of the design, it’s refreshing to scribble away notes to store electronically. Previously to keep track of my written notes, I would write on paper (oh how old fashioned!?) and then scan digitally using Evernote on my phone.

    Draw Screen Protector

    Writing on glass using the Apple Pencil is a little slippery and need something that gives the texture to almost simulate the friction you would get when writing on paper. There are a handful of screen protectors that provide this with varying degrees of success. The most popular being is Paperlike, which I plan on putting an order for when I’ve worn out my current screen protector.

    My current screen protector is Nillkin and isn’t too bad. It provides adequate protection as well as giving enough texture with enough anti-reflection qualities that doesn’t hinder screen visibility. Added bonus: a nice light scratchy sound as you'd expect if writing with an old-fashioned pencil!

    Applications

    I'm deliberately leaving out the most obvious and well-known apps that we are well aware of such as YouTube, Netflix, Gmail, Kindle, Twitter, Spotify etc.

    Jump Desktop

    I wrote about this very briefly in my previous post. If you want a link to your laptop/workstation from your iPad, Jump Desktop is your best option. Once you have the application installed on your iPad and host machine you are up and running in minutes. Judging by past updates, it’s getting better with every release.

    Evernote

    I don’t think I can speak about Evernote highly enough. I am a premium member and is one of my most highly used applications across all mediums. Worth every penny! It organises my notes, scribbles and agendas with little effort.

    Evernote is effectively my brain dump of ideas.

    Notes haven’t looked so good with the use of a recent feature - Templates. On creation of a new note, you have the option to select a predefined template based from the many Evernote provides from their own Template Gallery.

    Grammarly

    Grammarly is a must for all writers to improve the readability of your content. I myself had only started using Grammarly since last year and now can't think of writing a post without it. In the iPad form, Grammarly forms part of the keyboard that carries out checks as you type. This works quite well with my writing workflow when using Evernote.

    Autodesk Sketchbook

    If the Apple Pencil has done anything for me, is to allow me to experiment more with what it can do and in the process allowing me to try things I don’t generally do. In this case, sketch! I would be lying if I said Autodesk Sketchbook is the best drawing apps out there as I haven’t used any others. For an app that is free, it has a wide variety of features that will accommodate both novice and experts alike.

    1.1.1.1

    Developed by the team who brought you the Cloudflare CDN infrastructure comes 1.1.1.1, an app for providing faster and more private internet. This is something I always have running in the background to have a form or protection using public hotspots and to stop my ISP from snooping where I go on the internet.

    When compared to other DNS directory services, Cloudflare touts 1.1.1.1 as the fastest. As everything you do on the internet starts with a DNS request, choosing the fastest DNS directory will accelerate the online experience.

  • Published on
    -
    6 min read

    Searching For A New Tablet and Going Back To iPad

    I’ve been looking for a tablet for quite some time and doing some in-depth research on the best one to get. I am always a stickler for detail and wanting to get best for the time based on budget and specification.

    Only having ever owned two tablets in the past - an iPad 2 and Nexus 7. Being someone who has semented himself in the Android/Google ecosystem, I automatically got along with the Nexus and quickly became my daily driver for web browsing and reading the vast variety of books from Amazon and Google Books. That was 5-6 years ago. The tablet game has changed... No longer is it just about viewing information, watching videos with some minor swipe gestures and basic gaming. It’s more!

    Ever since Microsoft released the first version of their Surface tablet computer, it shifted the industry standards to what we should now expect from a tablet, which then led to more innovation such as:

    • Keyboard support
    • Writing with palm rejection (not that old school stylus from yesteryear!)
    • Multitasking with the ability to view multiple apps in one screen, which is only getting better by the day!
    • Near laptop replacement - We’ll go into this a little later

    I wasn’t so quick to jump on the new iterations of tablets entering the market as I was waiting to see the proof in the pudding and for prices to go down. I just don’t think its worth spending over £600 on a tablet - looking at you iPad Pro! Nevertheless, from initially piquing my interest, it now got my full attention. For the first in a long time, I could see how having a tablet be useful in my day to day activities again.

    Do I Really Need A Tablet?

    Short answer: Yes.

    If you asked me this question last year I would have more than likely have said no. My Pixel 2 smartphone fit the bill for for my portable needs. Tablet life was soon being relegated to just holidays and long weekends away.

    The only thing that has changed is the increased amount of blogging and writing I now do. Typing on a smartphone really made my thumbs tired for long periods of time for when I didn’t have a computer to hand. On the other hand, I found lugging around my MacBook Pro 15" just for writing was a little excessive and lacking all day battery life.

    I could see myself buying a tablet along with a Bluetooth keyboard for easy quick note taking for when going to conferences and for writing something a little more indepth. For anyone who writes, they will probably tell you when you have a sudden spark of inspiration you need to just write it down.

    Conundrum: To Android or Not To Android

    There seems to be a real lack of good Android tablets going around that has good build quality, vanilla OS with accessories to match. It’s guaranteed that if you go for an Android tablet, you’ll be subjected to inferior cheap cases and hardware. This was indeed the case when looking for a nice flip case for my old Nexus 7.

    One would be forgiven for being given the impression accessory manufacturers don’t give Android tablets the light of day - very annoying. I still love the nice leather Kavaj case I purchased soon after getting my iPad 2. My iPad 2 may not be getting used, but still looks the part resting on the bookshelf! I guess it’s understandable why accessory manufacturers are not providing the goods for where there is limited demand. It all comes down to a lack of flagship Android devices and I was hoping the Pixel Slate would change this. Not a chance! I really wanted to go for the Pixel Slate but the main unknown factor for me is the longevity of a device that starts at £749.

    The only choice was to consider an iPad.

    What About The Microsoft Surface?

    The Microsoft Surface is a computer powerhouse and if I needed another laptop, this would have been a great purchase. I look forward to owining one in the future. Again, it all comes down to price. You have to take into consideration the cost of the computer itself as well as the added type cover. Plus I feared I would be greeted with a long Windows Update when I have a sudden spark of writing inspiration.

    Choosing An iPad

    Apple’s have positioned their iPad lineup that should meet all demand:

    I opted for the iPad Air for the 10.5” screen, A12 Bionic processor and Smart connector. The Smart connector was something previously available to the Pro series only and it was a welcome addition to their mid range tablet as this will give me the ability to connect a keyboard cover and any further peripherals that maybe on the horizon. Future proof!

    The performance and multi-tasking support is pretty good as well. I am writing this very post with Evernote in one window, Chrome in another whilst listening to Spotify.

    Near Laptop Replacement and iPad OS

    I have no expectation to make the iPad a laptop replacement. But it’s the nearest experience to it. In all honesty, I don’t understand how some even find the iPad Pro a complete replacement. Would someone enlighten me?

    I found using Jump Desktop to remote onto my laptop a really good way to get a laptop experience on my iPad. Very useful when I need to use applications I’d never be able to run on a tablet like VMWare. Jump Desktop is one of the best remote desktop applications you can use on an iPad.

    Jump Desktop features one of the fastest RDP rendering engines on the planet. Built in-house and hand tuned for high performance on mobile devices. Jump’s RDP engine also supports audio streaming, printer and folder sharing, multi-monitors, touch redirection, RD Gateway and international keyboards.

    I am really looking forward to the release of iPad OS as it might lead to a more immersive experience that bridges the gap closer to the basic features we expect from a laptop. I always felt iOS still lacks some of features currently present in Android, such as widgets to see app activity at a glance and more control over your files.

    Conclusion

    If you’re looking for a tablet that has the capability to do a lot of wonderful things with a lot of nice supported accessories, you can’t go wrong with an iPad Air.

    Update (21/06/2019): Android Abandoning The Tablet Market

    Well this totally caught me off guard. The Verge reported on 20th June that Android are exiting the tablet market and concentrating their efforts on building laptops. This further validates my purchase and choosing an iPad was indeed the right decision.

  • Published on
    -
    2 min read

    Export Changes Between Two Git Commits In SourceTree

    I should start off by saying how much I love TortoiseGit and it has always been the reliable source control medium, even though it's a bit of a nightmare to set up initially to work alongside Bitbucket. But due to a new development environment for an external project, I am kinda forced to use preinstalled Git programs:

    • SourceTree
    • Git Bash

    I am more inclined to use a GUI when interacting with my repositories and use the command line when necessary.

    One thing that has been missing from SourceTree ever since it was released, is the ability to export changes over multiple commits. I was hoping after many years this feature would be incorporated. Alas, no. After Googling around, I came across a StackOverflow post that showed the only way to export changes in Sourcetree based on multiple commits is by using a combination of the git archive and git diff commands:

    git archive --output=archived_changes.zip HEAD $(git diff --diff-filter=ACMRTUXB --name-only hash1 hash2)
    

    This can be run directly using the Terminal window for a repository in Sourcetree. The "hash1" and "hash2" values are the long 40 character length commit ID's.

    The StackOverflow post has helped me in what I needed to achieve and as a learning process, I want to take things a step further in my post to understand what the archive command is actually doing for my own learning. So let's dissect the command into manageable chunks.

    Part 1

    git archive --output=archived_changes.zip HEAD
    

    This creates the archive of the whole repository into a zip file. We can take things further in the next section to select the commits we need.

    Part 2

    git diff --diff-filter=ACMRTUXB
    

    The git diff command shows changes in between commits. The filter option gives us more flexibility to select the files that are:

    • A Added
    • C Copied
    • D Deleted
    • M Modified
    • R Renamed
    • T have their type (mode) changed
    • U Unmerged
    • X Unknown
    • B have had their pairing Broken

    Part 3

    --name-only hash1 hash2
    

    The second part of the git diff command uses the "name-only" option that just shows which files have changed over multiple commits based on the hash values entered.

    Part 4

    The git diff command needs to be wrapped around parentheses to act as a parameter for the git archive command.

  • Published on
    -
    1 min read

    Kentico Cloud Certified

    Over the Bank Holiday weekend, I had some time to kill one evening and decided to have a go at completing the Kentico Cloud exam to become a certified developer. Taking the exam is a natural progression to warrant oneself as an expert on the platform, especially as I have been using Kentico Cloud since it was first released. Time to put my experience to the test!

    Unlike traditional Kentico CMS Developer exams, the Kentico Cloud exam consists of 40 questions to complete over a duration of 40 mins. The pass rate is still the same at 70%.

    Even though I have been using Kentico Cloud for many years, I highly recommend developers to get yourself certified providing you are familiar with the interface, built a few applications already and have exposure to the API endpoint. The exam itself is platform-agnostic and you won't be tested on any language-specific knowledge.

    The surprising thing I found after completing the exam is a higher awareness of what Kentico Cloud does not only as a platform but also touched upon areas you wouldn't have necessarily been familiar with. There certainly more to Kentico Cloud than meets the eye!

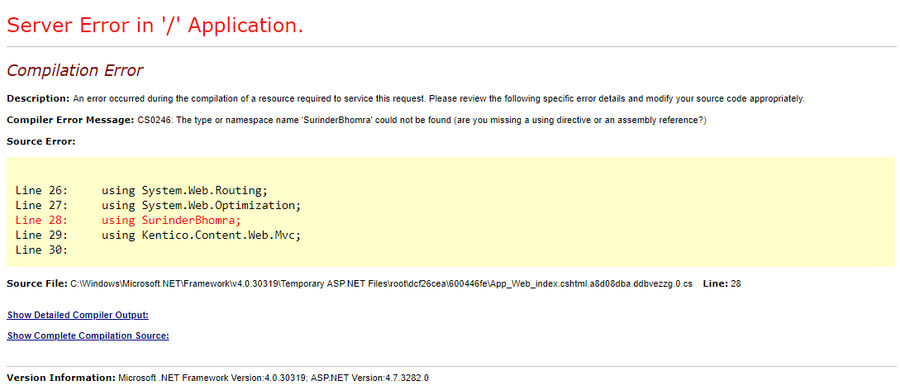
  • After renaming my MVC project from "SurinderBhomra" to "Site.Web" (to come across less self-serving) I get the following error:

    Compiler Error Message: CS0246: The type or namespace name 'xxx' could not be found (are you missing a using directive or an assembly reference?)

    CS0246 Compiler Error - Temporary ASP.NET Files

    But the misleading part of this compiler error is the source file reference to ASP.NET Temporary Files directory, which led me to believe that my build was been cached when it was actually to do with the fact I missed some areas where the old project name still remained.

    I carried out a careful rename throughout my project by updating all the places that mattered, such as:

    • Namespaces
    • Using statements
    • "AssemblyTitle" and "AssemblyProduct" attributes in AssemblyInfo.cs
    • Assembly name and Default Namespace in Project properties (followed by a rebuild)

    The key area I missed that caused the above compiler error is overlooking the the namespace section in the /Views/web.config file.

    <system.web.webpages.razor>
      <host factorytype="System.Web.Mvc.MvcWebRazorHostFactory, System.Web.Mvc, Version=5.2.3.0, Culture=neutral, PublicKeyToken=31BF3856AD364E35">
      <pages pagebasetype="System.Web.Mvc.WebViewPage">
        <namespaces>
          ...
          ...
          ...
          <add namespace="System.Web">
          ...
          ...
          ...
        </add></namespaces>
      </pages>
    </host></system.web.webpages.razor>
    

    When you first create your project in Visual Studio, it automatically adds its original namespace to this file. This also goes for any other web.config you happen to have nested in other areas inside you MVC project.

  • Published on
    -
    3 min read

    Automatically Backing Up Plesk Data To Synology

    In light of my hosting issues over the last week, I decided it was time to take measures in ensuring all websites under my hosting provider are always backed up automatically. I generally take hosting backups offsite on an ad-hoc basis and entrust the hosting provider to keep up their end of the bargain by doing this on my behalf.

    If you are with a hosting provider (like I was previously - A2 Hosting), who talks the talk but can't actually walk the walk in regards to the service they offer, you will more than likely end up having backup woes. It's always best practice to take control of your own backups and if this can be automated, makes life so much easier!

    All Plesk panels have a "Backup Manager" area where you can action manual or scheduled backup processes. Depending on your hosting provider, the features shown in this area might be varied. Some have the option to backup straight to your Dropbox account. What we will be focusing on is remotely backing up our website data to our Synology NAS using FTP.

    Before we log into Plesk to select our Remote Backup option, we need to carry out some setup on our Synology.

    Port Forwarding for FTP and FTPS Protocols

    Most likely, your router will have a limited number of ports open to allow outside internet traffic to enter the local network. To make the most of your Synology, there is a recommended number of ports you need to open to make use of all the services.

    We are interested in opening to the following ports:

    • FTP: 21
    • FTPS: 990

    I prefer to send over any data using FTPS just for better security.

    You will have to login to your router settings to open ports. I would provide some instructions on how to do this, but every router is different. I just managed to find these settings hidden away in my own Billion router.

    Synology Setup

    Setting up FTP is pretty straight-forward. Just make sure you have administrative privileges to access the Control Panel.

    Enable FTP

    In Control Panel, go to: File services > FTP Tab.

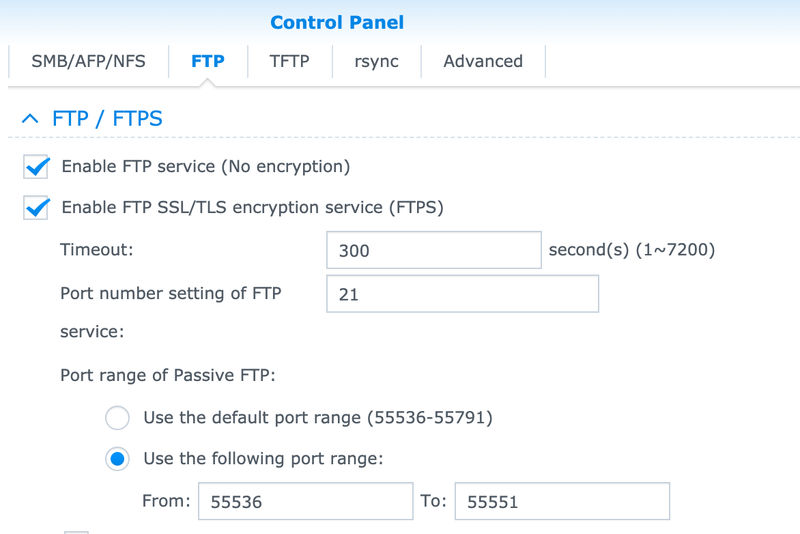
    All we need to do here is to enable two FTP settings:

    • Enable FTP service (no encryption)
    • Enable FTP SSL/TLS encryption (FTPS)

    Synology Control Panel - Enable FTP

    The reason why I selected the "Enable FTP service (no encryption)" option is purely for initial testing purposes. If there are any issues when making a connection via FTP from a new service for the first time, I just like to ensure if a successful connection can be made via standard FTP. After my testing is done, I would disable this option.

    Create a Synology User

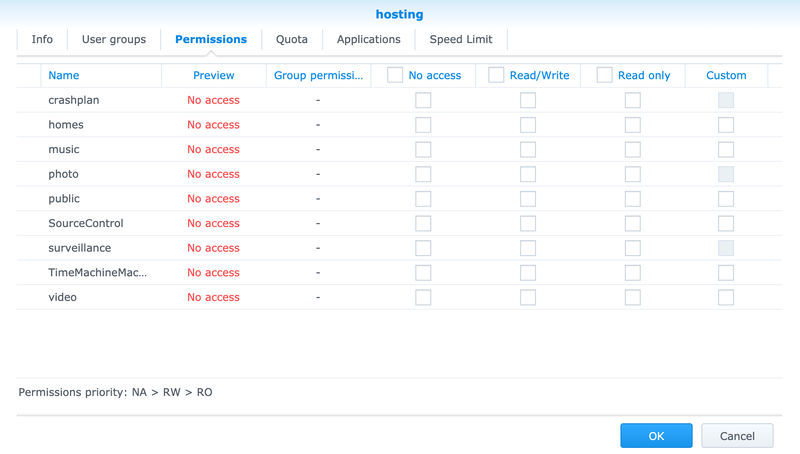
    I prefer to create a new user specifically for FTP connections rather than my main own account, as I have the ability to lock down access to only read and write permissions in its home directory. No Synology services or applications will be accessible.

    Synology FTP User Permissions

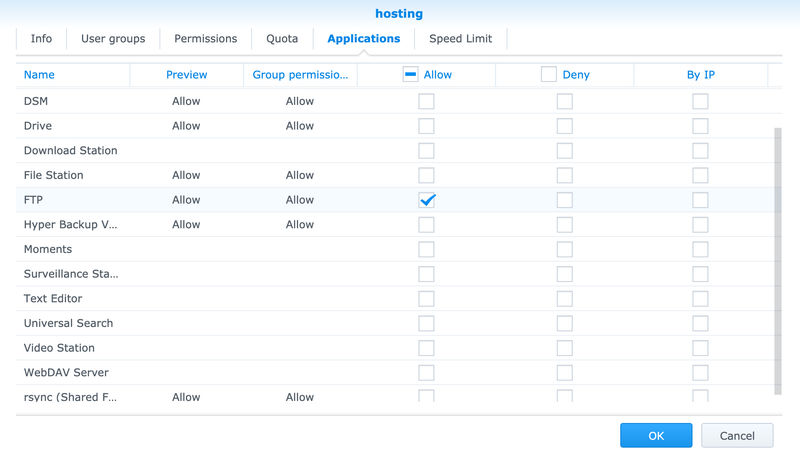
    The only application I allow my user to access is "FTP".

    Synology FTP User Application Permissions

    Plesk Backup Manager Setup

    FTP Configuration

    In Backup Manager, go to "Remote Storage Settings and select "FTP". Enter the following settings along with your user credentials:


    On clicking the "OK" or "Apply" button should return no errors. But if there are errors, check the logs and ensure you haven't missed any permissions for your Synology user.

    Set Backup Schedule

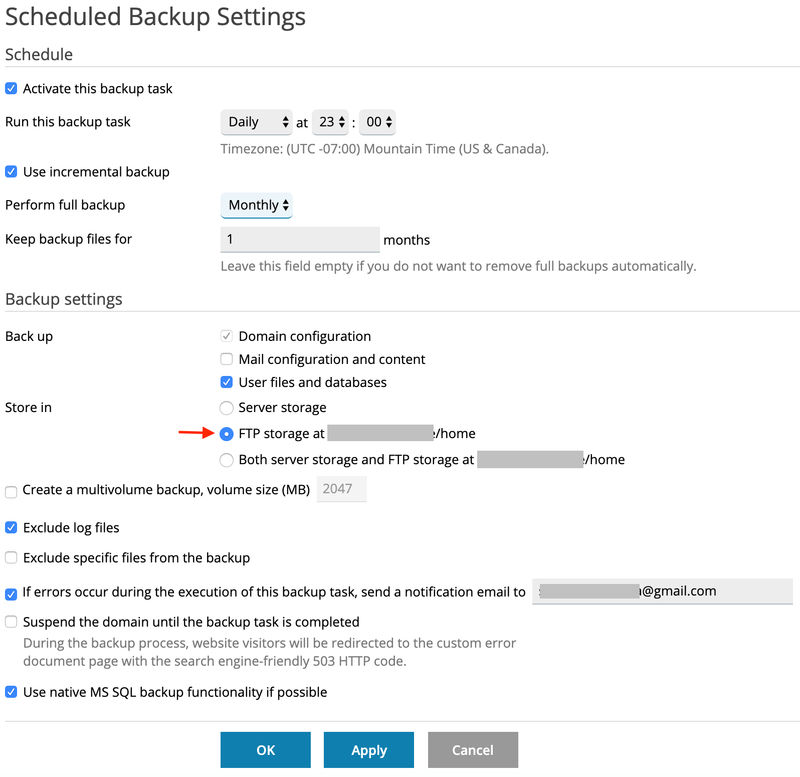
    Now we have set our remote storage settings, we now need to put a schedule in place to generate a backup on as often as we require. It's up to on how often you set the regularity of the backups. I've set mine to run daily at 11pm and retain these backups for a month.

    Plesk Scheduled Backup

    Make sure you set the Backup settings to store the backup in your newly created FTP storage.

    A Word To The Wise

    Just because we now have automatic backups running protecting us from any foreseen hosting issues, this doesn't mean we're all in the clear. Backups are useless to us if they don't work. I check my backups at least once a week and ensure the most recently backed up file is free from corruption and can be opened.

  • As great as it is building sites using the MVC framework in Kentico, I do miss some of the page features we’re spoilt with that previous editions of Kentico has to offer.

    Like anything, there are always workarounds to implement the features we have become accustomed to but ensuring the correct approach is key, especially when moving existing Kentico clients onto Kentico 12 MVC edition. Familiarity is ever so important for the longer tenure clients who already have experience using previous versions of Kentico.

    In my Syndicut Medium post, I show how to use Kentico's existing fields from the CMS_Document table to work alongside the new MVC approach.

    Take a read here: https://medium.com/syndicut/adding-navigation-properties-to-pages-in-kentico-12-mvc-8f054f804af2