Blog

Categorised by 'ASP.NET'.

  • Facebook ConnectIf I need to login and authenticate a Facebook user in my ASP.NET website, I either use the Facebook Connect's JavaScript library or SocialAuth.NET. Even though these two methods are sufficient for the purpose, I don't think it's the most ideal or efficient way.

    The Facebook Connect JavaScript library is quite basic and doesn't have the flexibility required for full .NET integration through FormsAuthentication. Whereas SocialAuth.NET provides full .NET integration and all authentication is done server-side with minimal development.

    I'd say if you are looking for a straight-forward way to integrate social site authentication, SocialAuth.NET is the way to go. It's API can communicate with other social sites such as Twitter, LinkedIn and Gmail.

    Recently, I found a better and more efficient way to authenticate Facebook users on my site using Graph API and Hammock.

    Hammock is a C# a REST library for .NET that greatly simplifies consuming and wrapping RESTful services. This allows us to embrace the social site’s core technology instead of using varied SDK's or API's. There are many community driven frameworks and API's readily available on the Internet, but they can really cause problems if they evolve too quickly or haven’t been thoroughly tested.

    Suddenelfilio, has written a useful blog post on connecting Facebook using Hammock. You will see by his example that you can interact with Facebook anyway you want.

    The same principle could also be applied to other website API's that use REST based services, such as Twitter.

  • I always found writing code to read an RSS feed within my .NET application very time-consuming and long-winded. My RSS code was always a combination of using WebRequest, WebResponse, Stream, XmlDocument, XmlNodeList and XmlNode. That’s a lot of classes just to read an RSS feed.

    Yesterday, I stumbled on an interesting piece of code on my favourite programming site StackOverflow.com, where someone asked how to parse an RSS feed in ASP.NET. The answer was surprisingly simple. RSS feeds can now be consumed using the System.ServiceModel.Syndication namespace in .NET 3.5 SP1. All you need is two lines of code:

    var reader = XmlReader.Create("http://mysite.com/feeds/serializedFeed.xml");
    var feed = SyndicationFeed.Load(reader);
    

    Here’s a full example on how we can iterate through through the SyndicationFeed class:

    public static List<BlogPost> Get(string rssFeedUrl)
    {
        var reader = XmlReader.Create(rssFeedUrl);
        var feed = SyndicationFeed.Load(reader);
    
        List<BlogPost> postList = new List<BlogPost>();
    
        //Loop through all items in the SyndicationFeed
        foreach (var i in feed.Items)
        {
            BlogPost bp = new BlogPost();
            bp.Title = i.Title.Text;
            bp.Body = i.Summary.Text;
            bp.Url = i.Links[0].Uri.OriginalString;
            postList.Add(bp);
        }
    
        return postList;
    }
    

    That’s too simple, especially when compared to the 70 lines of code I normally use to do the exact same thing.

  • The thing that annoys me when using ASP.NET controls is the amount of cluttered HTML that gets generated. It sometimes reminds of my early web development days when Dreamweaver was the development tool of choice. That was a long time ago!

    CheckBoxList

    By default when using a Checkbox or Radio button list, the following markup is generated:

    <table id="MainContent_TestCheckList">
        <tbody>
                <tr>
                    <td>
                        <input type="checkbox" value="1" name="ctl00$MainContent$TestCheckList$0" id="MainContent_TestCheckList_0"><label for="MainContent_TestCheckList_0">Item 1</label>
                    </td>
                    <td>
                        <input type="checkbox" value="2" name="ctl00$MainContent$TestCheckList$1" id="MainContent_TestCheckList_1"><label for="MainContent_TestCheckList_1">Item 2</label>
                    </td>
                    <td>
                        <input type="checkbox" value="3" name="ctl00$MainContent$TestCheckList$2" id="MainContent_TestCheckList_2"><label for="MainContent_TestCheckList_2">Item 3</label>
                    </td>
                    <td>
                        <input type="checkbox" value="4" name="ctl00$MainContent$TestCheckList$3" id="MainContent_TestCheckList_3"><label for="MainContent_TestCheckList_3">Item 4</label>
                    </td>
                </tr>
        </tbody>
    </table>
    

    Yuck!

    Thankfully, this control contains a property called “RepeatLayout” that gives us the option to render our list of checkboxes or radio buttons in a much nicer way.

    Flow

    Rendered within a <span> container.

    <span id="MainContent_TestCheckList">
        <input type="checkbox" value="1" name="ctl00$MainContent$TestCheckList$0" id="MainContent_TestCheckList_0"><label for="MainContent_TestCheckList_0">Item 1</label>
        <input type="checkbox" value="2" name="ctl00$MainContent$TestCheckList$1" id="MainContent_TestCheckList_1"><label for="MainContent_TestCheckList_1">Item 2</label>
        <input type="checkbox" value="3" name="ctl00$MainContent$TestCheckList$2" id="MainContent_TestCheckList_2"><label for="MainContent_TestCheckList_2">Item 3</label>
        <input type="checkbox" value="4" name="ctl00$MainContent$TestCheckList$3" id="MainContent_TestCheckList_3"><label for="MainContent_TestCheckList_3">Item 4</label>
    </span>
    

    OrderedList or UnorderedList

    Rendered within a <ul> (unordered list) or <ol> (ordered list). Note: Multi-column layouts (RepeatColumns attribute) are not supported when using this option.

    <ul id="MainContent_TestCheckList">
        <li><input type="checkbox" value="1" name="ctl00$MainContent$TestCheckList$0" id="MainContent_TestCheckList_0"><label for="MainContent_TestCheckList_0">Item 1</label></li>
        <li><input type="checkbox" value="2" name="ctl00$MainContent$TestCheckList$1" id="MainContent_TestCheckList_1"><label for="MainContent_TestCheckList_1">Item 2</label></li>
        <li><input type="checkbox" value="3" name="ctl00$MainContent$TestCheckList$2" id="MainContent_TestCheckList_2"><label for="MainContent_TestCheckList_2">Item 3</label></li>
        <li><input type="checkbox" value="4" name="ctl00$MainContent$TestCheckList$3" id="MainContent_TestCheckList_3"><label for="MainContent_TestCheckList_3">Item 4</label></li>
    </ul>
    

    Table

    We won’t be using this option.

  • Back in 2009 I wrote a simple web application to output all videos uploaded from a user’s channel. Luckily, hardly anything has changed. Now you only need to register for a Developer Key and state an Application Name. You are no longer required to provide a Client ID.

    This time round, I needed to output data onto my page from a single YouTube entry when a user pastes the URL of a YouTube video in one of my form fields.

    using System;
    using System.Linq;
    using System.Text;
    using Google.GData;
    using Google.YouTube;
    using Google.GData.Client;
    
    namespace MyProject.Helpers.Common
    {
        public class YouTubeHelper
        {
            private static string YouTubeDeveloperKey = WebConfigurationManager.AppSettings["YouTubeDeveloperKey"].ToString();
            private static string YouTubeAppName = WebConfigurationManager.AppSettings["YouTubeAppName"].ToString();
    
            //Get YouTube video
            public static Video YouTubeVideoEntry(string videoID)
            {
                YouTubeRequestSettings settings = new YouTubeRequestSettings(YouTubeAppName, YouTubeDeveloperKey);
                YouTubeRequest request = new YouTubeRequest(settings);
    
                //Link to the feed we wish to read from
                string feedUrl = String.Format("http://gdata.youtube.com/feeds/api/videos/{0}", videoID);
    
                Feed<Video> videoFeed = request.Get<Video>(new Uri(feedUrl));
    
                return videoFeed.Entries.SingleOrDefault();
            }
    
            //Extract the YouTube ID from the web address.
            public static string GetVideoID(string videoUrl)
            {
                Uri tempUri = new Uri(videoUrl); 
    
                string sQuery = tempUri.Query;
    
                return System.Web.HttpUtility.ParseQueryString(sQuery).Get("v");
            }
    
            //Get required YouTube video information
            public static YouTubeDetail GetVideoInformation(string url)
            {
                Video v = YouTubeVideoEntry(GetVideoID(url));
    
                //Pass required YouTube information to custom class called YouTubeDetail
                YouTubeDetail vDetail = new YouTubeDetail();
                vDetail.ID = v.VideoId;
                vDetail.Title = v.Title;
                vDetail.Description = v.Description;
    
                return vDetail;
            }
        }
    }
    

    Hopefully, my “YouTubeHelper” class is easy to follow. All you need to use is the “GetVideoInformation()” method by simply passing a page link to where your YouTube video resides. At the moment only full YouTube URL’s are accepted not the short URL (http://youtu.be/).

  • I stated in my last post that when I got better knowledge of using Google Checkout, I will show a full example on how to implement Google’s payment provider.

    What I wanted to achieve within my own Google Checkout implementation was the ability to ensure I was retrieving sufficient information from the payment provider. So the transaction data stored within my own database would match exactly what is happening within Google. For example, if a payment was accepted/declined some internal processes need to be carried out. The best way of achieving this was by using a call-back page to process notifications from Google synchronously.

    Before we get into the call-back code, we need to login to our Google Checkout account as a merchant and carry out some basic configuration setup. My example’s will be based on a sandbox environment.

    Google Account Setup

    Integration (Settings > Integration)

    The Integration configuration is the most important page since it contains the basis to how we would like Google Checkout to work.
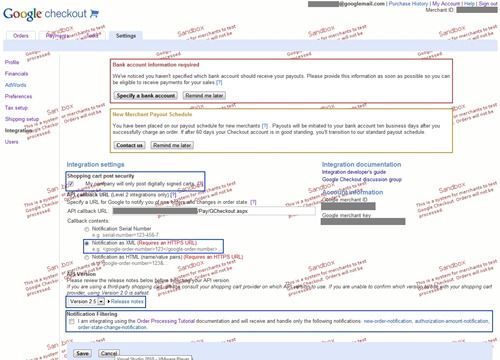
    Google Checkout - Integration

    As you can see, we have specified a call-back URL that will point to a page in our site. The call-back page is what Google uses to let our site know what’s happening with our transactions and if required, we can create our own internal actions to deal with events that are thrown to us. I have set the notifications to be sent in XML format.

    Next, we want to ensure the correct API version is used. Issues are bound to occur is the incorrect version is selected. In this case, I am using the most recent API version: 2.5.

    I have unselected Notification Filtering because we want to receive all types of notifications. Google Checkout document states:

    Google Checkout responds with a <charge-amount-notification> synchronously after a charge-order request. If you have not selected the option to only receive new order notifications, authorization amount notifications and order state change notifications, Google Checkout will also send you a charge-amount-notification anytime an order has been charged.”

    We want to receive a “charge amount notification” to allow us to know if the transaction was charged successfully. This is an actual confirmation to state we have received the money. We shouldn’t assume anything until this is received.

    Preferences (Settings > Preferences)

    Google Checkout - Preferences

    I have setup our order processing to automatically authorise the buyers card for an order. You might be thinking: “This is a bit of manual process…” and you’d be right. If we selected the second option to automatically authorise and charge the buyers card, this would leave a big hole in setting up our internal website processes. By authorising a buyers card gives us more flexibility on how to handle the transaction.

    It’s not compulsory for the email option to be selected.

    Other Setup

    You should be good to go on starting to mess around with implementing your site with Google Checkout. What I haven’t covered is the financial settings such as adding Banking information. This should be a straight-forward process. My main aim is to make sure the basics of Google Merchant account setup is complete.

    One really useful page that will help you with investigating problematic transactions is the “Integration Console” (Tools > Integration Console). Generally, this should be empty but any issues will be logged here. This has helped me over the course of integrating Google Checkout in my site.

    Call-back Page

    Ok. We have Google Merchant Account setup. Now we need to concentrate on our call-back page. My call-back page is based on a customer purchasing a News subscription. We are going to capture all the data Google sends us (excluding refunds) and store them in our own database.

    using System;
    using System.Collections.Generic;
    using System.Linq;
    using System.Web;
    using System.Web.UI;
    using System.Web.UI.WebControls;
    using System.IO;
    using GCheckout;
    using GCheckout.AutoGen;
    using GCheckout.Util;
    using GCheckout.OrderProcessing;
    using System.Xml;
    
    public partial class Pay_GCheckout : System.Web.UI.Page
    {
        public string SerialNumber = "";
    
        void Page_Load(Object sender, EventArgs e)
        {
            // Extract the XML from the request.
            Stream RequestStream = Request.InputStream;
            StreamReader RequestStreamReader = new StreamReader(RequestStream);
            string RequestXml = RequestStreamReader.ReadToEnd();
            
            RequestStream.Close();
    
            // Act on the XML.
            switch (EncodeHelper.GetTopElement(RequestXml))
            {
                case "new-order-notification":
                    NewOrderNotification N1 = (NewOrderNotification)EncodeHelper.Deserialize(RequestXml, typeof(NewOrderNotification));
                    SerialNumber = N1.serialnumber;
                    string OrderNumber1 = N1.googleordernumber;
                    string ShipToName = N1.buyershippingaddress.contactname;
                    string ShipToAddress1 = N1.buyershippingaddress.address1;
                    string ShipToAddress2 = N1.buyershippingaddress.address2;
                    string ShipToCity = N1.buyershippingaddress.city;
                    string ShipToState = N1.buyershippingaddress.region;
                    string ShipToZip = N1.buyershippingaddress.postalcode;
    
                    CustomerSubscription cs = new CustomerSubscription();
                    cs.TransactionNumber = OrderNumber1;
                    cs.Address1 = ShipToAddress1;
                    cs.Address2 = ShipToAddress2;
                    cs.Address3 = ShipToCity;
                    cs.Region = ShipToState;
                    cs.PostCode = ShipToZip;
                    cs.TransactionType = CustomerSubscription.TransTypeOnline;
                    cs.FinancialOrderState = N1.ordersummary.financialorderstate.ToString();
    
                    foreach (Item ThisItem in N1.shoppingcart.items)
                    {
                        string Name = ThisItem.itemname;
                        int Quantity = ThisItem.quantity;
                        decimal Price = ThisItem.unitprice.Value;
                    }
                    
                    if (N1.shoppingcart.merchantprivatedata != null && N1.shoppingcart.merchantprivatedata.Any != null && N1.shoppingcart.merchantprivatedata.Any.Length > 0)
                    {
                        foreach (XmlNode node in N1.shoppingcart.merchantprivatedata.Any) 
                        { 
                            if (node.LocalName.Trim() == "customer-id")
                            { 
                                cs.CustomerID = int.Parse(node.InnerText);
                            }
    
                            if (node.LocalName.Trim() == "subscription-id")
                            {
                                cs.SubscriptionID = int.Parse(node.InnerText);
                            }
                        }
                    }
    
                    CustomerSubscription.AddOnlineSubscription(cs);
    
                    break;
                case "risk-information-notification":
                    RiskInformationNotification N2 = (RiskInformationNotification)EncodeHelper.Deserialize(RequestXml, typeof(RiskInformationNotification));
                    // This notification tells us that Google has authorized the order and it has passed the fraud check.
                    // Use the data below to determine if you want to accept the order, then start processing it.
                    SerialNumber = N2.serialnumber;
                    string OrderNumber2 = N2.googleordernumber;
                    string AVS = N2.riskinformation.avsresponse;
                    string CVN = N2.riskinformation.cvnresponse;
                    bool SellerProtection = N2.riskinformation.eligibleforprotection;
                    break;
                case "order-state-change-notification":
                    OrderStateChangeNotification N3 = (OrderStateChangeNotification)EncodeHelper.Deserialize(RequestXml, typeof(OrderStateChangeNotification));
                    // The order has changed either financial or fulfillment state in Google's system.
                    SerialNumber = N3.serialnumber;
                    string OrderNumber3 = N3.googleordernumber;
                    string NewFinanceState = N3.newfinancialorderstate.ToString();
                    string NewFulfillmentState = N3.newfulfillmentorderstate.ToString();
                    string PrevFinanceState = N3.previousfinancialorderstate.ToString();
                    string PrevFulfillmentState = N3.previousfulfillmentorderstate.ToString();
                    break;
                case "charge-amount-notification":
                    ChargeAmountNotification N4 = (ChargeAmountNotification)EncodeHelper.Deserialize(RequestXml, typeof(ChargeAmountNotification));
                    // Google has successfully charged the customer's credit card.
                    SerialNumber = N4.serialnumber;
                    string OrderNumber4 = N4.googleordernumber;
                    decimal ChargedAmount = N4.latestchargeamount.Value;
    
                    int customerID = 0;
    
                    if (N4.ordersummary.shoppingcart.merchantprivatedata != null && N4.ordersummary.shoppingcart.merchantprivatedata.Any != null && N4.ordersummary.shoppingcart.merchantprivatedata.Any.Length > 0)
                    {
                        foreach (XmlNode node in N4.ordersummary.shoppingcart.merchantprivatedata.Any) 
                        { 
                            if (node.LocalName.Trim() == "customer-id")
                            { 
                                customerID = int.Parse(node.InnerText);
                            }
                        }
                    }
    
                    if (N4.ordersummary.financialorderstate == FinancialOrderState.CHARGED)
                    {
                        CustomerSubscription.UpdateFinancialOrderState(OrderNumber4, N4.ordersummary.financialorderstate.ToString());
    
                        //Make user paid member
                        CustomerHelper.UpgradeCustomerToPaid(customerID);
                    }
    
                    break;
                case "refund-amount-notification":
                    RefundAmountNotification N5 = (RefundAmountNotification)EncodeHelper.Deserialize(RequestXml, typeof(RefundAmountNotification));
                    // Google has successfully refunded the customer's credit card.
                    SerialNumber = N5.serialnumber;
                    string OrderNumber5 = N5.googleordernumber;
                    decimal RefundedAmount = N5.latestrefundamount.Value;
                    break;
                case "chargeback-amount-notification":
                    ChargebackAmountNotification N6 = (ChargebackAmountNotification)EncodeHelper.Deserialize(RequestXml, typeof(ChargebackAmountNotification));
                    // A customer initiated a chargeback with his credit card company to get her money back.
                    SerialNumber = N6.serialnumber;
                    string OrderNumber6 = N6.googleordernumber;
                    decimal ChargebackAmount = N6.latestchargebackamount.Value;
    
                    break;
                case "authorization-amount-notification":
                    AuthorizationAmountNotification N7 = (AuthorizationAmountNotification)EncodeHelper.Deserialize(RequestXml, typeof(AuthorizationAmountNotification));
                    SerialNumber = N7.serialnumber;
                    string OrderNumber7 = N7.googleordernumber;
                    
                    // Charge Order If Chargeable
                    if (N7.ordersummary.financialorderstate == FinancialOrderState.CHARGEABLE)
                    {
                        GCheckout.OrderProcessing.ChargeOrderRequest chargeReq = new GCheckout.OrderProcessing.ChargeOrderRequest(OrderNumber7);
    
                        GCheckoutResponse oneGCheckoutResponse = chargeReq.Send();
    
                    }
    
                    CustomerSubscription.UpdateFinancialOrderState(OrderNumber7, N7.ordersummary.financialorderstate.ToString());
    
                    break;
                default:                
                    break;
            }
        }
    }
    

    N.B: The code snippet (above) is shown purely as a simple example for you to build on. It is based on the “notification_handshake.aspx” sample code that is downloadable here.

    So what’s going on here? Well the events are processed in the following order:

    1. “new-order-notification” - A new order has been received. Details of the News Subscription along with the customer who ordered it will be stored in our database.

    2. “authorization-amount-notification” - Google tells us that the amount has successfully be authorised. If the order state is “chargeable”, we can go ahead charge the order and update the order state. The customer order state will consist of the following statuses: Cancelled, Chargeable, Charged, Charging, Payment Declined and Reviewing. I think it’s a good to store this information because it will allow a site administrator to view statuses of all orders and act on them, if needed.

    3. “charge-amount-notification” – Google verifies the order was successful. If the order state is marked as charged, the customer will be upgraded to a paid News Subscriber.

    Outcome

    You have successfully setup Google Checkout payment with basic notifications. If you already have Google Checkout code in place where a user can add one or more items to the shopping cart this code can stay. All you need to do is carry out the changes described in this post.

  • I’ve been busy lately integrating a payment provider into a site I am working in. After looking at the best payment providers, it came down to either using PayPal or Google Checkout. In the end I decided to use Google’s payment provider (as you can probably tell from my post title).

    Before I start this post, I assume you have already created a sandbox Google Checkout account and know your way around setup and integration.

    For my own Google Checkout integration, I needed to be able to add new transaction item in my database only if a customer has ordered an item and if their payment is approved. This is where Google’s call-back notification service comes into play.

    I decided to use an synchronous notification process based on one the sample code that can be downloaded here: http://code.google.com/p/google-checkout-dotnet-sample-code/downloads/list.

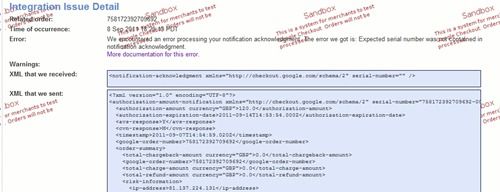
    Just using the sample code provided by Google out-the-box caused issues. It seems that the code samples do not correctly reflect version changes to the payment provider. One of the repeating errors I got was: “Expected serial number was not contained in notification acknowledgement”.

    Google Checkout ErrorList

    You will only receive this error only if you are using API version 2.5 and have “Notification Filtering” enabled in account settings. Unfortunately, notification filtering is something I needed to ensure both Google Checkout and my database transactions were in sync.

    The Integration Issue error log showed me that the transaction serial number was not getting populated from my call-back notification page.

    Google Checkout Error XML Detail

    After a lot of debugging it became apparent that the notification page provided by Google Code sample was wrong! It was missing a key case statement: “authorization-amount-notification”. Once this was added no more errors occurred.

    If you are using the “notification_extended.aspx”, “notification.aspx” or “notification_handshake.aspx” code samples. Be sure to make the following change:

    <%@ Import Namespace="System.IO" %>
    <%@ Import Namespace="GCheckout" %>
    <%@ Import Namespace="GCheckout.AutoGen" %>
    <%@ Import Namespace="GCheckout.Util" %>
    <script runat="server" language="c#">
    
      public string SerialNumber = "";
    
      void Page_Load(Object sender, EventArgs e) {
        // Extract the XML from the request.
        Stream RequestStream = Request.InputStream;
        StreamReader RequestStreamReader = new StreamReader(RequestStream);
        string RequestXml = RequestStreamReader.ReadToEnd();
        RequestStream.Close();
        // Act on the XML.
        switch (EncodeHelper.GetTopElement(RequestXml)) {
          case "new-order-notification":
            NewOrderNotification N1 = (NewOrderNotification) EncodeHelper.Deserialize(RequestXml, typeof(NewOrderNotification));
            SerialNumber = N1.serialnumber;
            string OrderNumber1 = N1.googleordernumber;
            string ShipToName = N1.buyershippingaddress.contactname;
            string ShipToAddress1 = N1.buyershippingaddress.address1;
            string ShipToAddress2 = N1.buyershippingaddress.address2;
            string ShipToCity = N1.buyershippingaddress.city;
            string ShipToState = N1.buyershippingaddress.region;
            string ShipToZip = N1.buyershippingaddress.postalcode;
            foreach (Item ThisItem in N1.shoppingcart.items) {
              string Name = ThisItem.itemname;
              int Quantity = ThisItem.quantity;
              decimal Price = ThisItem.unitprice.Value;
            }
            break;
          case "risk-information-notification":
            RiskInformationNotification N2 = (RiskInformationNotification) EncodeHelper.Deserialize(RequestXml, typeof(RiskInformationNotification));
            // This notification tells us that Google has authorized the order and it has passed the fraud check.
            // Use the data below to determine if you want to accept the order, then start processing it.
            SerialNumber = N2.serialnumber;
            string OrderNumber2 = N2.googleordernumber;
            string AVS = N2.riskinformation.avsresponse;
            string CVN = N2.riskinformation.cvnresponse;
            bool SellerProtection = N2.riskinformation.eligibleforprotection;
            break;
          case "order-state-change-notification":
            OrderStateChangeNotification N3 = (OrderStateChangeNotification) EncodeHelper.Deserialize(RequestXml, typeof(OrderStateChangeNotification));
            // The order has changed either financial or fulfillment state in Google's system.
            SerialNumber = N3.serialnumber;
            string OrderNumber3 = N3.googleordernumber;
            string NewFinanceState = N3.newfinancialorderstate.ToString();
            string NewFulfillmentState = N3.newfulfillmentorderstate.ToString();
            string PrevFinanceState = N3.previousfinancialorderstate.ToString();
            string PrevFulfillmentState = N3.previousfulfillmentorderstate.ToString();
            break;
          case "charge-amount-notification":
            ChargeAmountNotification N4 = (ChargeAmountNotification) EncodeHelper.Deserialize(RequestXml, typeof(ChargeAmountNotification));
            // Google has successfully charged the customer's credit card.
            SerialNumber = N4.serialnumber;
            string OrderNumber4 = N4.googleordernumber;
            decimal ChargedAmount = N4.latestchargeamount.Value;
            break;
          case "refund-amount-notification":
            RefundAmountNotification N5 = (RefundAmountNotification) EncodeHelper.Deserialize(RequestXml, typeof(RefundAmountNotification));
            // Google has successfully refunded the customer's credit card.
            SerialNumber = N5.serialnumber;
            string OrderNumber5 = N5.googleordernumber;
            decimal RefundedAmount = N5.latestrefundamount.Value;
            break;
          case "chargeback-amount-notification":
            ChargebackAmountNotification N6 = (ChargebackAmountNotification) EncodeHelper.Deserialize(RequestXml, typeof(ChargebackAmountNotification));
            // A customer initiated a chargeback with his credit card company to get her money back.
            SerialNumber = N6.serialnumber;
            string OrderNumber6 = N6.googleordernumber;
            decimal ChargebackAmount = N6.latestchargebackamount.Value;
            break;
        // Edit: Additional case statement for "authorization-amount-notification"
          case "authorization-amount-notification":
            AuthorizationAmountNotification N7 = (AuthorizationAmountNotification)EncodeHelper.Deserialize(RequestXml, typeof(AuthorizationAmountNotification));
            // Information about a successful reauthorization for an order
            SerialNumber = N7.serialnumber;
            string OrderNumber7 = N7.googleordernumber;
            break;
          default:
            break;
        }
      }
    </script>
    <notification-acknowledgment xmlns="http://checkout.google.com/schema/2" serial-number="<%=SerialNumber %>" />
    

    Once I have got to grips on using Google Checkout I will add another blog post containing my full call-back solution.

  • For a news site I am currently working on, I needed to display the last time a news article was last published. I wanted to be able to show the duration based on respective major time format. For example, if an article was displayed a couple hours ago, I would want it to to display “2 hours” not “120 minutes”.

    More importantly, if an article hadn’t been published to the site more than a week, I don’t want the exact time duration to be displayed. I would prefer the following message: “more than a week ago”. This way, if the site administrator gets really lazy the website viewer will not know the exact time period the site was last updated.

    Code:

    public class TimePassed
    {
        public static string GetPassedTime(DateTime since)
        {
            TimeSpan ts = DateTime.Now.Subtract(since);
    
            if (ts.Days <= 7)
            {
                switch (ts.Days)
                {
                    case 0:
                        switch (ts.Hours)
                        {
                            case 0:
                                switch (ts.Minutes)
                                {
                                    case 0:
                                        return String.Format("{0} seconds ago", ts.Seconds);
                                    case 1:
                                        return "1 minute ago";
                                    default:
                                        return String.Format("{0} minutes ago", ts.Minutes);
                                }
                            case 1:
                                return "1 hour ago";
                            default:
                                return String.Format("{0} hours ago", ts.Hours);
                        }
                    case 1:
                        return "yesterday";
                    default:
                        return String.Format("{0} days ago", ts.Days);
                }
            }
            else
            {
                return "more than a week ago";
            }
        }
    }
    
  • To be able to retrieve values from a ASP.NET CheckBoxList control or a group of HTML checkboxes, use the following jQuery:

    $(document).ready(function () {
        var checkboxValues = [];
    
        $('#<%=MyCheckBoxList.ClientID %> input[type=checkbox]').click(function () {
            $('input[type=checkbox]:checked').each(function () {
                checkboxValues.push(this.value);
            });        
        });
        
        var values = checkboxValues.toString(); //Output Format: 1,2,3
    });
    

    If you do use this code snippet on a CheckBoxList, take a look that this article on how to create a custom CheckBoxList control with a value attribute.

  • ASP.NET server controls is a great way to quickly build a page with dynamic functionality. Even though we do not have much of direct control over the way these controls are rendered, they do a pretty good job and its not very often I get annoyed with them.

    Until now.

    Generally, I find myself using the .Attributes.Add() method when needing to add additional attributes to certain server controls. No problem! In this case, I wanted to add a “value” attribute that will contain the record ID for that checkbox. I can then use this value within my JavaScript. I would have thought a value attribute would already be there. Its perfectly valid HTML mark-up:

    <form>
        <input type="checkbox" name="vehicle" value="Volvo" />
        <input type="checkbox" name="vehicle" value="Volkswagen" />
    </form> 
    

    For some reason, when I tried to add my custom attributes after my CheckBoxList was databound (as shown below), the attribute was simply ignored.

    NewsCheckList.Items[0].Attributes["value"] = "1";
    NewsCheckList.Items[1].Attributes["value"] = "2";
    NewsCheckList.Items[2].Attributes["value"] = "3";
    

    So I decided the best way forward would be to create a custom CheckBoxList control that would contain a value attribute. I based my code from an old (but very useful) article that can be found here.

    using System;
    using System.Collections.Generic;
    using System.Linq;
    using System.Text;
    using System.Web.UI.WebControls;
    using System.IO;
    using System.Web.UI;
    using System.Collections;
    using System.ComponentModel;
    
    namespace Site.WebControls
    {
        [DefaultProperty("Text"),
        ToolboxData("<{0}:CheckBoxValueList runat=server></{0}:CheckBoxValueList>")]
        public class CheckBoxValueList : CheckBoxList
        {
            protected override void Render(HtmlTextWriter writer)
            {
                StringBuilder sb = new StringBuilder();
                TextWriter tw = new StringWriter(sb);
                
                HtmlTextWriter originalStream = new HtmlTextWriter(tw);
                base.Render(originalStream);
                string renderedText = sb.ToString();
    
                int start = 0;
                int labelStart = 0;
                int end = renderedText.Length;
    
                for (int i = 0; i < this.Items.Count; i++)
                {
                    StringBuilder itemAttributeBuilder = new StringBuilder();
    
                    end = renderedText.Length;
                    start = renderedText.IndexOf("<input", start, end - start);
                    labelStart = renderedText.IndexOf("<label", start, end - start);
    
                    this.Items[i].Attributes.Render(new HtmlTextWriter(new StringWriter(itemAttributeBuilder)));
    
                    renderedText = renderedText.Insert(labelStart + 7, itemAttributeBuilder.ToString() + " ");
                    renderedText = renderedText.Insert(start + 7, String.Format("{0} value=\"{1}\" ", itemAttributeBuilder.ToString(), this.Items[i].Value));
                    start = renderedText.IndexOf("/>", start, renderedText.Length - start);
                }
                
                writer.Write(renderedText);
            }
        }
    }
    
  • From one of the projects I have been working on, I came across a snippet of code that used the XmlDocument.Load method. What alarmed me about this piece of code was the fact that there was no error handling. If for some reason the XML file could not be found or a node was missing, the whole page would have crashed. Not good.

    I must admit, I am not exactly the best person to speak about implementing wide-scale error handling in every facet of code. But I do ensure the core foundations of an application or website do incorporate sufficient error handling.

    So back to the matter in hand. This is the original code using the XmlDocument.Load functionality:

    XmlDocument doc = new XmlDocument();
    
    doc.Load(Server.MapPath("/xml/storeGB.xml"));
    
    XmlNode countryNode = doc.SelectSingleNode("//countries");
    foreach (XmlNode node in countryNode.ChildNodes)
    {
        //Do something with the elements
        Response.Write(node.Name + node.InnerText);
    }
    

    I changed the code to the following:

    XmlDocument doc = new XmlDocument();
    
    //Check if language XML file exists
    if (File.Exists(Server.MapPath("/xml/storeGB.xml")))
    {
        try
        {
            doc.Load(Server.MapPath("/xml/storeGB.xml"));
    
            XmlNode countryNode = doc.SelectSingleNode("//countries");
    
            if (countryNode != null)
            {
                foreach (XmlNode node in countryNode.ChildNodes)
                {
                    //Do something with the elements
                    Response.Write(node.Name + node.InnerText);
                }
            }
            else
            {
                //Output error message if there is no node
            }
        }
        catch (XmlException ex)
        {
            Debug.WriteLine(String.Format("XmlException for countries: {0}", ex.Message));
        }
    }
    

    I am sure you will agree that this is the better approach to using XmlDocument.Load.