Blog

Categorised by 'CMS'.

  • I’ll get right to it. Should I be making the move to a headless content management platform? I am no stranger to the Headless CMS sector after the many years of being involved in using different providers for client-based projects, so I am well-versed on the technology to make a judgement. But any form of judgment gets thrown out the window when making a consideration from a personal perspective.

    Making the move to a Headless CMS is something I’ve been thinking for quite some time now as it would streamline my website development considerably. I can see my web application build footprint being smaller compared to how it is at the moment by running on Kentico 12.

    This website has been running on Kentico CMS for around 6 years ever since I was first introduced to the Kentico platform, which gave me a very good reason to move from BlogEngine. I wanted my web presence to be more than just a blog that would give me the flexibility to be something more. I do not like the idea of being restricted to just one feature-base.

    As great as it is running my website on Kentico CMS, it’s too big of an application for my needs. Afterall, I am just using the content-management functionality and none of the other great features the platform offers, so it’s good time to start thinking of downsizing and reduce running costs. Headless seems the most suitable option right?

    I won’t be going into detail on what headless is. The internet contains information on the subject matter detailed in a more digestable manner over the years suitable for varied levels of technical expertise. “Headless CMS” is the industry buzz-word that clients are aware of. You can also take a read of a Medium post I wrote last year about one type of headless platform - Kentico Cloud (now named Kontent) and the market.

    So why haven’t I made the move to Headless CMS? I think it comes down to following factors:

    • Pricing
    • Infrastructure and stability
    • Platform changes
    • Trust

    Pricing

    First and foremost, it’s the price. I am aware that all Headless CMS providers have a free or starter tier, each with their own defined limitations whether that be the number of API requests or content limits. I like to look into the future and see where my online presence may take me and at some point, I would need to consider the cost of a paid tier. How does that fit into my yearly hosting costs?

    At the moment, I am paying £80 yearly. If I were to jump onto headless, the cheapest price I’ve seen equates to £66 a year and I haven’t factored in hosting costs yet. I could get away with low-cost hosting as my web build will be on a smaller scale and I plan my next build using the .NET Core framework.

    If I had my own company or product where I was looking for ways to deliver content across multiple channels, I would use headless in a heartbeat. I could justify the cost as I know I would be getting my money’s worth and if I were to find myself exceeding a tiers limit I could just move onto the next.

    Infrastructure and Stability

    Infrastructure and stability of a headless service all come down to how much you’re willing to pay. The API uptime is the most important part after the platform features. I’ve noticed that some starter and free tiers do not state an uptime, for example, 99.9% or 99.5%. Depending on the technology stack, this might not be an issue where a constant connection to the API is required, for example, Gatsby.

    I do think in this area where Headless CMS wins, is the failover and backup procedures in place. They would more than likely surpass the infrastructure in place from a personally hosted and managed site.

    Platform Changes

    It’s natural for improvements and changes to be made throughout the lifespan of a product. The only thing with headless you don’t have a choice on whether you want those changes as what works for one person may not necessarily work for another. You are locked into the release cycle.

    I remember back in the early days when Headless CMS’s started to gain traction, releases were being made in such a quick turnaround at the expense of the editors who had to quickly adapt to the subtle changes in features. The good thing now is the dust has settled as the platform has gotten to the point of maturity.

    The one area I still have difficulty getting over is the rich-text area. Each headless CMS provider seems to have their restrictions and you never really get full control over HTML markup unless a normal text area is used. There are ways around this but some restrictions still do exist.

    Where do you as an individual fit into this lifecycle? That’s the million-dollar question. However, there is one headless platform that is very involved with feedback from their users, Kentico Kontent, where all ideas are put under consideration, voted on and (if successful) submitted into the roadmap. I haven’t seen this approach offered by other Headless CMS platforms and maybe this is something they should also do.

    Trust

    There is a trust aspect to an external provider storing your content. Data is your most valuable asset. Is there any chance in the service being discontinued at some-point? If I am being totally honest to myself, I don’t think this is a valid point as long as the chosen platform has proven it’s worth and cemented itself over a lengthy period of time. Choose the big players (in no particular order), such as:

    • Kontent
    • Contentful
    • Prismic
    • DatoCMS
    • ButterCMS

    There is also another aspect to trust that draws upon a further point I made in the previous section regarding platform changes. In the past, I’ve seen content features getting deprecated. This doesn’t break your current build, just causes you to rethink things when updating to the newer version API interface.

    Conclusion

    I think moving to a Headless CMS requires a bigger leap than I thought. I say this purely from a personal perspective. The main piece of work would be to carry out content modelling for pages, migrate all my site content and media into the new platform and apply page redirects. This is before I have made a start in developing the new site.

    I will always be in two minds on whether I should use a Headless CMS. If I wasn’t such a control-freak when it comes to every aspect of my application and content, I think I could make the move. Maybe I just need to learn to let go.

  • Published on
    -
    5 min read

    Generate Code Name For Tags In Kentico

    With every Kentico release that goes by, I am always hopeful that they will somehow add code name support to Tags where a unique text-based identifier is created, just like Categories (via CategoryName field). I find the inclusion of code names very useful when used in URL as wildcards to filter a list of records, such as blog posts.

    In a blog listing page, you'll normally have the ability to filter by both category or tag and to make things nice for SEO, we include them in our URLs, for example:

    • /Blog/Category/Kentico
    • /Blog/Tag/Kentico-Cloud

    This is easy to carry out when dealing with categories as every category you create has "CategoryName" field, which strips out any special characters and is unique, fit to use in slug form within a URL! We're not so lucky when it comes to dealing with Tags. In the past, to allow the user to filter my blog posts by tag, the URL was formatted to look something like this: /Blog/Tag/185-Kentico-Cloud, where the number denotes the Tag ID to be parsed into my code for querying.

    Not the nicest form.

    The only way to get around this was to customise how Kentico stores its tags on creation and update, without impacting its out-of-the-box functionality. This could be done by creating a new table that would store newly created tags in code name form and link back to Kentico's CMS_Tag table.

    Tag Code Name Table

    The approach on how you'd create your table is up to you. It could be something created directly in the database, a custom table or module. I opted to create a new class name under one of my existing custom modules that groups all site-wide functionality. I called the table: SurinderBhomra_SiteTag.

    The SurinderBhomra_SiteTag consists of the following columns:

    • SiteTagID (int)
    • SiteTagGuid (uniqueidentifier)
    • SiteTagLastModified (datetime)
    • TagID (int)
    • TagCodeName (nvarchar(200))

    If you create your table through Kentico, the first four columns will automatically be generated. The "TagID" column is our link back to the CMS_Tag table.

    Object and Document Events

    Whenever a tag is inserted or updated, we want to populate our new SiteTag table with this information. This can be done through ObjectEvents.

    public class ObjectGlobalEvents : Module
    {
        // Module class constructor, the system registers the module under the name "ObjectGlobalEvents"
        public ObjectGlobalEvents() : base("ObjectGlobalEvents")
        {
        }
    
        // Contains initialization code that is executed when the application starts
        protected override void OnInit()
        {
          base.OnInit();
    
          // Assigns custom handlers to events
          ObjectEvents.Insert.After += ObjectEvents_Insert_After;
          ObjectEvents.Update.After += ObjectEvents_Update_After;
        }
    
        private void ObjectEvents_Insert_After(object sender, ObjectEventArgs e)
        {
          if (e.Object.TypeInfo.ObjectClassName.ClassNameEqualTo("cms.tag"))
          {
            SetSiteTag(e.Object.GetIntegerValue("TagID", 0), e.Object.GetStringValue("TagName", string.Empty));
          }
        }
    
        private void ObjectEvents_Update_After(object sender, ObjectEventArgs e)
        {
          if (e.Object.TypeInfo.ObjectClassName.ClassNameEqualTo("cms.tag"))
          {
            SetSiteTag(e.Object.GetIntegerValue("TagID", 0), e.Object.GetStringValue("TagName", string.Empty));
          }
        }
    
        /// <summary>
        /// Adds a new site tag, if it doesn't exist already.
        /// </summary>
        /// <param name="tagId"></param>
        /// <param name="tagName"></param>
        private static void SetSiteTag(int tagId, string tagName)
        {
          SiteTagInfo siteTag = SiteTagInfoProvider.GetSiteTags()
                                .WhereEquals("TagID", tagId)
                                .TopN(1)
                                .FirstOrDefault();
    
          if (siteTag == null)
          {
            siteTag = new SiteTagInfo
            {
              TagID = tagId,
              TagCodeName = tagName.ToSlug(), // The .ToSlug() is an extenstion method that strips out all special characters via regex.
            };
    
            SiteTagInfoProvider.SetSiteTagInfo(siteTag);
          }
        }
    }
    

    We also need to take into consideration when a document is deleted and carry out some cleanup to ensure tags no longer assigned to any document are deleted from our new table:

    public class DocumentGlobalEvents : Module
    {
        // Module class constructor, the system registers the module under the name "DocumentGlobalEvents"
        public DocumentGlobalEvents() : base("DocumentGlobalEvents")
        {
        }
    
        // Contains initialization code that is executed when the application starts
        protected override void OnInit()
        {
          base.OnInit();
    
          // Assigns custom handlers to events
          DocumentEvents.Delete.After += Document_Delete_After;
        }
    
        private void Document_Delete_After(object sender, DocumentEventArgs e)
        {
          TreeNode doc = e.Node;
          TreeProvider tp = e.TreeProvider;
    
          GlobalEventFunctions.DeleteSiteTags(doc);
        }
    
        /// <summary>
        /// Deletes Site Tags linked to CMS_Tag.
        /// </summary>
        /// <param name="tnDoc"></param>
        private static void DeleteSiteTags(TreeNode tnDoc)
        {
          string docTag = tnDoc.GetStringValue("DocumentTags", string.Empty);
    
          if (!string.IsNullOrEmpty(docTag))
          {
            foreach (string tag in docTag.Split(','))
            {
              TagInfo cmsTag = TagInfoProvider.GetTags()
                               .WhereEquals("TagName", tag)
                               .Column("TagCount")
                               .FirstOrDefault();
    
              // If the the tag is no longer stored, we can delete from SiteTag table.
              if (cmsTag?.TagCount == null)
              {
                List<SiteTagInfo> siteTags = SiteTagInfoProvider.GetSiteTags()
                                     .WhereEquals("TagCodeName", tag.ToSlug())
                                     .TypedResult
                                     .ToList();
                if (siteTags?.Count > 0)
                {
                  foreach (SiteTagInfo siteTag in siteTags)
                    SiteTagInfoProvider.DeleteSiteTagInfo(siteTag);
                }
              }
            }
          }
        }
    }
    

    Displaying Tags In Page

    To return all tags linked to a page by its "DocumentID", a few of SQL joins need to be used to start our journey across the following tables:

    1. CMS_DocumentTag
    2. CMS_Tag
    3. SurinderBhomra_SiteTag

    Nothing Kentico's Object Query API can't handle.

    /// <summary>
    /// Gets all tags for a document.
    /// </summary>
    /// <param name="documentId"></param>
    /// <returns></returns>
    public static DataSet GetDocumentTags(int documentId)
    {
      DataSet tags = DocumentTagInfoProvider.GetDocumentTags()
                        .WhereID("DocumentID", documentId)
                        .Source(src => src.Join<TagInfo>("CMS_Tag.TagID", "CMS_DocumentTag.TagID"))
                        .Source(src => src.Join<SiteTagInfo>("SurinderBhomra_SiteTag.TagID", "CMS_DocumentTag.TagID"))
                        .Columns("TagName", "TagCodeName")
                        .Result;
    
      if (!DataHelper.DataSourceIsEmpty(tags))
        return tags;
    
      return null;
    }
    

    Conclusion

    We now have our tags working much like categories, where we have a display name field (CMS_Tag.TagName) and a code name (SurinderBhomra_SiteTag.TagCodeName). Going forward, any new tags that contain spaces or special characters will be sanitised and nicely presented when used in a URL. My blog demonstrates the use of this functionality.

  • There are times when you need to know what widgets are being used on a page. In my case, I needed to know this information to render JavaScript code at the bottom of the page that each of my widgets depends on.

    Why don't I just place all the JavaScript code my site and widgets use in one file? Loading one large JavaScript file isn't the best approach for page performance. Instead, I use LabJS to dynamically load scripts in specific execution order without blocking other resources. So if I created a Carousel widget in Kentico, I would only load the JavaScript plugin if added to the page.

    I'll use my JavaScript scenario as a basis for demonstrating the way to list out widgets used in a page.

    If we delve into the CMS_Document table, Kentico uses the "DocumentPageBuilderWidgets" field that stores a JSON structure consisting of a list of all the widgets and their property values. All we are interested in is the type property.

    Let's get to the code.

    Controller - SharedController

    I created a SharedController class containing a GenerateWidgetJavascript() PartialViewResult. This will convert the JSON from the "DocumentPageBuilderWidgets" field into a JSON Object to then be queried (using SelectTokens) to select every iteration of the type field in the hierarchy.

    /// <summary>
    /// Get widget used on a page to render any required JavaScript.
    /// </summary>
    /// <returns></returns>
    public PartialViewResult GenerateWidgetJavascript()
    {
        List<string> widgetTypes = new List<string>();
    
        if (Page.GetStringValue("DocumentPageBuilderWidgets", string.Empty) != string.Empty)
        {
            JObject pageWidgetJson = JObject.Parse(Page.GetStringValue("DocumentPageBuilderWidgets", string.Empty));
    
            if (pageWidgetJson != null)
                widgetTypes = pageWidgetJson.SelectTokens("$.editableAreas[*].sections[*].zones[*].widgets[*].type").Select(jt => jt.ToString().Substring(jt.ToString().LastIndexOf('.') + 1)).Distinct().ToList();
        }
    
        return PartialView("Widgets/_PageWidgetJs", widgetTypes);
    }
    

    Additional manipulation is carried out on the type field using LINQ to return a distinct set of results, as there might be a case where the same widget is used multiple times on a page. Since I name all my widgets in the following format - <SiteName>.<WidgetGroup>.<WidgetName>, I am only interested in the <WidgetName>. For example, my widget would be called "SurinderSite.Layout.Carousel". The controller will simply output "Carousel".

    To avoid confusion in my code snippet, it's worth noting I use a Page variable. This contains information about the current page and is populated in my base controller. It has a type of TreeNode. You can see my approach to getting the current page information in this post.

    Partial View - _PageWidgets

    The most suitable place to add my widget dependent JavaScript is in the /View/Shared/Widgets directory - part of the recommended Kentico project structure.

    All we need to do in the view is iterate through the string collection of widget types and have a bunch of if-conditions to render the necessary JavaScript.

    @model List<string>
    
    @if (Model.Any())
    {
        <script>
            @foreach (string widgetType in Model)
            {
                if (widgetType == "Carousel")
                {
                    <text>
                        $LAB
                            .script("/resources/js/plugins/slick.min.js")
                            .script("/resources/js/carousel.min.js").wait(function () {
                                {
                                    FECarousel.Init();
                                }
                            });
                    </text>
                }
            }
        </script>
    }
    

    Layout View

    The Layout view will be the best place to add the reference to our controller in the following way:

    @{ Html.RenderAction("GenerateWidgetJavascript", "Shared"); }
    
  • Over the Bank Holiday weekend, I had some time to kill one evening and decided to have a go at completing the Kentico Cloud exam to become a certified developer. Taking the exam is a natural progression to warrant oneself as an expert on the platform, especially as I have been using Kentico Cloud since it was first released. Time to put my experience to the test!

    Unlike traditional Kentico CMS Developer exams, the Kentico Cloud exam consists of 40 questions to complete over a duration of 40 mins. The pass rate is still the same at 70%.

    Even though I have been using Kentico Cloud for many years, I highly recommend developers to get yourself certified providing you are familiar with the interface, built a few applications already and have exposure to the API endpoint. The exam itself is platform-agnostic and you won't be tested on any language-specific knowledge.

    The surprising thing I found after completing the exam is a higher awareness of what Kentico Cloud does not only as a platform but also touched upon areas you wouldn't have necessarily been familiar with. There certainly more to Kentico Cloud than meets the eye!

  • As great as it is building sites using the MVC framework in Kentico, I do miss some of the page features we’re spoilt with that previous editions of Kentico has to offer.

    Like anything, there are always workarounds to implement the features we have become accustomed to but ensuring the correct approach is key, especially when moving existing Kentico clients onto Kentico 12 MVC edition. Familiarity is ever so important for the longer tenure clients who already have experience using previous versions of Kentico.

    In my Syndicut Medium post, I show how to use Kentico's existing fields from the CMS_Document table to work alongside the new MVC approach.

    Take a read here: https://medium.com/syndicut/adding-navigation-properties-to-pages-in-kentico-12-mvc-8f054f804af2

  • This month I've been writing some blog posts on why I decided to start using Cloudflare service for my website and utilising its API to allow me to purge cached files from the Cloudflare CDN on demand. Before reading further, I highly suggest perusing those posts just to put everything into context for my reasoning into using Cloudflare as well as the C# code that interacts with the API, which I will be referencing later on within this very post.

    My intial Cloudflare integration evolves around serving media files more efficiently through a CDN and having the ability to refresh these files automatically as updates are made within the Kentico CMS. Cloudflare's CDN services can help cache your content across their large global network, moving static files closer to your visitor.

    Based on the Page Rules I configured within the Cloudflare dashboard, I am caching all media library files served through the /getmedia/ URL path into the Cloudflare CDN. The same file will be served through the CDN until the set cache limit has expired. We need to implement functionality that will add some automation to the Kentico platform to purge the cache of a specific media library file when updated.

    Add A Global Event

    I created an event handler for the updating of Media library files as I wanted to get details of the file being updated by leveraging the MediaFileInfo class to access the Update.After event.

    protected override void OnInit()
    {
        base.OnInit();
    
        MediaFileInfo.TYPEINFO.Events.Update.After += Update_After;
    }
    
    private void Update_After(object sender, ObjectEventArgs e)
    {
        MediaFileInfo fileInfo = e.Object as MediaFileInfo;
    
        GlobalEventFunctions.PurgeMediaCache(fileInfo);
    }
    

    PurgeMediaCache() Method

    The event above calls a GlobalEventFunctions.PurgeMediaCache() method that will pass the information about the changed file ready for purging. The file URL parsed to the Cloudflare.PurgeSelectedFiles() method needs to be exact and take into consideration how your instance of Kentico is serving media files. If Permanent URL's are being used the /getmedia/ URL needs to be constructed consisting of:

    • Current domain
    • File GUID
    • File Name
    • File Extension

    Otherwise, we can just use get the file path as normal to where the media file resides.

    public class GlobalEventFunctions
    {
        /// <summary>
        /// Purges a file from the Cloudflare cache.
        /// </summary>
        /// <param name="fileInfo"></param>
        public static void PurgeMediaCache(MediaFileInfo fileInfo)
        {
            bool permanentURLEnabled = SettingsKeyInfoProvider.GetBoolValue($"{SiteContext.CurrentSiteName}.CMSMediaUsePermanentURLs");
            string filePath = string.Empty;
                
            if (permanentURLEnabled)
                filePath = $"{GetCurrentDomain()}/getmedia/{fileInfo.FileGUID.ToString()}/{fileInfo.FileName}{fileInfo.FileExtension}";
            else
                filePath = $"{GetCurrentDomain()}/{fileInfo.FilePath}";
    
            try
            {
                // Get code from: https://www.surinderbhomra.com/Blog/Post/2018/11/11/Cloudflare-API-Purge-Files-By-URL-In-C
                CloudflareCacheHelper cloudflareHelper = new CloudflareCacheHelper();
    
                cloudflareHelper.PurgeSelectedFiles(new List<string> { filePath });
            }
            catch (Exception ex)
            {
                EventLogProvider.LogException("Cloudflare Purge File Cache", "CLOUDFLARE_PURGE", ex, SiteContext.CurrentSiteID, $"Purge File: {filePath}");
            }
        }
    
        /// <summary>
        /// Get domain from current http context.
        /// </summary>
        /// <returns></returns>
        private static string GetCurrentDomain()
        {
            return $"{HttpContext.Current.Request.Url.Scheme}{Uri.SchemeDelimiter}{HttpContext.Current.Request.Url.Host}{(!HttpContext.Current.Request.Url.IsDefaultPort ? $":{HttpContext.Current.Request.Url.Port}" : null)}";
        }
    }
    

    We need not consider any other scenarios, such as insert or deletion. If a file is inserted, there is nothing to purge as it's a new file that will be cached directly into in the CDN on first request and when it comes to deletion we can just wait for the cache to expire.

    What's Next?

    The integration I have detailed so far is just scratching the surface of what Cloudflare has to offer and will investigate further on pushing more content over to the CDN. One area, in particular, I am looking into is carrying out full page caching. You might be thinking why even bother as Kentico has pretty good caching mechanisms already in place?

    Well Cloudflare has a really neat feature called "Always Online", where a cached version of a page is served if on the off chance it happens to go down or requires a reboot to install key security updates. But implementing this feature requires strict Page Rules to be setup within the Cloudflare dashboard to ensure the general workings of Kentico are not effected.

  • A couple day ago my website got absolutely hammered by a wave of constant SQL injection attacks by the same IP over a time period of a couple hours.

    I only managed to notice this whilst perusing the Event Log within the Kentico Administration interface. I don't normally check my own error logs as regularly as I should do, but since my site has recently gone through a bit of a revamp (which I'm still yet to post about), I wanted to ensure I haven't broken anything.

    To be honest, I am flattered that someone would think this site is worth the time and energy in trying to hack my site. Trust me, it ain't worth it.

    Even though Kentico has handled these attacks well, as a precaution I wanted to implement an additional layer of security before any further untoward activity reaches to my site. Being on a shared hosting platform my options are limited and my hands are tied to put in an infrastructure that doesn't cost the world.

    Enter Cloudflare

    I have always had some form of awareness of the Cloudflare content delivery network, just never put the service into practice. At one point I was looking into utilising Cloudflare to manage all my site media files over their CDN. But Cloudflare isn't just a CDN, it's able to offer much more:

    • Analytics - monitor traffic as well as caching ratio and more!
    • Firewall- manage access by IP, country, or query rules.
    • Rate limiting- protect your site or API from malicious traffic by blocking client IP addresses that hit a URL pattern and exceed a threshold you define.
    • Page rules - to allow caching to be triggered by a number of rules targeting specific areas of a site.

    The great thing is that these options are part of the free plan... even though there are restrictions to the number of settings you are able to put in place. The security options alone was enough of a reason to try out Cloudflare. But for my needs, the free plan seemed to tick all the boxes. I am just scratching the surface to what Cloudflare has to offer and have already got a few of the features working alongside Kentico.

    How I'm Using Cloudflare With Kentico

    As security was a main concern for me, one of the first things I did was to add in some rules through the firewall and block suspicious traffic. Naturally the next was to take advantage of the CDN capabilities. I wouldn't recommend full site caching unless you have some pretty strict page rules in place as this has a chance to cause issues with the Kentico Admin interface. By default, Cloudflare doesn't cache HTML pages, which is a good thing as it gives us a plain canvas to target the areas we want to cache.

    Being on the free plan, I only had three page rules at my disposal and made the decision to cache the following parts of my site.

    Area Regex Rule Settings
    Media Library Files (using Permanent URL's) *surinderbhomra.com/
    	getmedia/\* | <br>**Cache Level:** Caches Everything<br>**Edge Cache TTL:** A month<br>**Browser Cache TTL:** 16 days<br> |
    

    | Site CSS, JavaScript and Images | *surinderbhomra.com/
    resources/* | Cache Level: Caches Everything
    Edge Cache TTL: A month
    Browser Cache TTL: 16 days | | ScriptResource.axd/WebResource.axd | *surinderbhomra.com/*.axd | Cache Level: Caches Everything
    Edge Cache TTL: 7 days
    Browser Cache TTL: 7 days |

    Two cache types are used:

    1. Edge Cache TTL - is the setting that controls how long CloudFlare's edge servers will cache a resource before requesting a fresh copy from your server.
    2. Browser Cache TTL - is the time that CloudFlare instructs a visitor's browser to cache a resource. Until this time expires, the browser will load the resource from its local cache and speeding up the request.

    I am caching my assets for a considerable amount of time, which begs the question how will changes to files purge the cache in Cloudflare? Luckily, Cloudflare has quite a nice API, where I have the ability to purge everything or individual files (maximum of 30 in one request).

    Purge Media Library File Cache

    I am in the middle of testing a GlobalEvent handler that will carry out the following steps when files are inserted or updated:

    • Get path of the file.
    • Check if site is using Permanent URL's. As the URL to the file will be constructured differently if enabled.
    • Convert the relative path to an absolute path.
    • Pass the absolute file path to Cloudflare using the following Purge Files by URL API endpoint.

    Once I have carried out some further tests, I will be posting this code in a follow-up post.

    Purge Site File Cache

    Now attempting to purge the cache for site files such as JavaScript, CSS and images are a little more tricky as I need to keep an eye on the files changed. The easiest thing to do is I could write some code that will iterate through all the files in the /resources folder and purge everything from the CDN. Not the most elegant solution. Still, need to ponder on the correct implementation. If anyone has got any better suggestions, let me know.

    How Do I Know Cloudflare Is Caching My Site Files?

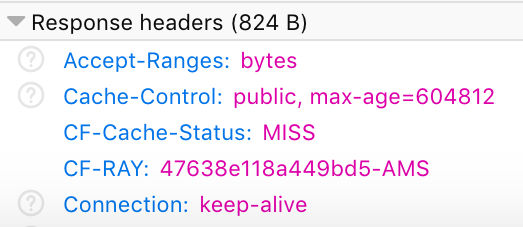
    It does take a little time in Cloudflare to cache all files on a site. It all depends on pages being viewed. A page needs to be loaded in order to submit all its contents to cache. On first load, the response header CF-Cache-Status will return a "MISS", which means the content has not been served from Cloudflare.

    Cloudflare Response - MISS

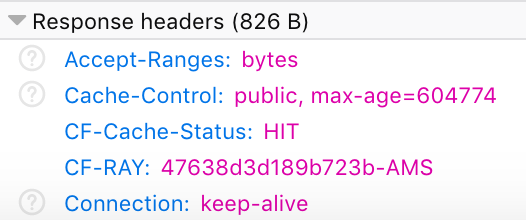
    However, when you go back to the page and re-check the page headers, the CF-Cache-Status should return "HIT". If this is not the case, check your Page Rules within the Cloudflare dashboard.

    Cloudflare Response - HIT

    Is Cloudflare Worth It?

    Quick answer - Yes!

    Setup is very straight-forward. All that is required is to carry out a change to your domain and point your DNS to the DNS Cloudflare assigns to you. There is no downtime in doing this. As a result, overall site performance has improved and page speed test faired much better.

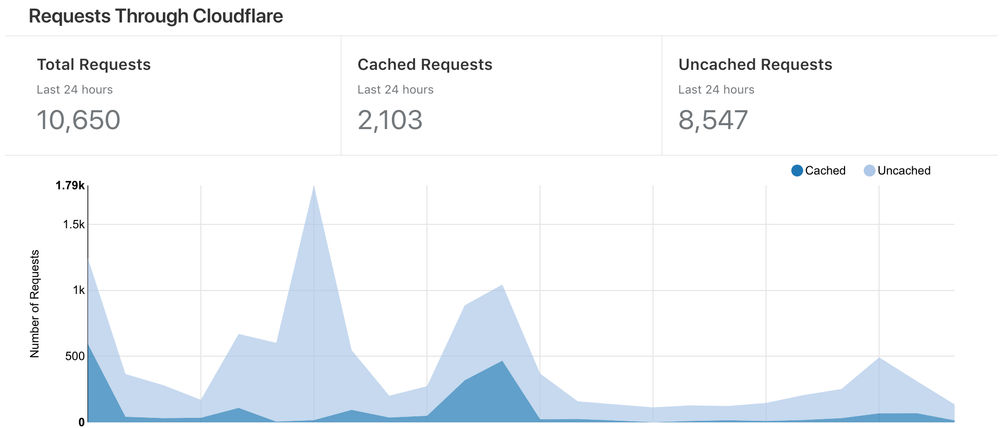
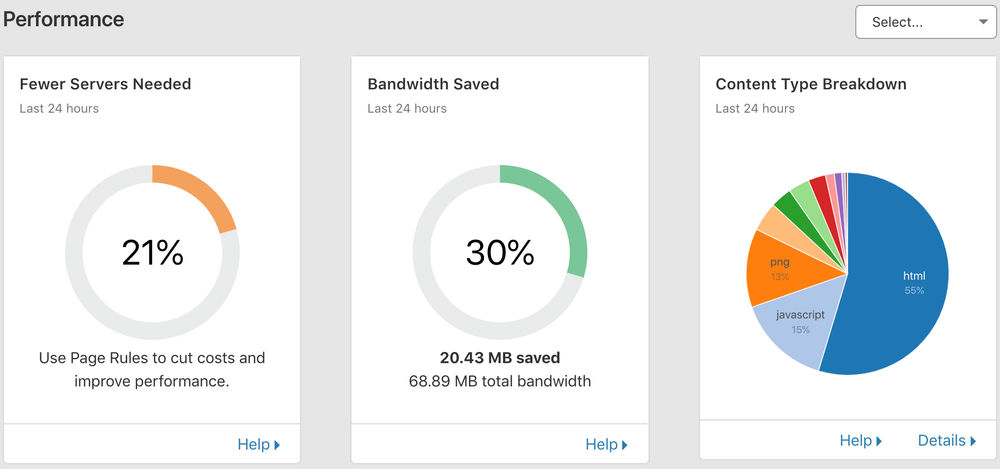
    To give you a better insight for transparency, here are some statistics straight from my Cloudflare portal over a 24 hour period:

    Requests Through Cloudflare
    (Understandably, the number of cached items served through Cloudflare is low due to only caching specific areas)

    Cloudflare Performance
    (My basic shared hosting should now be performing better as less requests are being served via the origin server)

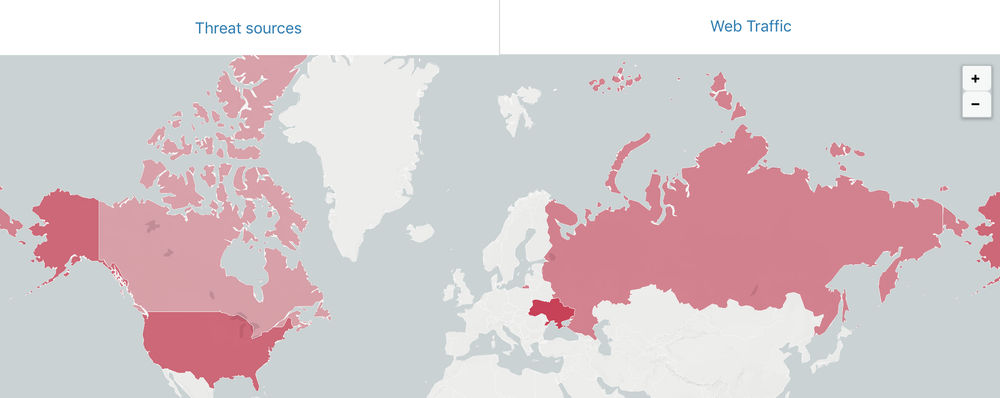
    Cloudflare Detected Threats
    (Blocked threats - the reason why I decided to give Cloudflare a try in the first place)

    I still have to carry out a lot more research in using Cloudflare to its full potential and will use my website as a test bed to see what I can achieve. My end goal is to make my website quicker and more secure!

  • Published on
    -
    2 min read

    Kentico - Call 404 Page From Code

    There will be times when you want to direct a user to a 404 page based on certain conditions from within your code. For example, when dealing with pages that use wildcard URL's, you might want to redirect the user to a 404 page if the value of that wildcard parameter returns no data.

    In my blog I have two wildcard parameters to allow the user to filter my posts by either category or tag. At code-level if no blog posts are returned based on the category or tag value, I have two choices:

    1. Display a "no results" message
    2. Redirect to a 404 page

    As you can tell by the title of this post, I wanted to go for the latter.

    From a Kentico perspective wildcard parameters in a URL aren't what I call "proper" pages and the CMS routing engine won't send you a 404 page as you'd think. So we need to carry the redirect at code-level ourselves based on the conditions we provide. As far as I'm aware, Kentico doesn't have a method in code to do this and settled for a workaround suggested by Sébastien Gumy in the following DevNet post.

    I made some minor changes to the code and placed it in a helper method for use throughout my project with ease:

    using CMS.Helpers;
    using CMS.PortalEngine;
    using CMS.URLRewritingEngine;
    
    namespace Site.Common.Kentico
    {
        public class PortalContextHelper
        {
            /// <summary>
            /// Redirect page to 404.
            /// </summary>
            public static void SendToPageNotFound()
            {
                PortalContext.Clear();
                CMSHttpContext.Current.Response.StatusCode = 404;
                URLRewriter.RewriteUrl(RequestStatusEnum.PageNotFound, string.Empty, ExcludedSystemEnum.Unknown);
            }
        }
    }
    

    The SendToPageNotFound() method can then be used in the following way:

    #region Get Querystring Parameters
    
    string tag = QueryHelper.GetString("Tag", string.Empty);
    string category = QueryHelper.GetString("Category", string.Empty);
    int pageNo = QueryHelper.GetInteger("PageNo", 1);
    
    #endregion
    
    int tagId = TagLogic.GetTagIdFromQuerystring(tag);
    
    // A custom method to get back blog posts based on parameters.
    BlogListing postData = BlogLogic.GetBlogPosts(CurrentDocument.NodeAliasPath, category, tagId, (pageNo - 1));
    
    if (postData.BlogPosts != null)
    {
        BlogListing.DataSource = postData.BlogPosts;
        BlogListing.DataBind();
    }
    else
    {
        // Send to 404 page.
        PortalContextHelper.SendToPageNotFound();
    }
    

    Please note: This has only been tested in Kentico 10.

  • Published on
    -
    2 min read

    The Journey To Kentico Cloud

    From working at Syndicut, I have had both the opportunity and pleasure of working with many different platforms. The most exciting development for me over the years has been the shift on how content management systems are being decoupled from the very applications they push content to. I have blogged about this many years ago when I first used Prismic, which at the time seemed the most viable option. Even though there were pros and cons.

    I always felt the cons were more related to the restrictions on what the platform offered and not the architecture itself. I write my thoughts on the journey to how [at Syndicut] we've used headless CMS's in the past, to now using Kentico Cloud. Kentico Cloud is indeed a very promising headless CMS platform. Even though it hasn't been in the market that long when compared to its competitors, but it embodies something more:

    • Proactive development team who take an active step towards bugs and improvements.
    • A wide variety of boilerplate templates to accommodate different code frameworks.
    • Boilerplate templates updated regularly.
    • A clear roadmap to the features developers can expect and release deadlines.
    • Accessible and quick to respond support team.

    Some highlights to take away from the post:

    The common misconception we get from clients is on the surface, a headless based CMS can appear restrictive compared to platforms they are previously used to. However, that cannot be further from the truth. Once there is an understanding of how data can be given a hierarchy, category, relationships and workflow, they seem to run with curating content fairly quickly.

    For agile projects where there is a need to manage content for multiple channels, or for creating tagged content hubs for digital marketing purposes, Kentico Cloud is the best option.

    Headless CMS is a ticket to freedom for those who wish to take it. Why waste time worrying about hardware infrastructure, security and platform updates when you can invest that time in purely building your application and content?

    As a business or developer, you might be hesitant to make the change. When I first read about decoupled architecture, I too had some hesitation as a lot of faith is invested in the platforms scalability and features. But with services like Kentico Cloud, who are pushing the boundaries with every release, they are changing our perception for the better on what we think we should expect from a headless CMS.

    Take a read here: https://medium.com/syndicut/our-headless-cms-journey-to-kentico-cloud-b26c4eb39ed7

  • I wrote a post a couple of years ago regarding my observations on developing a Kentico site using MVC in version 9. Ever since Kentico 9, there was a shift in how MVC applications are to be developed, which has pretty much stood the test of time as we've seen in releases since then. The biggest change being the CMS itself is purely used to manage content and the presentation layer is a separate MVC application connected through a Web Farm interface.

    The one thing I missed when working on sites in Kentico's MVC is the ability to get values from the current document as you could do in Kentico 8 MVC builds:

    public ActionResult Article()
    {
        TreeNode page = DocumentContext.CurrentDocument;
    
        // You might want to do something complex with the TreeNode here...
    
        return View(page);
    }
    

    In Kentico 11, the approach is to use wrapper classes using the Code Generator feature the Kentico platform offers from inside your Page Type. The Kentico documentation describes this approach quite aptly:

    The page type code generators allow you to generate both properties and providers for your custom page types. The generated properties represent the page type fields. You can use the providers to work with published or latest versions of a specific page type.

    You can then use these generated classes inside your controllers to retrieve page type data.

    Custom Route Constraint

    In order to go down a similar approach to get the current document just like in Kentico 8, we'll need to modify our MVC project and add a custom route constraint called CmsUrlConstraint. The custom route constraint will call DocumentHelper.GetDocument() method and return a TreeNode object based on the Node Alias path.

    CmsUrlConstraint

    Every Page Type your MVC website consists of will need to be listed in this route constraint, which will in turn direct the incoming request to a controller action and store the Kentico page information within a HttpContext if there is a match. To keeps things simple, the route constraint contains the following pages:

    • Home
    • Blog
    • Blog Month
    • Blog Post
    public static class RouteConstraintExtension
    {
        /// <summary>
        /// Set a new route.
        /// </summary>
        /// <param name="values"></param>
        /// <param name="controller"></param>
        /// <param name="action"></param>
        /// <returns></returns>
        public static RouteValueDictionary SetRoute(this RouteValueDictionary values, string controller, string action)
        {
            values["controller"] = controller;
            values["action"] = action;
    
            return values;
        }
    
        #region CMS Url Contraint
    
        public class CmsUrlConstraint : IRouteConstraint
        {
            /// <summary>
            /// Check for a CMS page for the current route.
            /// </summary>
            /// <param name="httpContext"></param>
            /// <param name="route"></param>
            /// <param name="parameterName"></param>
            /// <param name="values"></param>
            /// <param name="routeDirection"></param>
            /// <returns></returns>
            public bool Match(HttpContextBase httpContext, Route route, string parameterName, RouteValueDictionary values, RouteDirection routeDirection)
            {
                string pageUrl = values[parameterName] == null ? "/Home" : $"/{values[parameterName].ToString()}";
    
                // Check if the page is being viewed in preview.
                bool previewEnabled = HttpContext.Current.Kentico().Preview().Enabled;
    
                // Ignore the site resource directory containing Image, CSS and JS assets to save call to Kentico API.
                if (pageUrl.StartsWith("/resources"))
                    return false;
    
                // Get page from Kentico by alias path in its published or unpublished state.
                // PageLogic.GetByNodeAliasPath() method carries out the document lookup by Node Alias Path.
                TreeNode page = PageLogic.GetByNodeAliasPath(pageUrl, previewEnabled);
    
                if (page != null)
                {
                    // Store current page in HttpContext.
                    httpContext.Items["CmsPage"] = page;
    
                    #region Map MVC Routes
    
                    // Set the routing depending on the page type.
                    if (page.ClassName == "CMS.Home")
                        values.SetRoute("Home", "Index");
    
                    if (page.ClassName == "CMS.Blog" ||  page.ClassName == "CMS.BlogMonth")
                        values.SetRoute("Blog", "Index");
    
                    if (page.ClassName == "CMS.BlogPost")
                        values.SetRoute("Blog", "Post");
    
                    #endregion
    
                    if (values["controller"].ToString() != "Page")
                        return true;
                }
    
                return false;
            }
        }
    
        #endregion
    }
    

    To ensure page data is returned from Kentico in an optimum way, I have a PageLogic.GetByNodeAliasPath() method that ensures cache dependencies are used if the page is not in preview mode.

    Apply Route Constraint To RouteConfig

    public class RouteConfig
    {
        public static void RegisterRoutes(RouteCollection routes)
        {
            ...
    
            // Maps routes to Kentico HTTP handlers.
            // Must be first, since some Kentico URLs may be matched by the default ASP.NET MVC routes,
            // which can result in pages being displayed without images.
            routes.Kentico().MapRoutes();
    
            // Custom MVC constraint validation to check for a CMS template, otherwise fallback to default MVC routing.
            routes.MapRoute(
                name: "CmsRoute",
                url: "{*url}",
                defaults: new { controller = "HttpErrors", action = "NotFound" },
                constraints: new { url = new CmsUrlConstraint() }
            );
    
            ...
        }
    }
    

    Usage In Controller

    Now that we have created our route constraint and applied it to our RouteConfig, we can now enjoy the fruits of our labour by getting back the document TreeNode from HttpContext. The code sample below demonstrates getting some values for our Home controller.

    public class HomeController : Controller
    {
        public ActionResult Index()
        {
            TreeNode currentPage = HttpContext.Items["CmsPage"] as TreeNode;
    
            if (currentPage != null)
            {
                HomeViewModel homeModel = new HomeViewModel
                {
                    Title = currentPage.GetStringValue("Title", string.Empty),
                    Introduction = currentPage.GetStringValue("Introduction", string.Empty)
                };
    
                return View(homeModel);
            }
    
            return HttpNotFound();
        }
    }
    

    Conclusion

    There is no right or wrong in terms of the approach you as a Kentico developer use when getting data out from your page types. Depending on the scale of the Kentico site I am working on, I interchange between the approach I detail in this post and Kentico's documented approach.