Blog

Categorised by 'CMS'.

  • I decided to write this blog post after one of my fellow Kentico Cloud developer Matt Nield tweeted the following last week:

    So happy to see this coming to Kentico Cloud! The amount to times I yearned for something I could use to clear cache!
    — Surinder Bhomra (@SurinderBhomra) July 13, 2017

    Webhook capability is something I have been yearning for since I built my first Kentico Cloud project and this feature cannot come soon enough! It will really take the Kentico Cloud headless CMS integration within our applications to the next level. One of the main things I am looking forward to is using webhooks is to develop a form of dependency caching, so when content is updated in Kentico Cloud, the application can reflect these changes.

    In fact, I am so excited to have this feature in my hands for my caching needs, I have already started developing something I could potentially use in time for the Q3 2017 release - should be any time now.


    As we all know, to not only improve overall performance of your application as well as reducing requests to the Kentico Cloud API, we are encouraged to set a default cache duration. There is documentation on the different routes to accomplish this:

    1. Controller-level - using OutputCache attribute
    2. CachedDeliveryClient class - provided by the Kentico Cloud Boilerplate that acts as a wrapper around the original DeliveryClient object to easily cache data returned from the API for a fixed interval.

    I personally prefer caching at controller level, unless the application is doing something very complex at runtime for manipulating incoming data. So in the mean time whilst I wait for webhook functionality to be released, I decided to create a custom controller attribute called "KenticoCacheAttribute", that will only start the caching process only if the application is not in debug mode.

    using System;
    using System.Collections.Generic;
    using System.Linq;
    using System.Web;
    using System.Web.Mvc;
    
    namespace Site.Web.Attributes
    {
        public class KenticoCacheAttribute : OutputCacheAttribute
        {
            public KenticoCacheAttribute()
            {
                Duration = HttpContext.Current.IsDebuggingEnabled ? 0 : int.Parse(ConfigurationManager.AppSettings["KenticoCloud.CacheDuration"]);
            }
        }
    }
    

    The "KenticoCacheAttribute" inherits the OutputCacheAttribute class, which gives me additional control to when I'd like the caching process to happen. In this case, the cache duration is set within the web.config.

    I found the one main benefit of my custom controller attribute is that I will never forget to start caching pages on my website when it comes to deployment to production, since we never want our website to have debugging enabled unless we're in a development environment. This also works the other way. We're not too concerned about caching in a development environment as we always want to see changes in incoming data straight away.

    The new cache attribute is used in the exact same approach as OutputCacheAttribute, in the following way:

    [Route("{urlSlug}")]
    [KenticoCacheAttribute(VaryByParam = "urlSlug")]
    public async Task<ActionResult> Detail(string urlSlug)
    {
         // Do something...
    
        return View();
    }
    

    This is a very simple customisation I found useful through my Kentico Cloud development.

    The custom attribute I created is just the start on how I plan on integrating cache managment for Kentico Cloud applications. When webhook capability is released, I can see further improvements being made, but may require a slightly different approach such as developing a custom MVC Action Filter instead.

  • Ever since I re-developed my website in Kentico 10 using Portal Templates, I have been a bit more daring when it comes to immersing myself into the inner depths of Kentico's API and more importantly - K# macro development. One thing that has been on my list of todo's for a long time was to create a custom macro extension that would render all required META open graph tags in a page.

    Adding these type of META tags using ASPX templates or MVC framework is really easy to do when you have full control over the page markup. I'll admit, I don't know if there is already an easier way to do what I am trying to accomplish (if there is let me know), but I think this macro is quite flexible with capability to expand the open graph output further.

    This is how I currently render the Meta HTML within my own website at masterpage level (click for a larger image):

    Open Graph HTML In Masterpage

    I instantly had problems with this approach:

    1. The code output is a mess.
    2. Efficiency from a performance standpoint does not meet my expectations.
    3. Code maintainability is not straight-forward, especially if you have to update this code within the Page Template Header content.

    CurrentDocument.OpenGraph() Custom Macro

    I highly recommend reading Kentico's documentation on Registering Custom Macro Methods before adding my code. It will give you more of an insight on what can be done that my blog post alone will not cover. The implementation of my macro has been developed for a Kentico site that is a Web Application and has been added to the "Old_App_Code" directory.

    // Registers methods from the 'CustomMacroMethods' container into the "String" macro namespace
    [assembly: RegisterExtension(typeof(CustomMacroMethods), typeof(TreeNode))]
    namespace CMSApp.Old_App_Code.Macros
    {
        public class CustomMacroMethods : MacroMethodContainer
        {
            [MacroMethod(typeof(string), "Generates Open Graph META tags", 0)]
            [MacroMethodParam(0, "param1", typeof(string), "Default share image")]
            public static object OpenGraph(EvaluationContext context, params object[] parameters)
            {
                if (parameters.Length > 0)
                {
                    #region Parameter variables
    
                    // Parameter 1: Current document.
                    TreeNode tnDoc = parameters[0] as TreeNode;
                    
                    // Paramter 2: Default social icon.
                    string defaultSocialIcon = parameters[1].ToString();
    
                    #endregion
    
                    string metaTags = CacheHelper.Cache(
                        cs =>
                        {
                            string domainUrl = $"{HttpContext.Current.Request.Url.Scheme}{Uri.SchemeDelimiter}{HttpContext.Current.Request.Url.Host}{(!HttpContext.Current.Request.Url.IsDefaultPort ? $":{HttpContext.Current.Request.Url.Port}" : null)}";
    
                            StringBuilder metaTagBuilder = new StringBuilder();
    
                            #region General OG Tags
                            
                            metaTagBuilder.Append($"<meta property=\"og:title\" content=\"{DocumentContext.CurrentTitle}\"/>\n");
    
                            if (tnDoc.ClassName == KenticoConstants.Page.BlogPost)
                                metaTagBuilder.Append($"<meta property=\"og:description\" content=\"{tnDoc.GetValue("BlogPostSummary", string.Empty).RemoveHtml()}\" />\n");
                            else
                                metaTagBuilder.Append($"<meta property=\"og:description\" content=\"{tnDoc.DocumentPageDescription}\" />\n");
    
                            if (tnDoc.GetValue("ShareImageUrl", string.Empty) != string.Empty)
                                metaTagBuilder.Append($"<meta property=\"og:image\" content=\"{domainUrl}{tnDoc.GetStringValue("ShareImageUrl", string.Empty).Replace("~", string.Empty)}?width=600\" />\n");
                            else
                                metaTagBuilder.Append($"<meta property=\"og:image\" content=\"{domainUrl}/{defaultSocialIcon}\" />\n");
    
                            #endregion
    
                            #region Twitter OG Tags
    
                            if (tnDoc.ClassName == KenticoConstants.Page.BlogPost || tnDoc.ClassName == KenticoConstants.Page.GenericContent)
                                metaTagBuilder.Append("<meta property=\"og:type\" content=\"article\" />\n");
                            else
                                metaTagBuilder.Append("<meta property=\"og:type\" content=\"website\" />\n");
    
                            metaTagBuilder.Append($"<meta name=\"twitter:site\" content=\"@{Config.Twitter.Account}\" />\n");
                            metaTagBuilder.Append($"<meta name=\"twitter:title\" content=\"{DocumentContext.CurrentTitle}\" />\n");
                            metaTagBuilder.Append("<meta name=\"twitter:card\" content=\"summary\" />\n");
    
                            if (tnDoc.ClassName == KenticoConstants.Page.BlogPost)
                                metaTagBuilder.Append($"<meta property=\"twitter:description\" content=\"{tnDoc.GetValue("BlogPostSummary", string.Empty).RemoveHtml()}\" />\n");
                            else
                                metaTagBuilder.Append($"<meta property=\"twitter:description\" content=\"{tnDoc.DocumentPageDescription}\" />\n");
    
                            if (tnDoc.GetValue("ShareImageUrl", string.Empty) != string.Empty)
                                metaTagBuilder.Append($"<meta property=\"twitter:image\" content=\"{domainUrl}{tnDoc.GetStringValue("ShareImageUrl", string.Empty).Replace("~", string.Empty)}?width=600\" />");
                            else
                                metaTagBuilder.Append($"<meta property=\"twitter:image\" content=\"{domainUrl}/{defaultSocialIcon}\" />");
    
                            #endregion
    
                            // Setup the cache dependencies only when caching is active.
                            if (cs.Cached)
                                cs.CacheDependency = CacheHelper.GetCacheDependency($"documentid|{tnDoc.DocumentID}");
    
                            return metaTagBuilder.ToString();
                        },
                        new CacheSettings(Config.Kentico.CacheMinutes, KenticoHelper.GetCacheKey($"OpenGraph|{tnDoc.DocumentID}"))
                    );
    
                    return metaTags;
                }
                else
                {
                    throw new NotSupportedException();
                }
            }
        }
    }
    

    This macro has been tailored specifically to my site needs with regards to how I am populating the OG META tags, but is flexible enough to be modified based on a different site needs. I am carrying out checks to determine what pages are classed as "article" or "website". In this case, I am looking out for my Blog Post and Generic Content pages.

    I am also being quite specific on how the OG Description is populated. Since my website is very blog orientated, there is more of a focus to populate the description fields with "BlogPostSummary" field if the current page is a Blog Post, otherwise default to "DocumentPageDescription" field.

    Finally, I ensured that all article pages contained a new Page Type field called "ShareImageUrl", so that I have the option to choose a share image. This is not compulsory and if no image has been selected, a default share image you pass as a parameter to the macro will be used.

    Using the macro is pretty simple. In the header section of your Masterpage template, just add the following:

    Open Graph Macro Declaration

    As you can see, the OpenGraph() macro can be accessed by getting the current document and passing in a default share icon as a parameter.

    Macro Benchmark Results

    This is where things get interesting! I ran both macro implementations through Kentico's Benchmark tool to ensure I was on the right track and all efforts to develop a custom macro extension wasn't all in vain. The proof is in the pudding (as they say!).

    Old Implementation

    Total runs: 1000
    Total benchmark time: 1.20367s
    Total run time: 1.20267s
    
    Average time per run: 0.00120s
    Min run time: 0.00000s
    Max run time: 0.01700s
    

    New Implementation - OpenGraph() Custom Macro

    Total runs: 1000
    Total benchmark time: 0.33222s
    Total run time: 0.33022s
    
    Average time per run: 0.00033s
    Min run time: 0.00000s
    Max run time: 0.01560s
    

    The good news is that the OpenGraph() macro approach has performed better over my previous approach across all benchmark results. I believe caching the META tag output is the main reason for this as well as reusing the current document context when getting page values.

  • This site has been longing for an overhaul, both visually and especially behind the scenes. As you most likely have noticed, nothing has changed visually at this point in time - still using the home-cooked "Surinder theme". This should suffice in the meantime as it currently meets my basic requirements:

    • Bootstrapped to look good on various devices
    • Simple
    • Function over form - prioritises content first over "snazzy" design

    However, behind the scenes is a different story altogether and this is where I believe matters most. Afterall, half of web users expect a site to load in 2 seconds or less and they tend to abandon a site that isn’t loaded within 3 seconds. Damning statistics!

    The last time I overhauled the site was back in 2014 where I took a more substantial step form to current standards. What has changed since then? I have upgraded to Kentico 10, but this time using ASP.NET Web Forms over MVC.

    Using ASP.NET Web Form approach over MVC was very difficult decision for me. Felt like I was taking a backwards step in making my site better. I'm the kind of developer who gets a kick out of nice clean code output. MVC fulfils this requirement. Unfortunately, new development approach for building MVC sites from Kentico 9 onwards will not work under a free license.

    The need to use Kentico as a platform was too great, even after toying with the idea of moving to a different platform altogether. I love having the flexibility to customise my website to my hearts content. So I had to the option to either refit my site in Kentico 10 or Kentico Cloud. In the end, I chose Kentico 10. I will be writing in another post why I didn't opt for the latter. I'm still a major advocate of Kentico Cloud and started using it on other projects.

    The developers at Kentico weren't lying when they said that Kentico 10 is "better, stronger, faster". It really is! I no longer get the spinning loader for obscene duration of time whilst opening popups in the administration interface or lengthy startup times when the application has to restart.

    Upgrading from Kentico 8.0 to 10 alone was a great start. I have taken some additional steps to keep my site clean as possible:

    1. Disable view state on all pages, components and user controls.
    2. Caching static files, such as CSS, JS and images. You can see how I do this at web.config level from this post.
    3. Maximising Kentico's cache dependencies to cache all data.
    4. Took the extra step to export all site contents into a fresh installation of Kentico 10, resulting in a slightly smaller web project and database size.
    5. Restructured pages in the content tree to be more efficient when storing large number of pages under one section.

    I basically carried out the recommendations on optimising website performance and then some! My cache statatics have never been so high!

    My Kentico 10 Cache Statistics

    One slight improvement (been a long time coming) is better open graph support when sharing pages on Facebook and Twitter. Now my links look pretty within a tweet.

  • Published on
    -
    2 min read

    Kentico 9 Certified Developer

    I haven't done the Kentico certified exam for over two years - but this doesn't make me any less of an awesome and competent Kentico Developer. Over the last two years, a lot has changed within the Kentico realm resulting in the subject matter becoming a little more of a challenge to keep up to speed with. Afterall, two years ago we saw the dawn of a new age - the end of Kentico 7 and the start of Kentico 8. I am seeing the same thing happening again, except this time we're just about seeing Kentico 10 making it's appearance over the horizon.

    What I noticed this time round was the increased number of questions evolving around macro's. It felt like I was bombarded at the time of carrying out the exam. I think the only thing that got me through is remembering the approach I took to the macro's I wrote for a recent EMS project.

    The Kentico Certification Preparation Guide has greatly improved compared to previous versions where in the past questions were pretty simple and a vast contrast to the real thing. This allowed me to gauge a lot more on the type of questions that would potentially be presented, but I did notice quite a few questions from the preparation guide cropped up in the real exam - although slightly re-worded.

    I highly recommend anyone who is interested in becoming a Kentico Certified Developer to read the following post by Jeroen Furst prior to taking the exam called: Tips for becoming a Kentico Certified Developer. Jeroen brings up some really good points and guidance to prepare yourself. If only I came across this post two years ago when I wasn't too sure what to expect (being my first Kentico exam), I would have felt more comfortable in understanding what was required.

    I was expecting there to be some questions relating to MVC due to all the effort made by the Kentico development team to make the MVC integration seamless within Kentico 9. Alas, this was not the case. Jeroen also states the following:

    If you are planning to take any older v6, v7 or v8 exams (if still possible) you might run into questions regarding Azure and the Intranet solution. These topics are not part of the v9 exam anymore.

    The Kentico 9 exam purely focuses on the core Kentico features as well as the platform architecture every Kentico developer should know in order to build high quality sites. You will also find yourself learning some new things in the process of preparing for the exam as well as brushing up on your existing knowledge.

    If you succeed, you can proudly display this badge in all its glory! ;-)

    Kentico 9 Certified Developer

  • Published on
    -
    6 min read

    My Development Overview of Kentico 9 MVC

    When Kentico offered the option to build websites using MVC, I was one of the many developers who jumped at the chance to utilise the new programming model. I've been building websites using the MVC programming model ever since it was first made available in Kentico 7 and with each version, the MVC implementation just got better and better. So much so, I even built my very own website (currently in Kentico 8) in MVC.

    MVC in Kentico has always been a bit of a hybrid being in the sense that it wasn't true MVC to the core, which is to be expected when you have to accommodate vast array of features the Kentico platform offers. Luckily for us Kentico 9 has wholeheartedly embraced MVC with open arms and things can only get better with subsequent versions.

    I have listed a few observations I thought would be good to write about from my initial experience of using MVC in Kentico 9 whilst working on a client project. I will be talking (very high level) about the changes from previous versions of Kentico MVC as well as the new development approaches for Kentico 9.

    1) Goodbye "Pages", Hello "Content-only Pages" Page Types

    "Content-only pages" is a new addition to Kentico 9 and is another form of Page Type, with its primary job (as the name suggests) to store content. The main difference between "Pages" and "Content-only Pages", is:

    • Aren't based on Page Templates.
    • Provides a simplified interface when managing content.
    • Does not have a presentation URL. URL patterns now need to be specified which handles the presentation to the MVC site via routing.
    • Lacks the ability to create many Page Aliases.

    "Content-only pages" is a requirement to developing MVC sites in Kentico 9. Overall, I actually found "Content-only pages" quite restrictive and useful key page properties are no longer available, such as the URLs and Navigation tabs. I really do wish that these features were left in.

    Kentico 9 MVC Missing Page Properties

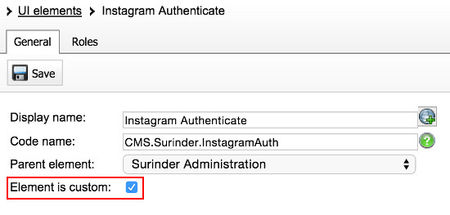
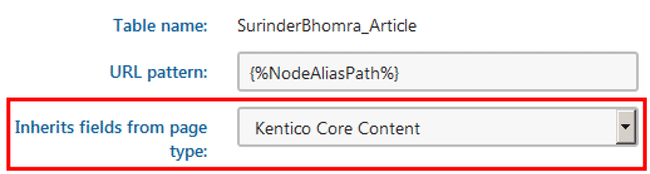
    I will be talking more about the removal of the URLs in my next point, the missing Navigation property is easier to get around. I created a base content page called "Kentico Core Content" that contained all the fields that you would normally find under Navigation properties and inherited this page type on all my content-only pages, such as Articles. You'll then have to just make the customisations to inherit these fields at code level. Easy!

    Kentico 9 Core Content Page Inheritance

    2) No Document Aliases

    There's no option to allow the site administrator to add multiple document aliases for a page. This alone was nearly a deal breaker for me and was tempted to either go down Portal or ASPX templates route. The ability to create multiple document aliases in the URLs section is very powerful feature, especially if you plan on adding 301 redirects.

    To get around this excluded feature, you will either have to use URL Rewriting at web.config level or add additional routes at controller level to carry out all specific page redirects.

    So before deciding whether to choose the MVC approach, ask yourself if this is pressing feature for you and your client.

    3) Separation of the CMS and Presentation Layer

    Kentico 8 stepped up the MVC integration by allowing the developer to build their sites using MVC through the CMSApp_MVC project. This created a basic form of separation at project level that was much better suited compared to mixing key MVC components (Controllers/Models/Views) into what is a Web Form powered site in it's infancy in Kentico 7.

    Now there is complete separation between the CMS Admin and Presentation layer (or MVC site). Since the CMSApp_MVC approach has been made obselete in Kentico 9, you now have the full ability to create an MVC site as you would do normally in a non-Kentico web application. The only way Kentico and your MVC website can talk to one another is through a Web Farm configuration.

    Kentico 9 MVC Architecture

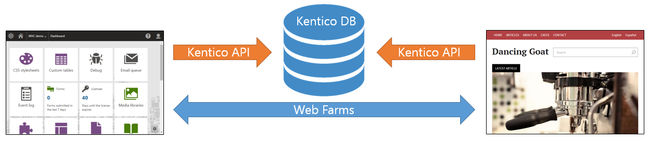
    I personally love this setup. My website can be kept light as possible and still harness the power of what Kentico has to offer through using conventional API calls from the Kentico library. I can tell you this for sure, the website itself performs better than ever and no one can tell what CMS is powering the site. Good for security.

    4) Licensing and Environment Setup

    Due to the need for Web Farm setup to allow syncronisation of content between the CMS and MVC site, the licensing requirements have changed. Based upon how you want to setup your separate sites, Kentico provides different licensing approaches, which pretty much covers all scenarios.

    My preferred setup is to run the Kentico and the MVC application under two different sites, on separate domains. Again, my reasoning comes down to catering for that additional level of security where the management of your site is on a sub-domain and not so obvious where the administration area resides. In this case, two licenses will be required. For example:

    You will get a free license for the Kentico site as long as the subdomain is "admin".

    The only sad part (for me personally) is that Kentico CMS Free Edition license does not allow for MVC websites. I really do hope that this changes at some point. I'd love to utilise full Kentico 9 MVC on future personal projects that are currently on the free edition. Otherwise they will forever be stuck in version 8.2.

    5) Page Templates

    The ability to use Page Templates alongside standard page types is still available within the Kentico interface, but you can only develop an MVC site this way by creating a (now obsolete) "CMSApp_MVC" project. Kentico 9 MVC is still fully backwards compatible with this approach.

    6) Retrieving Content In MVC Controllers

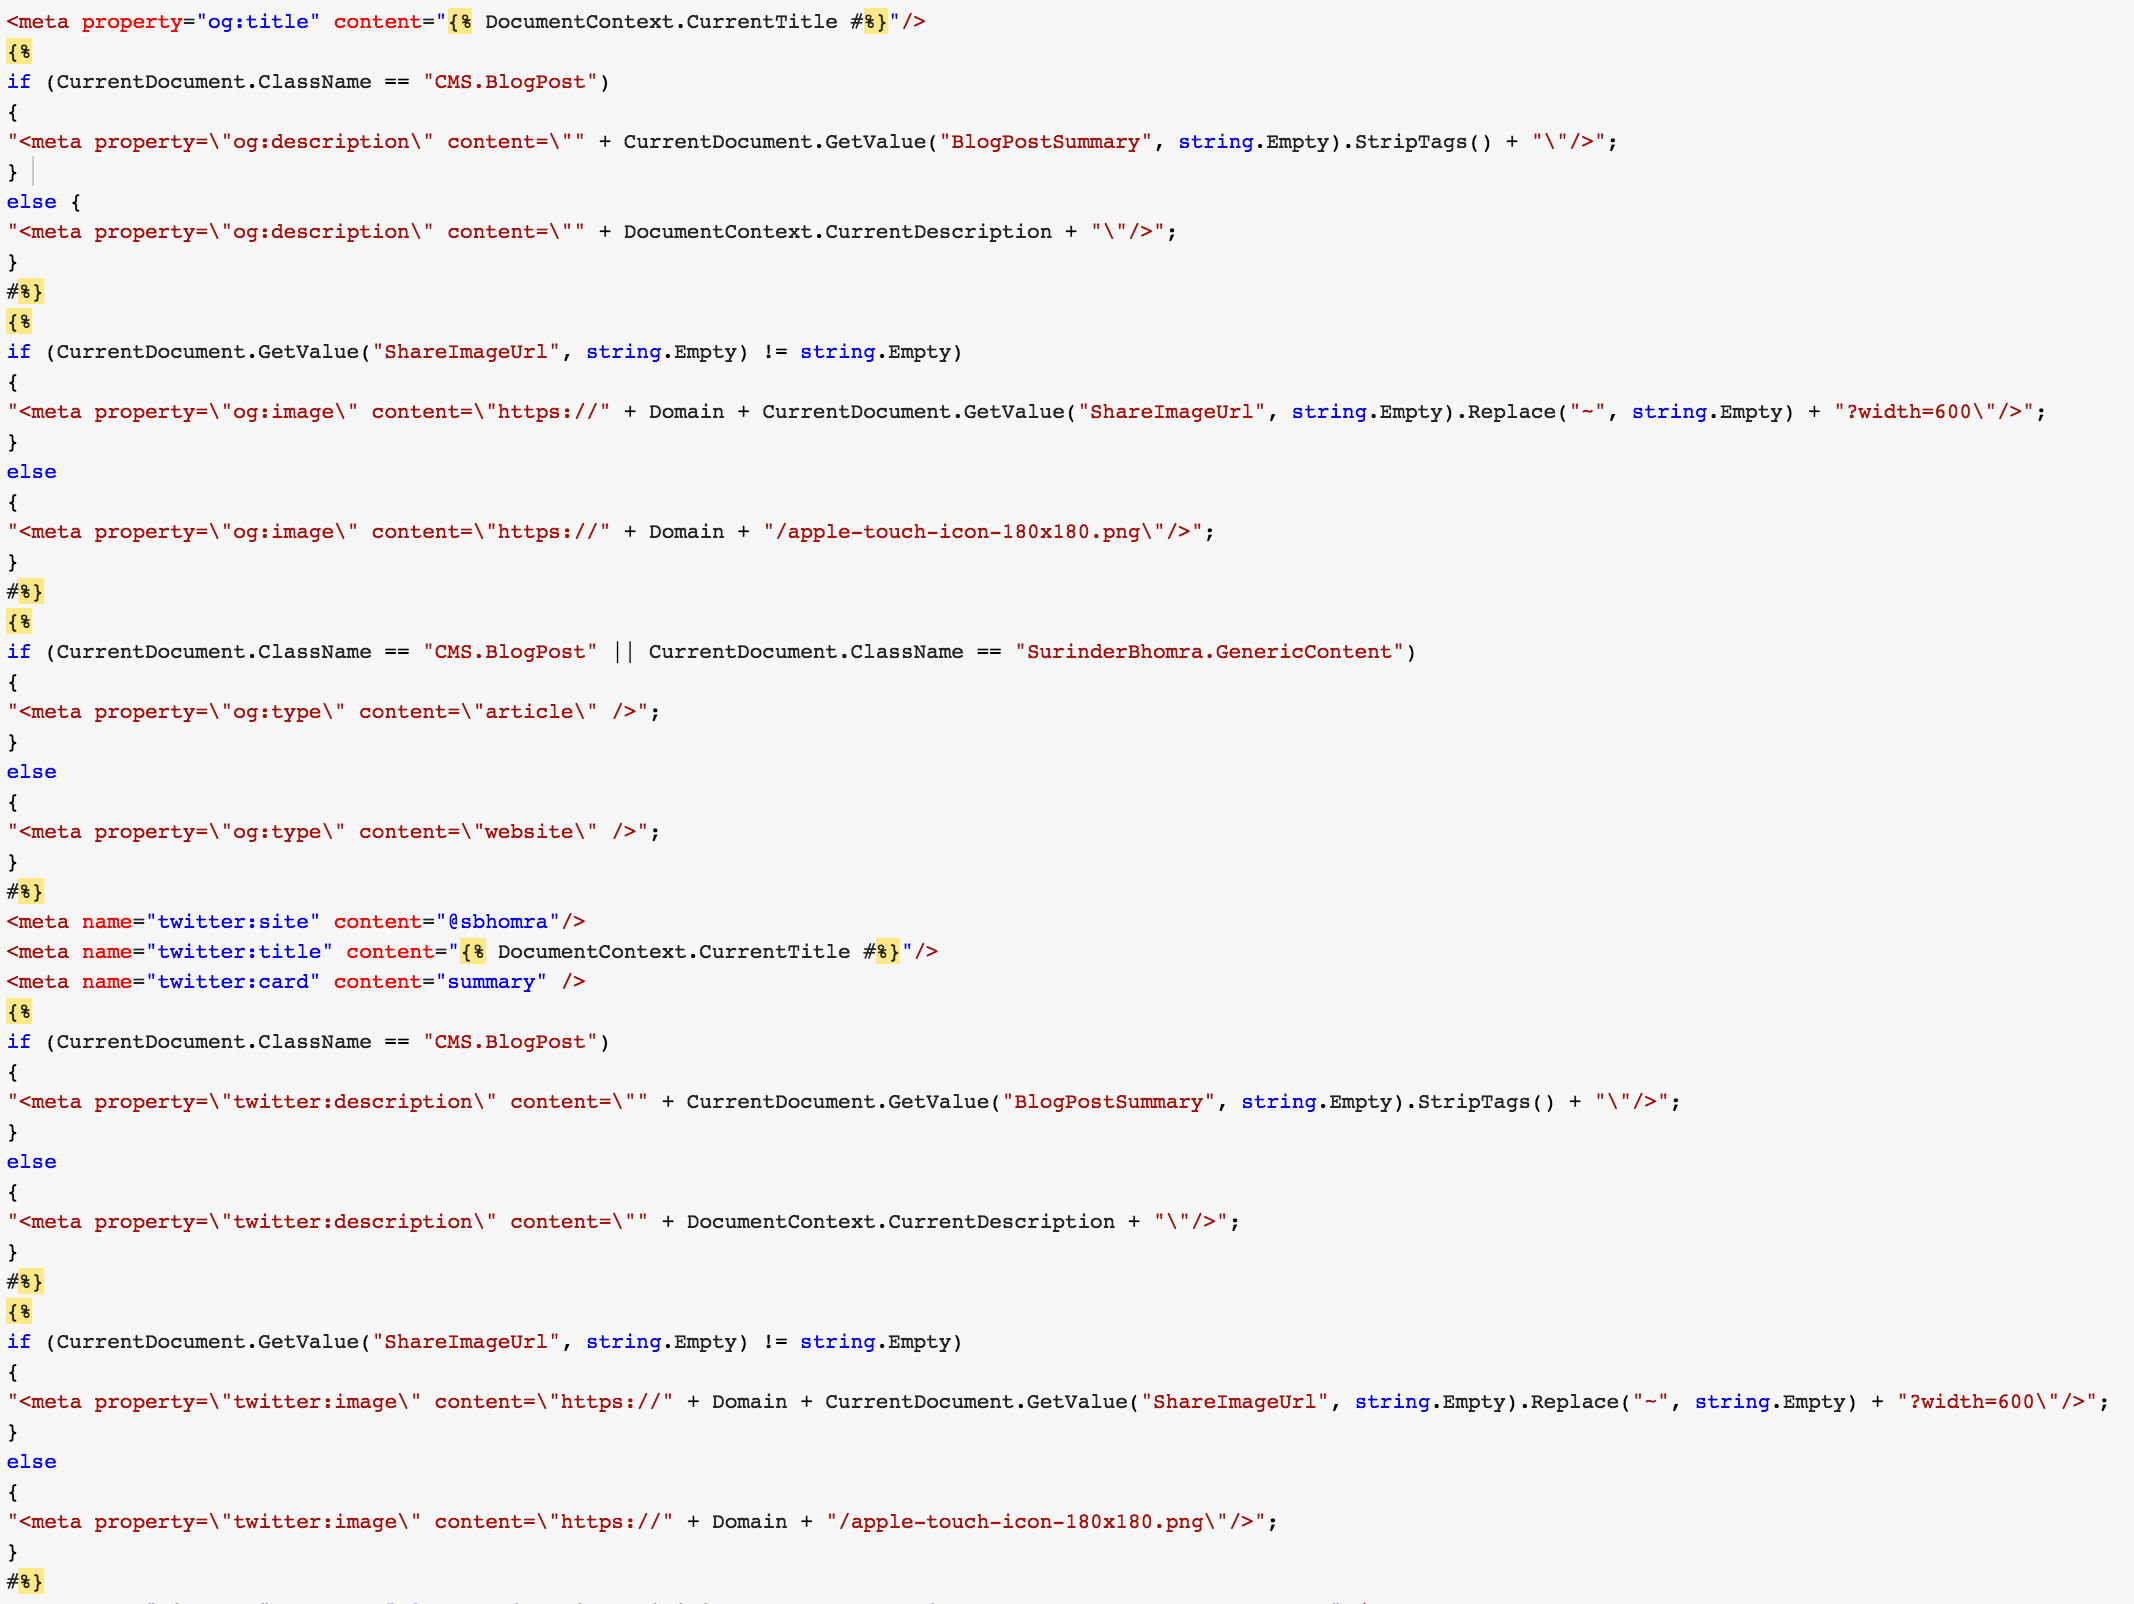
    In Kentico 8, a controller acted as the code-behind to your Page Template where you could get all the information about a current page by calling DocumentContext.CurrentDocument. In Kentico 9, this is no longer the case and it is recommended content should be retrieved using its auto-generated code. I generally don't go down the route of using the auto-generated code. I instead like to create my own custom methods so I have the freedom to pull out the exact data my data needs by passing the Node Alias Path into my control from the URL route patten. Personal preference.

    7) Friendly URL's Should Include A Node ID

    Kentico recommends all page URL's should consist of NodeID and Page alias, to ensure optimum search engine optimisation on the event the page alias of pages changes on the live site. Kentico's documentation states:

    Typically, a page alias will be part of a macro expression that makes up a URL pattern in content only page types. For example, a URL pattern can be specified like this /Articles/{%NodeID%}/{%NodeAlias%}. Where {%NodeAlias%} accesses the page alias.

    I've gone down the route of creating a custom route contraint in my MVC project, to allow me to retrieve TreeNode for the current document via HttpContext just from passing the Node Alias only. I could go into more detail, but this is probably best suited for another blog post.

    Conclusion

    The MVC integration in Kentico is like a fine wine. It gets better and better every year (in this case release) and they should be congratulated for undertaking such a humongous task. Would I choose it over Portal or ASPX pages for every project? Probably not, because I can see clients expecting functionality that is not quite present in an MVC installation as of yet.

    I do like the freedom MVC gives me whilst harnessing the power of Kentico and it works great on those projects that require maximum flexibility and the seperation of code-levels allows me to do that. In addition, if my site requires scaling, I can easily move it to Azure. I am very much looking forward to what Kentico has in store for feature releases.

    If there is anything I have listed in my initial observation that are incorrect, please leave a comment and I will update this post.

  • Over the last few months, I've been working away on a Kentico 9 EMS project. Very exciting indeed! Really pulling out all the stops on trying to make an amazing site in an EMS framework alongside the whole team at Syndicut.

    This week, I had to develop a custom built form to grab some user's information. Unfortunately, I was unable to use Kentico's Form Builder due to the requirement where the details had to be submitted to an external API, as well as utilising a custom design.

    One of the many benefits you get out-the-box from using the Kentico Form Builder is the ability to log marketing activity to the Contact Management area to store information on the visitors who view and interact with your site. By building a custom form, I was losing losing key data, such as: First Name, Last Name Email Address and Telephone No. - The base key criteria of turning an anonymous visitor to a person with some context.

    To avoid this loss of data, I created a method that uses the CMS.OnlineMarketingContext class to allow you to manually update the current visitor information:

    /// <summary>
    /// Creates/Updates a contact in Kentico's Contact Management system.
    /// </summary>
    /// <param name="firstName">Visitors first name</param>
    /// <param name="lastName">Visitors last name</param>
    /// <param name="emailAddress">Visitors email address</param>
    /// <param name="businessPhone">Visitors business phone number</param>
    /// <param name="allowContactOverwrite">Overwrite existing contact fields with new information.</param>
    public static void SetMarketingContact(string firstName, string lastName, string emailAddress, string businessPhone, bool allowContactOverwrite = false)
    {
        ContactInfo existingContact = OnlineMarketingContext.GetCurrentContact();
                
        // Update an existing contact or create a new one if no existing contact exists.
        if (existingContact != null)
        {
            existingContact.ContactFirstName = firstName;
            existingContact.ContactLastName = lastName;
            existingContact.ContactEmail = emailAddress;
            existingContact.ContactBusinessPhone = businessPhone;
    
            if (allowContactOverwrite)
                existingContact.Update();
        }
    }
    

    My code only shows a handful of fields that I am updating, but the "ContactInfo" class provides access to many more.

  • After a long blogging hiatus, I decided to make my somewhat grand return! So here we go...

    There are times when you need to retrieve documents from using the TreeProvider.SelectNodes() that can return DataRowViews or DataRows of node information. Now, Kentico provides "DataHelper.GetDataRowViewValue()" and "DataHelper.DataRowValue()" methods to output your required fields of information. But I find these DataHelper methods quite tedious when you have a massive collection of node data. I am lazy and would do anything to make my life easier.

    So I created a DataHelperExtension class object that would allow me to get my commonly used DataRow and DataRowView fields with ease:

    • Document ID
    • Class Name
    • Node Alias Path
    • Get String Value (for custom fields)
    • Get Integer Value (for custom fields)
    • Page Menu Name
    • Node Has Children
    public static class DataHelperExtensions
    {
        /// <summary>
        /// Get the Document ID.
        /// </summary>
        /// <param name="dr"></param>
        /// <returns></returns>
        public static int DocumentId(this DataRow dr)
        {
            return int.Parse(DataHelper.GetDataRowValue(dr, "DocumentID").ToString());
        }
    
        /// <summary>
        /// Get the document Class Name.
        /// </summary>
        /// <param name="dr"></param>
        /// <returns></returns>
        public static string ClassName(this DataRow dr)
        {
            return DataHelper.GetDataRowValue(dr, "ClassName").ToString();
        }
            
        /// <summary>
        /// Get Node Alias Path.
        /// </summary>
        /// <param name="dr"></param>
        /// <param name="fullUrlPath"></param>
        /// <returns></returns>
        public static string NodeAliasPath(this DataRow dr, bool fullUrlPath = true)
        {
            if (!fullUrlPath)
                return DataHelper.GetDataRowValue(dr, "NodeAliasPath").ToString();
            else
                return DocumentURLProvider.GetUrl(DataHelper.GetDataRowValue(dr, "NodeAliasPath").ToString());
        }
    
        /// <summary>
        /// Get custom string field.
        /// </summary>
        /// <param name="dr"></param>
        /// <param name="fieldName"></param>
        /// <returns></returns>
        public static string GetStringValue(this DataRow dr, string fieldName)
        {
            if (DataHelper.GetDataRowValue(dr, fieldName) != null)
                return DataHelper.GetDataRowValue(dr, fieldName).ToString();
            else
                return String.Empty;
        }
            
        /// <summary>
        /// Get custom integer field.
        /// </summary>
        /// <param name="dr"></param>
        /// <param name="fieldName"></param>
        /// <returns></returns>
        public static int GetIntegerValue(this DataRow dr, string fieldName)
        {
            if (DataHelper.GetDataRowValue(dr, fieldName) != null)
                return int.Parse(DataHelper.GetDataRowValue(dr, fieldName).ToString());
            else
                return 0;
        }
            
        /// <summary>
        /// Get Menu Caption of a page, otherwise default to the Document Name.
        /// </summary>
        /// <param name="dr"></param>
        /// <returns></returns>
        public static string PageMenuName(this DataRow dr)
        {
            string menuCaption = DataHelper.GetDataRowValue(dr, "DocumentMenuCaption").ToString();
    
            if (String.IsNullOrEmpty(menuCaption))
                menuCaption = DataHelper.GetDataRowValue(dr, "DocumentName").ToString();
    
            return menuCaption;
        }
    
        /// <summary>
        /// Check if node has children.
        /// </summary>
        /// <param name="dr"></param>
        /// <returns></returns>
        public static bool NodeHasChildren(this DataRow dr)
        {
            return bool.Parse(DataHelper.GetDataRowValue(dr, "NodeHasChildren").ToString());
        }
    
        /// <summary>
        /// Get the Document ID.
        /// </summary>
        /// <param name="drv"></param>
        /// <returns></returns>
        public static int DocumentId(this DataRowView drv)
        {
            return int.Parse(DataHelper.GetDataRowViewValue(drv, "DocumentID").ToString());
        }
    
        /// <summary>
        /// Get the document Class Name.
        /// </summary>
        /// <param name="drv"></param>
        /// <returns></returns>
        public static string ClassName(this DataRowView drv)
        {
            return DataHelper.GetDataRowViewValue(drv, "ClassName").ToString();
        }
    
        /// <summary>
        /// Get Node Alias Path.
        /// </summary>
        /// <param name="drv"></param>
        /// <param name="fullUrlPath"></param>
        /// <returns></returns>
        public static string NodeAliasPath(this DataRowView drv, bool fullUrlPath = true)
        {
            if (!fullUrlPath)
                return DataHelper.GetDataRowViewValue(drv, "NodeAliasPath").ToString();
            else
                return DocumentURLProvider.GetUrl(DataHelper.GetDataRowViewValue(drv, "NodeAliasPath").ToString());
        }
    
        /// <summary>
        /// Get custom string field.
        /// </summary>
        /// <param name="drv"></param>
        /// <param name="fieldName"></param>
        /// <returns></returns>
        public static string GetStringValue(this DataRowView drv, string fieldName)
        {
            if (DataHelper.GetDataRowViewValue(drv, fieldName) != null)
                return DataHelper.GetDataRowViewValue(drv, fieldName).ToString();
            else
                return String.Empty;
        }
    
        /// <summary>
        /// Get custom integer field.
        /// </summary>
        /// <param name="drv"></param>
        /// <param name="fieldName"></param>
        /// <returns></returns>
        public static int GetIntegerValue(this DataRowView drv, string fieldName)
        {
            if (DataHelper.GetDataRowViewValue(drv, fieldName) != null)
                return int.Parse(DataHelper.GetDataRowViewValue(drv, fieldName).ToString());
            else
                return 0;
        }
    
        /// <summary>
        /// Get Menu Caption of a page, otherwise default to the Document Name.
        /// </summary>
        /// <param name="drv"></param>
        /// <returns></returns>
        public static string PageMenuName(this DataRowView drv)
        {
            string menuCaption = DataHelper.GetDataRowViewValue(drv, "DocumentMenuCaption").ToString();
    
            if (String.IsNullOrEmpty(menuCaption))
                menuCaption = DataHelper.GetDataRowViewValue(drv, "DocumentName").ToString();
    
            return menuCaption;
        }
    
        /// <summary>
        /// Check if node has children.
        /// </summary>
        /// <param name="drv"></param>
        /// <returns></returns>
        public static bool NodeHasChildren(this DataRowView drv)
        {
            return bool.Parse(DataHelper.GetDataRowViewValue(drv, "NodeHasChildren").ToString());
        }
    }
    

    Here's an example on how to put this DataHelperExtension class into use:

    if (!DataHelper.DataSourceIsEmpty(data))
    {
        DataView sortedData = data.Tables[0].DefaultView;
    
        foreach (DataRowView drvTestimonial in sortedData)
        {
            int docId = drvTestimonial.DocumentId(); // Get the Document ID
            string title = drvTestimonial.GetStringValue("Title"); // Custom field
    
            // Do something with the fields of data.
        }
    }
    

    Simple and effective!

  • There are many things that impress me about Kentico, especially when I compare my experiences to other CMS providers from previous walks of life. But the one thing that impresses me above all is how easy the guys at Kentico make upgrading to newer versions of their CMS platform. So I wasn't daunted when I had the job to upgrade a site from Kentico 5.5 all the way up to 8.2.

    Everything went smoothly. I was in the last leg of the upgrade process where the site had been upgraded to version 7 and was about to make the transition to 8. At this point, I started encoutering issues...

    Upgrading from version 7 to 8 alone is a very big jump and you will find that getting your site fully functional will require more effort than all the previous upgrades combined - depending on the size and complexity of your Kentico instance. Take a look at the "Upgrade Overview" section in the Kentico upgrade documentation for a list of important changes.

    I decided to list some quite important steps based upon information I have collated from issues others have experienced as well as key points covered within the Kentico Upgrade documentation. Following the points listed below resolved my upgrade issues, so it will more than likely help you too.

    1) Clear Browser Cache

    After each upgrade, remember to always clear your browser of all temporary files stored in cache and old cookies prior to logging into the Administration Area. Otherwise you will more than likely see a mish-mash of old/new graphical elements, as well as an Internal Server Error popup.

    Kentico 8 Upgrade - Internal Server Error

    2) Run The Site After Each Upgrade

    This is something I've had a tendency to forget. It is imperative that you run the site after each upgrade before moving onto the next, since Kentico requires code to be executed as well as database tasks.

    3) Update Macro Signatures

    This is an easy one. You'll probably see a bunch of Macro security errors in Kentico's Event Log post upgrade like these:

    Kentico 8 Upgrade - Macro Resolver Error

    Luckily, this is easily resolved by simply updating the macro signatures in the System > Macros > Signatures area of within the CMS Administration.

    Kentico 8 Upgrade - Sign Macros

    The system then resigns all macros. The new security signatures of all macros contain the username of your administrator account.

    4) Re-save All Page Types

    This is a strange one. For some odd reason, I experienced the same Internal Server Error popup message when logged into the CMS as described in point 1. In addition, I found when attempting to navigate directly to the website, I would get an Object not set to an instance of an object.NET error whenever a "DocumentContext.CurrentDocument" call was made.

    So I decided to randomly try something Kentico master Juraj suggested from one of his forum responses, which was to add and then remove a field from a document type. Instead, I just went to the Field section of each Page Type and clicked the "Save" button.

    I have no idea what difference this makes within the Kentico setup but this seems to do the trick.

    5) Custom Modules Created In Version 7

    If you have developed any custom modules, ensure you have marked them as "custom" before upgrading to version 8. I had numerous upgrade failures when Kentico Installation Manager was trying to upgrade the database. The error occurred in the CMS_UIElement table due to duplicated Element Resource ID's.

    You can mark your custom module as "custom" in version 7 by going to: Site Manager > Development > Modules > Your Custom Module > User Interface.

    Kentico 7 - Setting Element Is Custom

    6) Check Data & DB Versions

    After you have run an upgrade for each major version (6.0, 7.0, 8.0, 8.2), make sure you run the following SQL query against your Kentico database:

    SELECT
        KeyName, KeyValue
    FROM
        CMS_SettingsKey
    WHERE
        KeyName IN ('CMSDBVersion', 'CMSDataVersion')
    

    If both values for "CMSDBVersion" and "CMSDataVersion" are the same, you know the upgrade has successfully completed and you're on the right track. When I made my first attempt to upgrade a site from 7 to 8, I found the Data Version was 7.0 and the DB Version was 8.2. Not good.

    Useful Links

  • Published on
    -
    4 min read

    What Prismic.io Is Lacking

    WARNING! I may sound like an absolute hypocrite when the contents of this post is compared to my earlier post on first impressions of the Prismic.io platform. So here we go...

    I am starting to encounter increasingly longwinded and somewhat frustrating stumbling blocks during the development of a Prismic.io powered website due to lack of basic development related features. Fundamental features that should already be there from the start.

    I understand that Prismic.io is a new platform and is still in its infancy, but not having something simple as a time attribute to a date field is unforgivable (which I will explain later).

    The idea behind Prismic.io is to empower the developer and gives them the tools to manage the content anyway they want. Sounds great! But how can developers like myself be empowered when the tools that are provided are not up to scratch.

    So I have picked a few things lacking in the Prismic.io platform. I'll probably add some more on completion of the project I'm working on.

    1) Sorting By Date/Time

    Now you'd think if you have a date field, a time field would be not too far away. Wrong! A document only contains a date format field that shows a calendar on selection. This works for general use. But what if you have numerous articles written in a day that are displayed on a page in descending order and you wish to move an article higher up the page? There is no time field to allow for this.

    By default when using date ordering, two things happen:

    1. All documents are ordered by the date value defined in the document.
    2. If multiple documents added within a day, they are then ordered by the time it was added in Prismic.

    For me, this was a pain.

    2) Non-match predicate

    Sometimes, you want the ability to exclude documents from a query. In my case, return a list of authors except for one or two. Since Prismic.io predicate language is lacking a "not" operator I had to return a full list of authors and carry out the filtering at application level.

    In the grand scheme of things, this isn't a massive flaw. I can see this becoming an issue when you need to exclude items from a larger dataset. It would be faster to do this at Prismic level than application level.

    3) Where's the "OR" Operator?

    No really, I would like to know!

    4) No Required or Validation Fields

    It is not possible to make fields compulsory or implement any form of validation. Therefore, up to the developer to make sure suitable checks are put in place where null or incorrect values are present.

    To me, this seems a little bit backwards and you're solely relying on the editors to ensure the all data is correct and complete.

    5) WYSIWYG Editor Improvements

    As I stated in my previous post, that one of main deciding factors to why I used Prismic over Contentful was its easy to use WYSIWYG editor. I still stand by this point. It seems to offer a mish-mash of features that feel very intelligent and basic at the same time.

    The WYSIWYG functionality is based on a StructuredText field type, flexible enough to allow an amalgamation of different content, such as embedded object (from social websites), paragraphs, images, etc.

    On the surface, StructuredText is really nice to work with but then all of a sudden you encounter a key missing feature: blockquote! The only way I could get around this is by getting editors to insert custom mark up around any text for transformation into a blockquote at application level, like so:

    [BlockQuote][Hello. I would like to blockquote this text please.]
    

    This was just the start. There were other instances where further customisation had to be made to meet the editors requirements.

    I have to quote Paul Dijou here (link at bottom of post) for describing the additional changes he too had to make in a very theatrical manner:

    A writer wanted to have blockquotes: a whole paragraph should be displayed in a custom design and have an author. I had to kill him really fast and bury his body deep. Another one wanted semantic distinction between paragraphs, something like: this one should be red and this one blue just because. Thrown him into a bucket full of piranhas.

    6) Technical Support

    A platform or technology can only ever be as successful as the infrastructure present to support it. Without it, cracks will form. Currently, there is only one place you can ask a question: https://qa.prismic.io. It's definitely no StackOverflow. You really have to hope and pray for someone to answer your question promptly.

    7) Convoluted Production Workflow

    There will come a time when additional changes to a live site will be required. Whether it be modifications to a field or addition for a new document. All these changes will have to happen on the live Prismic repository. There is no development > stage > live workflow.

    It would be nice to have the ability to duplicate repositories and push new releases.

    Thankfully, someone has already raised this. I don't see this addition happening anytime soon.

    Summary

    My intention is not to give a very negative impression of the Prismic.io platform. It will most likely meet your content management needs. However, it does have its faults and unless modifications are made to some of the points raised from others in their Q&A forum and my post, I will have to question whether I use it again on a project by project basis. It's a CMS platform that just falls short of the mark.

    I recommend reading the following blog post written by Paul Dijou, describing his own experiences working with Prismic: http://platformpauldijou.fr/blog/2014/07/17/prismicio-when-happiness-met-disappointment.

    NOTE: If I have stated something that I have got completely wrong due to a lack of understanding. Let me know and I'll take everything back! :-)

  • Welcome to my new and improved website built in Kentico 8 and MVC Razor 5.

    My old site was crying for an upgrade and now seemed like a good opportunity to make quite a few modifications, such as:

    • Upgrading to Kentico 8
    • Ditch ASP.NET Web Forms for MVC Razor 5
    • Refresh the front-end (designed by yours truly!) ;-)
    • Responsive support using Bootstrap
    • Refactored all code to improve website performance and caching

    The new build has been a bit of a pet project and allowed me to put into practice everything I've learnt from over the years since my last build.

    Still work in progress and more refinements are in the pipeline.