Blog

Tagged by 'salesforce'

  • Reading and writing files from an external application to Saleforce has always resulted in giving me quite the headache... Writing to Salesforce probably exacerbates things more than reading. I will aim to detail in a separate post on how you can write a file to Salesforce.

    In this post I will demonstrate how to read a file found in the "Notes & Attachments" area of Salesforce as well as getting back all information about that file.

    The first thing we need is our attachment object, to get back all information about our file. I created one called "AttachmentInfo":

    public class AttachmentInfo
    {
        public string Id { get; set; }
        public string Name { get; set; }
        public string Description { get; set; }
        public string BodyLength { get; set; }
        public string ContentType { get; set; }
        public byte[] FileBytes { get; set; }
    }
    

    I created two methods in a class named "AttachmentInfoProvider". Both methods are pretty straight-forward and retrieve data from Salesforce using a custom GetRows() method that is part of another class object I created: ObjectDetailInfoProvider. You can get the code for this from the following blog post - Salesforce .NET API: Select/Insert/Update Methods.

    GetAttachmentsDataByParentId() Method

    /// <summary>
    /// Gets all attachments that belong to an object. For example a contact.
    /// </summary>
    /// <param name="parentId"></param>
    /// <param name="fileNameMatch"></param>
    /// <param name="orderBy"></param>
    /// <returns></returns>
    public static async Task<List<AttachmentInfo>> GetAttachmentsDataByParentId(string parentId, string fileNameMatch, string orderBy)
    {
        string cacheKey = $"GetAttachmentsByParentId|{parentId}|{fileNameMatch}";
    
        List<AttachmentInfo> attachments = CacheEngine.Get<List<AttachmentInfo>>(cacheKey);
    
        if (attachments == null)
        {
            string whereCondition = string.Empty;
    
            if (!string.IsNullOrEmpty(fileNameMatch))
                whereCondition = $"Name LIKE '%{fileNameMatch}%'";
    
            List<dynamic> attachmentObjects = await ObjectDetailInfoProvider.GetRows("Attachment", new List<string> {"Id", "Name", "Description", "Body", "BodyLength", "ContentType"}, whereCondition, orderBy);
    
            if (attachmentObjects.Any())
            {
                attachments = attachmentObjects.Select(attObj => new AttachmentInfo
                {
                    Id = attObj.Id,
                    Name = attObj.Name,
                    Description = attObj.Description,
                    BodyLength = attObj.BodyLength,
                    ContentType = attObj.ContentType
                }).ToList();
    
                // Add collection of pick list items to cache.
                CacheEngine.Add(attachments, cacheKey, 15);
            }
        }
    
        return attachments;
    }
    

    The GetAttachmentsDataByParentId() method takes in three parameters:

    • parentId: The ID that links an attachment to another object. For example, a contact.
    • fileNameMatch: The name of the file you wish to search for. For most flexibility, a wildcard search is performed.
    • orderBy: Order the returned dataset.

    If you're thinking this method alone will return the file itself, you'd be disappointed - this is where our next method GetFile() comes into play.

    GetFile() Method

    /// <summary>
    /// Gets attachment in its raw form ready for transformation to a physical file, in addition to its file attributes.
    /// </summary>
    /// <param name="attachmentId"></param>
    /// <returns></returns>
    public static async Task<AttachmentInfo> GetFile(string attachmentId)
    {
        List<dynamic> attachmentObjects = await ObjectDetailInfoProvider.GetRows("Attachment", new List<string> {"Id", "Name", "Description", "BodyLength", "ContentType"}, $"Id = '{attachmentId}'", string.Empty);
    
        if (attachmentObjects.Any())
        {
            AttachmentInfo attachInfo = new AttachmentInfo();
    
            #region Get Core File Information
    
            attachInfo.Id = attachmentObjects[0].Id;
            attachInfo.Name = attachmentObjects[0].Name;
            attachInfo.BodyLength = attachmentObjects[0].BodyLength;
            attachInfo.ContentType = attachmentObjects[0].ContentType;
    
            #endregion
    
            #region Get Attachment As Byte Array
    
            Authentication salesforceAuth = await AuthenticationResponse.Rest();
    
            HttpClient queryClient = new HttpClient();
    
            string apiUrl = $"{SalesforceConfig.PlatformUrl}/services/data/v37.0/sobjects/Attachment/{attachmentId}/Body";
    
            HttpRequestMessage request = new HttpRequestMessage(HttpMethod.Get, apiUrl);
            request.Headers.Add("Authorization", $"OAuth {salesforceAuth.AccessToken}");
            request.Headers.Accept.Add(new MediaTypeWithQualityHeaderValue("application/json"));
    
            HttpResponseMessage response = await queryClient.SendAsync(request);
    
            if (response.StatusCode == HttpStatusCode.OK)
                attachInfo.FileBytes = await response.Content.ReadAsByteArrayAsync();
    
            #endregion
    
            return attachInfo;
        }
        else
        {
            return null;
        }
    }
    

    An attachment ID is all we need to get back a file in its raw form. You will probably notice there is some similar functionality happening in this method where I am populating all fields of the AttachmentInfo object, just like the GetAttachmentsDataByParentId() method I detailed above. The only difference being is the fact this time round only a single file is returned.

    The reason behind this approach comes from a performance standpoint. I could have modified the GetAttachmentsDataByParentId() method to also return the file in its byte form. However, this didn't seem a good approach, since we could be outputting multiple files large in size. So making a separate call to focus on getting the physical file seemed like a wise approach.

    To take things one step further, you can render the attachment from Salesforce within your ASP.NET application using a Generic Handler (.ashx file):

    <%@ WebHandler Language="C#" Class="SalesforceFileHandler" %>
    
    using System;
    using System.Text;
    using System.Threading.Tasks;
    using System.Web;
    using Site.Salesforce;
    using Site.Salesforce.Models.Attachment;
    
    public class SalesforceFileHandler : HttpTaskAsyncHandler
    {
        public override async Task ProcessRequestAsync(HttpContext context)
        {
            string fileId = context.Request.QueryString["FileId"];
        
            // Check if there is a File ID in the query string.
            if (!string.IsNullOrEmpty(fileId))
            {
                AttachmentInfo attachment = await AttachmentInfoProvider.GetFile(fileId);
    
                // If attachment is returned, render to the browser window.
                if (attachment != null)
                {
                    context.Response.Buffer = true;
    
                    context.Response.AppendHeader("Content-Disposition", $"attachment; filename=\"{attachment.Name}\"");
    
                    context.Response.BinaryWrite(attachment.FileBytes);
    
                    context.Response.OutputStream.Write(attachment.FileBytes, 0, attachment.FileBytes.Length);
                    context.Response.ContentType = attachment.ContentType;
                }
                else
                {
                    context.Response.ContentType = "text/plain";
                    context.Response.Write("Invalid File");
                }
            }
            else
            {
                context.Response.ContentType = "text/plain";
                context.Response.Write("Invalid Request");
            }
    
            context.Response.Flush();
            context.Response.End();
        }
    }
    
  • To continue my ever expanding Salesforce journey in the .NET world, I am adding some more features to my "ObjectDetailInfoProvider" class that I started writing in my previous post. This time making some nice easy, re-usable CRU(D) methods... just without the delete.

    All the methods query Salesforce using Force.com Toolkit for .NET, which I have slightly adapted to allow me to easily interchange to a traditional REST approach when required.

    Get Data

    /// <summary>
    /// Gets data from an object based on specified fields and conditions.
    /// </summary>
    /// <param name="objectName"></param>
    /// <param name="fields"></param>
    /// <param name="whereCondition"></param>
    /// <param name="orderBy"></param>
    /// <param name="max"></param>
    /// <returns></returns>
    public static async Task<List<dynamic>> GetRows(string objectName, List<string> fields, string whereCondition, string orderBy = null, int max = -1)
    {
        ForceClient client = await AuthenticationResponse.ForceCom();
    
        #region Construct SQL Query
    
        StringBuilder query = new StringBuilder();
    
        query.Append("SELECT ");
    
        if (fields != null && fields.Any())
        {
            for (int c = 0; c <= fields.Count - 1; c++)
            {
                query.Append(fields[c]);
    
                query.Append(c != fields.Count - 1 ? ", " : " ");
            }
        }
        else
        {
            query.Append("* ");
        }
    
        query.Append($"FROM {objectName} ");
    
        if (!string.IsNullOrEmpty(whereCondition))
            query.Append($"WHERE {whereCondition} ");
    
        if (!string.IsNullOrEmpty(orderBy))
            query.Append($"ORDER BY {orderBy}");
    
        if (max > 0)
            query.Append($" LIMIT {max}");
    
        #endregion
    
        // Pass SQL query to Salesforce.
        QueryResult<dynamic> results = await client.QueryAsync<dynamic>(query.ToString());
    
        return results.Records;
    }
    

    Insert Row

    /// <summary>
    /// Creates a new row within an specific object.
    /// </summary>
    /// <param name="objectName"></param>
    /// <param name="fields"></param>
    /// <returns>Record ID</returns>
    public static async Task<string> InsertRow(string objectName, Dictionary<string, object> fields)
    {
        try
        {
            ForceClient client = await AuthenticationResponse.ForceCom();
    
            IDictionary<string, object> objectFields = new ExpandoObject();
    
            // Iterate through fields and populate dynamic object.
            foreach (KeyValuePair<string, object> f in fields)
                objectFields.Add(f.Key, f.Value);
    
            SuccessResponse response = await client.CreateAsync(objectName, objectFields);
    
            if (response.Success)
                return response.Id;
            else
                return string.Empty;
        }
        catch (Exception ex)
        {
            // Log error here.
    
            return string.Empty;
        }
    }
    

    Update Row

    /// <summary>
    /// Updates existing row within an specific object.
    /// </summary>
    /// <param name="recordId"></param>
    /// <param name="objectName"></param>
    /// <param name="fields"></param>
    /// <returns>Record ID</returns>
    public static async Task<string> UpdateRow(string recordId, string objectName, Dictionary<string, object> fields)
    {
        try
        {
            ForceClient client = await AuthenticationResponse.ForceCom();
    
            IDictionary<string, object> objectFields = new ExpandoObject();
    
            // Iterate through fields and populate dynamic object.
            foreach (KeyValuePair<string, object> f in fields)
                objectFields.Add(f.Key, f.Value);
    
            SuccessResponse response = await client.UpdateAsync(objectName, recordId, objectFields);
    
            if (response.Success)
                return response.Id;
            else
                return string.Empty;
        }
        catch (Exception ex)
        {
            // Log error here.
    
            return string.Empty;
        }
    }
    

    The neat thing about Insert and Update methods is that I am using an ExpandoObject, which is a dynamic data type that can represent dynamically changing data. This is a new feature in .NET 4.0. Ideal for the ultimate flexibility when it comes to parsing field name and its value. It's a very dynamic object that allows you to add properties and methods on the fly and then access them again.

    If there is any other useful functionality to add to these methods, please leave a comment.

  • I have been doing a lot of Saleforce integration lately, which has been both interesting and fun. Throughout my time working on Salesforce, I noticed that I am making very similar calls when pulling information out for consumption into my website. So I decided to make an extra effort to develop methods that would allow me to re-use commonly used functionality into a class library to make overall coding quicker.

    I am adding all my Salesforce object query related functionality to a class object called "ObjectDetailInfoProvider". This will give me enough scope to expand with additional methods as I see fit.

    To start with, I decided to deal with returning all information from both picklist and multi-select picklists fields, since I find that I constantly require the values of data due to the vast number of forms I am developing. To be extra efficient in every request, I taken the extra step to cache all returned data for a set period of time. I hate the idea of constantly hammering away at an API unless absolutely necessary.

    Before we get into it, it's worth noting that I am referencing a custom "AuthenticationResponse" class I created. You can grab the code here.

    Objects

    There are around seven class objects used purely for deserialization when receiving data from Salesforce. I'll admit I won't use all fields the API has to offer, but I normally like to have a complete fieldset to hand on the event I require further data manipulation.

    The one to highlight out of all the class objects is "ObjectFieldPicklistValue", that will store key information about the picklist values, such as Label, Value and Active state. All methods will return this object.

    public class ObjectFieldPicklistValue
    {
        [JsonProperty("active")]
        public bool Active { get; set; }
    
        [JsonProperty("defaultValue")]
        public bool DefaultValue { get; set; }
    
        [JsonProperty("label")]
        public string Label { get; set; }
    
        [JsonProperty("validFor")]
        public string ValidFor { get; set; }
    
        [JsonProperty("value")]
        public string Value { get; set; }
    }
    

    I have added all other Object Field class objects to a snippets section on my Bitbucket account.

    GetPicklistFieldItems() & GetMultiSelectPicklistFieldItems() Methods

    Both methods perform similar functions; the only difference is cache keys and lambda expression to only pull out either a picklist or multipicklist by its field name.

    /// <summary>
    /// Gets a values from a specific picklist within a Salesforce object. Items returned are cached for 15 minutes.
    /// </summary>
    /// <param name="objectApiName"></param>
    /// <param name="pickListFieldName"></param>
    /// <returns>Pick list values</returns>
    public static async Task<List<ObjectFieldPicklistValue>> GetPicklistFieldItems(string objectApiName, string pickListFieldName)
    {
        string cacheKey = $"GetPicklistFieldItems|{objectApiName}|{pickListFieldName}";
    
        List<ObjectFieldPicklistValue> pickListValues = CacheEngine.Get<List<ObjectFieldPicklistValue>>(cacheKey);
    
        if (pickListValues == null)
        {
            Authentication salesforceAuth = await AuthenticationResponse.Rest();
    
            HttpClient queryClient = new HttpClient();
    
            string apiUrl = $"{SalesforceConfig.PlatformUrl}services/data/v37.0/sobjects/{objectApiName}/describe";
    
            HttpRequestMessage request = new HttpRequestMessage(HttpMethod.Get, apiUrl);
            request.Headers.Add("Authorization", $"Bearer {salesforceAuth.AccessToken}");
            request.Headers.Accept.Add(new MediaTypeWithQualityHeaderValue("application/json"));
                    
            HttpResponseMessage response = await queryClient.SendAsync(request);
    
            string outputJson = await response.Content.ReadAsStringAsync();
    
            if (!string.IsNullOrEmpty(outputJson))
            {
                // Get all the fields information from the object.
                ObjectFieldInfo objectField = JsonConvert.DeserializeObject<ObjectFieldInfo>(outputJson);
    
                // Filter the fields to get the required picklist.
                ObjectField pickListField = objectField.Fields.FirstOrDefault(of => of.Name == pickListFieldName && of.Type == "picklist");
                        
                List<ObjectFieldPicklistValue> picklistItems = pickListField?.PicklistValues.ToList();
    
                #region Set cache
    
                pickListValues = picklistItems;
    
                // Add collection of pick list items to cache.
                CacheEngine.Add(picklistItems, cacheKey, 15);
    
                #endregion
            }
        }
    
        return pickListValues;
    }
    
    /// <summary>
    /// Gets a values from a specific multi-select picklist within a Salesforce object. Items returned are cached for 15 minutes.
    /// </summary>
    /// <param name="objectApiName"></param>
    /// <param name="pickListFieldName"></param>
    /// <returns>Pick list values</returns>
    public static async Task<List<ObjectFieldPicklistValue>> GetMultiSelectPicklistFieldItems(string objectApiName, string pickListFieldName)
    {
        string cacheKey = $"GetMultiSelectPicklistFieldItems|{objectApiName}|{pickListFieldName}";
    
        List<ObjectFieldPicklistValue> pickListValues = CacheEngine.Get<List<ObjectFieldPicklistValue>>(cacheKey);
    
        if (pickListValues == null)
        {
            Authentication salesforceAuth = await AuthenticationResponse.Rest();
    
            HttpClient queryClient = new HttpClient();
    
            string apiUrl = $"{SalesforceConfig.PlatformUrl}services/data/v37.0/sobjects/{objectApiName}/describe";
    
            HttpRequestMessage request = new HttpRequestMessage(HttpMethod.Get, apiUrl);
            request.Headers.Add("Authorization", $"Bearer {salesforceAuth.AccessToken}");
            request.Headers.Accept.Add(new MediaTypeWithQualityHeaderValue("application/json"));
    
            HttpResponseMessage response = await queryClient.SendAsync(request);
    
            string outputJson = await response.Content.ReadAsStringAsync();
    
            if (!string.IsNullOrEmpty(outputJson))
            {
                // Get all the fields information from the object.
                ObjectFieldInfo objectField = JsonConvert.DeserializeObject<ObjectFieldInfo>(outputJson);
    
                // Filter the fields to get the required picklist.
                ObjectField pickListField = objectField.Fields.FirstOrDefault(of => of.Name == pickListFieldName && of.Type == "multipicklist");
    
                List<ObjectFieldPicklistValue> picklistItems = pickListField?.PicklistValues.ToList();
    
                #region Set cache
    
                pickListValues = picklistItems;
    
                // Add collection of pick list items to cache.
                CacheEngine.Add(picklistItems, cacheKey, 15);
    
                #endregion
            }
        }
    
        return pickListValues;
    }
    
  • My custom Salesforce library that I readily use for any Salesforce integrations within my native .NET applications consists of a combination of both handwritten code as well as utilsing the functionality present within the Force.com Toolkit. Even though the Force.com Toolkit does pretty much everything you need for day to day activities like basic read and write interactions. When it comes to anything more, a custom approach is required.

    I have created a AuthenticationResponse class that contains two methods so I could easily interchange between different authentication processes depending on my needs:

    • Rest - Retrieves access token to Salesforce environment in a traditional REST approach.
    • ForceCom - Retrieves authentication details when API calls using Force.com toolkit is used.
    public class AuthenticationResponse
    {
        /// <summary>
        /// Retrieves access token to Salesforce environment in a traditional REST approach.
        /// </summary>
        /// <returns></returns>
        public static async Task<Authentication> Rest()
        {
            HttpClient authClient = new HttpClient();
                
            // Set required values to be posted.
            HttpContent content = new FormUrlEncodedContent(new Dictionary<string, string>
                    {
                        {"grant_type","password"},
                        {"client_id", SalesforceConfig.ConsumerKey},
                        {"client_secret", SalesforceConfig.ConsumerSecret},
                        {"username", SalesforceConfig.Username},
                        {"password", SalesforceConfig.LoginPassword}
                    }
            );
                
            HttpResponseMessage message = await authClient.PostAsync($"{SalesforceConfig.PlatformUrl}services/oauth2/token", content);
    
            string responseString = await message.Content.ReadAsStringAsync();
    
            JObject obj = JObject.Parse(responseString);
    
            return new Authentication
            {
                AccessToken = obj["access_token"].ToString(),
                InstanceUrl = obj["instance_url"].ToString()
            };
        }
    
        /// <summary>
        /// Retrieves authentication details when API calls using Force.com toolkit is used.
        /// </summary>
        /// <returns></returns>
        public static async Task<ForceClient> ForceCom()
        {
            ServicePointManager.SecurityProtocol = SecurityProtocolType.Tls12;
    
            AuthenticationClient auth = new AuthenticationClient();
    
            await auth.UsernamePasswordAsync(SalesforceConfig.ConsumerKey, SalesforceConfig.ConsumerSecret, SalesforceConfig.Username, SalesforceConfig.LoginPassword, $"{SalesforceConfig.PlatformUrl}services/oauth2/token");
    
            ForceClient client = new ForceClient(auth.InstanceUrl, auth.AccessToken, auth.ApiVersion);
    
            return client;
        }
    }
    

    All configuration settings such as the consumer key, consumer secret, username and password are being read from the web.config via a "SalesforceConfig" class. But these can be replaced by calling directly from your own app settings. Both methods return the access token required for querying a Salesforce platform.

  • Force.com Explorer is a really useful tool that gives you the ability to explore database tables within your Saleforce environment and run queries against them. Even though this tool has been retired since 2011, I still actively use it purely because I prefer to have an application installed on my computer, rather than the web-based tool - Workbench.

    I am writing this post for two reasons: Firstly, for Salesforce newcomers and secondly, one of my fellow developers working on the same project as me was having issues logging into Force.com Explorer. Judging by the title of this post this may sound a little self-explanatory or dim-witted. Nevertheless, it's a worthy post!

    Before I get to it, I am assuming you know the following three things:

    • How to generate a Security Token.
    • Create a Connected App.
    • Generate Client ID and Client Secret from your Connected App.

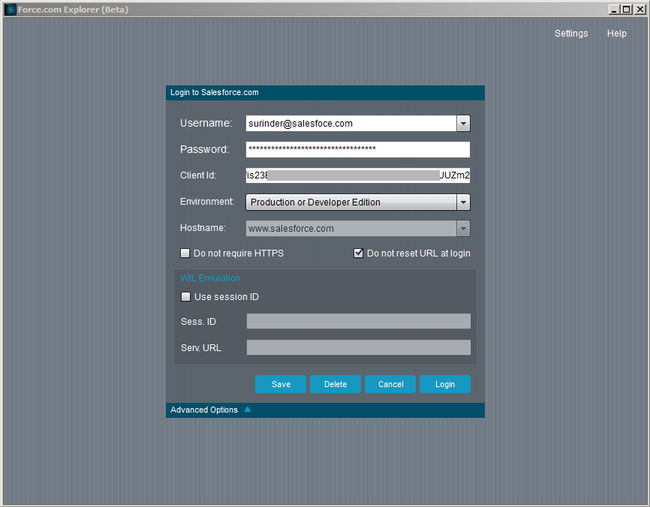
    Salesforce Force.com Explorer Login

    The easiest part of the login form is entering your login credentials and selecting the type of environment you are planning to explore. Just ensure you have a user login credentials that has sufficient access rights to explore Salesforce database objects.

    The Client ID field is a little misleading because this field doesn't just accept the Client ID key generated from your Connected App alone. It can also accept the following combination:"<Client-ID><Security-Token>". So don't make a misconception where the Client ID is only accepted.

    As you probably know (if you built apps using Salesforce API), combining the Client ID and Security Token allows you to access Salesforce data from any IP. If you whitelisted a specific IP in the Trusted IP Range at Connected App level, you might get away with using the Client ID alone.