Blog

Blogging on programming and life in general.

  • Over the Bank Holiday weekend, I had some time to kill one evening and decided to have a go at completing the Kentico Cloud exam to become a certified developer. Taking the exam is a natural progression to warrant oneself as an expert on the platform, especially as I have been using Kentico Cloud since it was first released. Time to put my experience to the test!

    Unlike traditional Kentico CMS Developer exams, the Kentico Cloud exam consists of 40 questions to complete over a duration of 40 mins. The pass rate is still the same at 70%.

    Even though I have been using Kentico Cloud for many years, I highly recommend developers to get yourself certified providing you are familiar with the interface, built a few applications already and have exposure to the API endpoint. The exam itself is platform-agnostic and you won't be tested on any language-specific knowledge.

    The surprising thing I found after completing the exam is a higher awareness of what Kentico Cloud does not only as a platform but also touched upon areas you wouldn't have necessarily been familiar with. There certainly more to Kentico Cloud than meets the eye!

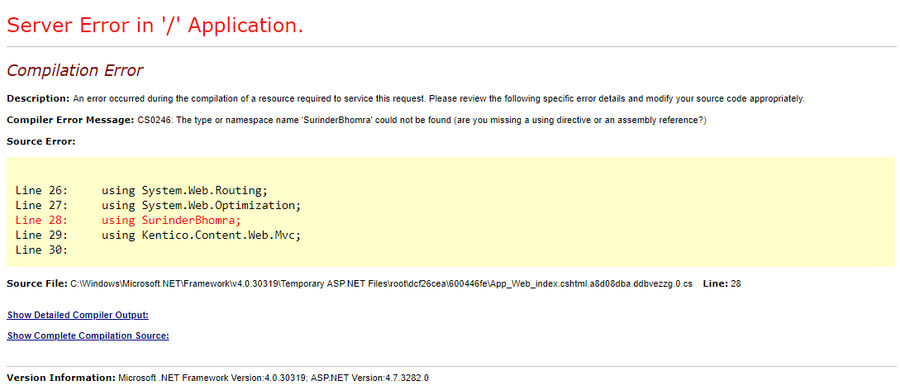
  • After renaming my MVC project from "SurinderBhomra" to "Site.Web" (to come across less self-serving) I get the following error:

    Compiler Error Message: CS0246: The type or namespace name 'xxx' could not be found (are you missing a using directive or an assembly reference?)

    CS0246 Compiler Error - Temporary ASP.NET Files

    But the misleading part of this compiler error is the source file reference to ASP.NET Temporary Files directory, which led me to believe that my build was been cached when it was actually to do with the fact I missed some areas where the old project name still remained.

    I carried out a careful rename throughout my project by updating all the places that mattered, such as:

    • Namespaces
    • Using statements
    • "AssemblyTitle" and "AssemblyProduct" attributes in AssemblyInfo.cs
    • Assembly name and Default Namespace in Project properties (followed by a rebuild)

    The key area I missed that caused the above compiler error is overlooking the the namespace section in the /Views/web.config file.

    <system.web.webpages.razor>
      <host factorytype="System.Web.Mvc.MvcWebRazorHostFactory, System.Web.Mvc, Version=5.2.3.0, Culture=neutral, PublicKeyToken=31BF3856AD364E35">
      <pages pagebasetype="System.Web.Mvc.WebViewPage">
        <namespaces>
          ...
          ...
          ...
          <add namespace="System.Web">
          ...
          ...
          ...
        </add></namespaces>
      </pages>
    </host></system.web.webpages.razor>
    

    When you first create your project in Visual Studio, it automatically adds its original namespace to this file. This also goes for any other web.config you happen to have nested in other areas inside you MVC project.

  • In light of my hosting issues over the last week, I decided it was time to take measures in ensuring all websites under my hosting provider are always backed up automatically. I generally take hosting backups offsite on an ad-hoc basis and entrust the hosting provider to keep up their end of the bargain by doing this on my behalf.

    If you are with a hosting provider (like I was previously - A2 Hosting), who talks the talk but can't actually walk the walk in regards to the service they offer, you will more than likely end up having backup woes. It's always best practice to take control of your own backups and if this can be automated, makes life so much easier!

    All Plesk panels have a "Backup Manager" area where you can action manual or scheduled backup processes. Depending on your hosting provider, the features shown in this area might be varied. Some have the option to backup straight to your Dropbox account. What we will be focusing on is remotely backing up our website data to our Synology NAS using FTP.

    Before we log into Plesk to select our Remote Backup option, we need to carry out some setup on our Synology.

    Port Forwarding for FTP and FTPS Protocols

    Most likely, your router will have a limited number of ports open to allow outside internet traffic to enter the local network. To make the most of your Synology, there is a recommended number of ports you need to open to make use of all the services.

    We are interested in opening to the following ports:

    • FTP: 21
    • FTPS: 990

    I prefer to send over any data using FTPS just for better security.

    You will have to login to your router settings to open ports. I would provide some instructions on how to do this, but every router is different. I just managed to find these settings hidden away in my own Billion router.

    Synology Setup

    Setting up FTP is pretty straight-forward. Just make sure you have administrative privileges to access the Control Panel.

    Enable FTP

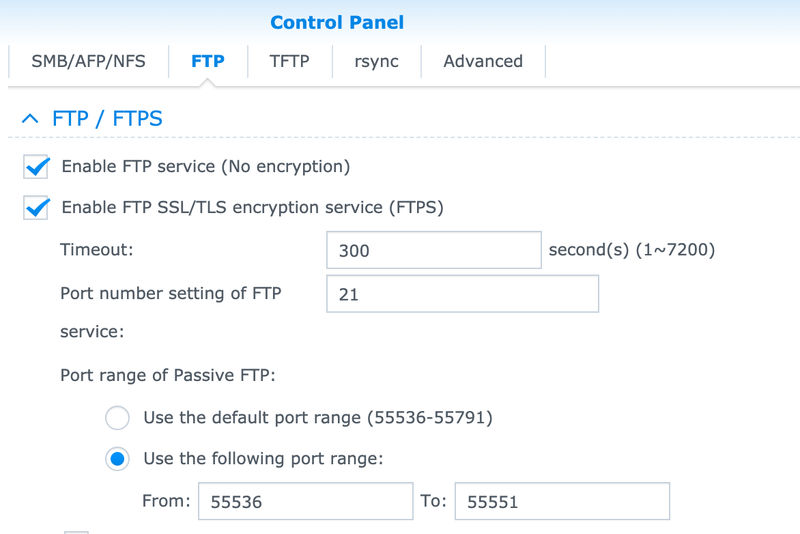
    In Control Panel, go to: File services > FTP Tab.

    All we need to do here is to enable two FTP settings:

    • Enable FTP service (no encryption)
    • Enable FTP SSL/TLS encryption (FTPS)

    Synology Control Panel - Enable FTP

    The reason why I selected the "Enable FTP service (no encryption)" option is purely for initial testing purposes. If there are any issues when making a connection via FTP from a new service for the first time, I just like to ensure if a successful connection can be made via standard FTP. After my testing is done, I would disable this option.

    Create a Synology User

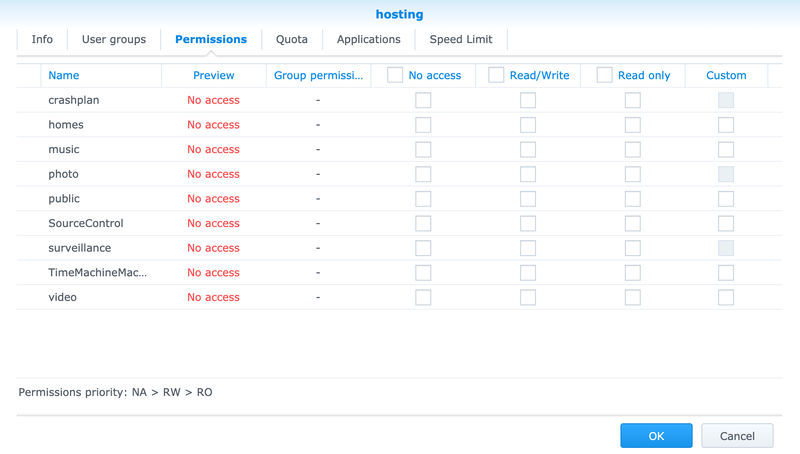
    I prefer to create a new user specifically for FTP connections rather than my main own account, as I have the ability to lock down access to only read and write permissions in its home directory. No Synology services or applications will be accessible.

    Synology FTP User Permissions

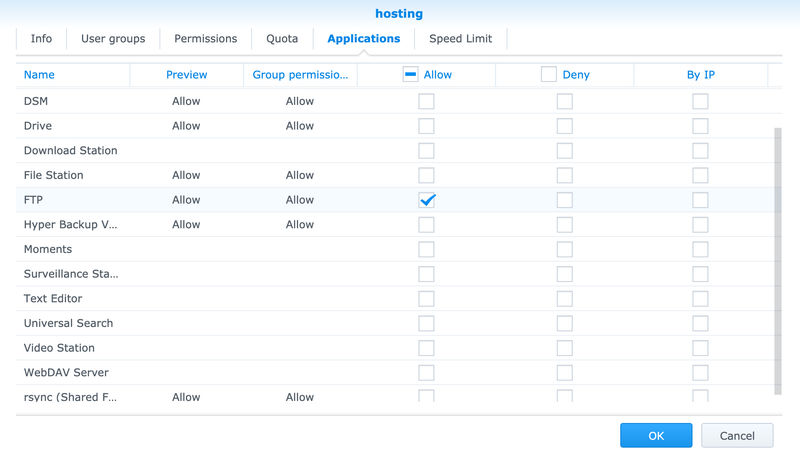
    The only application I allow my user to access is "FTP".

    Synology FTP User Application Permissions

    Plesk Backup Manager Setup

    FTP Configuration

    In Backup Manager, go to "Remote Storage Settings and select "FTP". Enter the following settings along with your user credentials:


    On clicking the "OK" or "Apply" button should return no errors. But if there are errors, check the logs and ensure you haven't missed any permissions for your Synology user.

    Set Backup Schedule

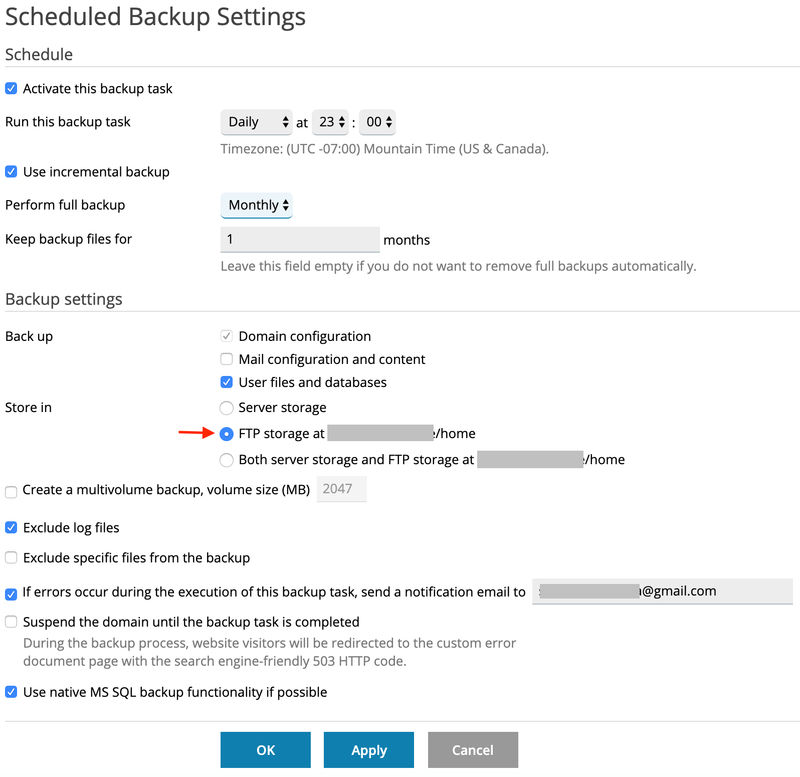
    Now we have set our remote storage settings, we now need to put a schedule in place to generate a backup on as often as we require. It's up to on how often you set the regularity of the backups. I've set mine to run daily at 11pm and retain these backups for a month.

    Plesk Scheduled Backup

    Make sure you set the Backup settings to store the backup in your newly created FTP storage.

    A Word To The Wise

    Just because we now have automatic backups running protecting us from any foreseen hosting issues, this doesn't mean we're all in the clear. Backups are useless to us if they don't work. I check my backups at least once a week and ensure the most recently backed up file is free from corruption and can be opened.

  • As great as it is building sites using the MVC framework in Kentico, I do miss some of the page features we’re spoilt with that previous editions of Kentico has to offer.

    Like anything, there are always workarounds to implement the features we have become accustomed to but ensuring the correct approach is key, especially when moving existing Kentico clients onto Kentico 12 MVC edition. Familiarity is ever so important for the longer tenure clients who already have experience using previous versions of Kentico.

    In my Syndicut Medium post, I show how to use Kentico's existing fields from the CMS_Document table to work alongside the new MVC approach.

    Take a read here: https://medium.com/syndicut/adding-navigation-properties-to-pages-in-kentico-12-mvc-8f054f804af2

  • It's been a turbulent last few days at the house of A2 Hosting where not only all their Windows hosting, but also a number of Wordpress hosting (as of 23rd April) has come to a standstill. After much pressing by its customers, it has come to light that a malware related security breach caused an outage, not only in one service, but many across A2 Hosting infrastructure.

    It's now been 3 days in counting where the outage still persists. Luckily, I managed to move back to my old hosting provider after waiting 2 days patiently for some form of recovery and I'm glad I did! I truly feel sorry for the many others who are still waiting on some form of resolution. I think I managed to get out from under A2 Hosting relatively unscathed.

    This whole outage has caused me to not only reflect on my time with A2 Hosting but also hosting providers in general.

    The Lies

    If I'm honest, the days were counting down after getting infuriated by their support (lack of!) and the lies by their marketing and sales to meet my relatively simple hosting needs. I like to think I'm very scrupulous when it comes to hosting and do my due diligence... In this case, A2 managed to get one over me in that department!

    I run a couple of sites on Kentico CMS and it was important to find a hosting company that caters for this platform due to the hardware resources required to run.

    Lo and behold...

    A2 Hosting - Best Kentico Hosting

    Judging by that page alone filled me with confidence at a reasonable price with a lot of extras thrown in. I confirmed this was the case by talking at length to the A2 sales team beforehand and was ensured any tier would meet my needs. So I opted for the mid-tier plan - Swift, costing around £125 for 2 years after some nice promotional offers.

    Knowing what I know now, I can report that the Swift plan and potentially all the other shared plans do not fit the requirements of a reasonably small Kentico site. Hosting Kentico on A2 Hosting was the bane of my life, as every so often my site would randomly timeout, with only one explanation from their support team:

    We suggest you optimize your website with help from your web developer to fix the issue.

    After politely requesting more information on the issue and also entertaining the fact I may need to up my hosting, I never really did get any adequate reason. It was always the efficiency of my website to blame.

    Don't Believe Them, Don't Trust Them

    Lack of Transparency

    In light of recent events, transparency isn't one of A2 Hostings strengths (unless when pressed upon by its many customers). When problems arise, I'd prefer to know exactly what is the root cause. Knowing this actually puts more confidence in a hosting provider. I think we all know the feeling when we're not given the full picture.

    Our minds have a habit of thinking of a worst-case scenario when we do not have the full picture.

    Honesty is the best policy!
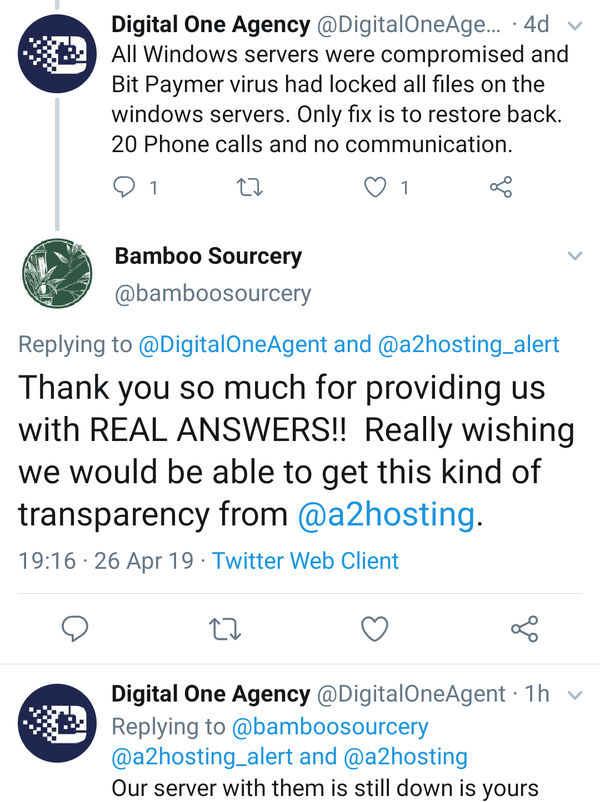
    A2 Hosting Tweet - Transparency
    (Example of A2 Hosting Lack of Transparency)

    99.9% Uptime Promise

    In reality, I don't expect 99.9% uptime from hosting providers as things do happen due to unforeseen circumstances. But I still expect the 98-99% range.

    A2 Hosting - 99.9%25 Uptime

    Judging by my uptime monitoring, I have never been blessed with 99.9% uptime during my tenure (1 out of 2-year plan) at A2 Hosting. My site has always encountered timeouts and downtime. The last major outage was around 2 months ago -  amounting up to 24 hours downtime!

    Trusting Your Hosting Provider

    If your website is big or small, handing over your online presence to a third-party is a big deal. You are whole-heartedly trusting a company to house your website with tender loving care. Any downtime and slow loading times can negatively impact your client base and SEO.

    I've learnt that a hosting provider could have many 5 star reviews and still lack the infrastructure and support to back it up. In fact, this is what perplexed me about A2 Hostings many positive reviews.

    Finding quality and appropriately priced hosting is very difficult to find. There are so many options, but the hosting industry has the classic issue of quantity over quality.

    Backups

    Regardless of how good any hosting company is, I would always recommend you take suitable measures to regularly carry out offsite backups on all your sites. Yes, this can be a laborious task if you are managing many sites, but its the only way to 100% sure you can be in control.

    This was the only way I was able to move swiftly back to SoftSys Hosting and not wait on A2 Hosting to restore their services. At one point, there was a question mark over the current state of A2 Hosting's backups are in.

    Tweet - A2 Hosting Backup
    (A2 Hosting Questionable Backups)

    Moving Back To Previous Hosting

    Believe or not, I can't remember the exact reason why I left Softsys Hosting. After all, I never had any issues with them throughout the 9 years I was with them. Very accommodating bunch of guys! I think what attracted me to A2 Hosting was their shiny website, the promise of faster load times and the option to have my site hosted on UK servers.

    It's always an absolute pain having to move and set everything back up again. But thanks to Ruchir at Softsys Hosting who was very attentive in helping me during my predicament and answering all my queries, managed to assist in achieving a quick turnaround. So in total, my site was only down for just under 2 days.

    It seems quite apt that I come back to the hosting provider I call home under the same reasons to why I started using them in the first place back in 2009 when I was failed by my first ever hosting provider (Ultima Hosts). Oh, the irony!

    Conclusion

    Unfortunately, there isn't an exact science to finding the most ideal hosting provider for your budget and requirements. If you ever have any qualms regarding your current hosting provider, you might have good reason to be. Hosting should be worry and hassle free, knowing that your data is in the hands of capable people. If you have the finances to move, just do it. Hardware can be replaced, data can not. Data is a commodity!

    Take online reviews with a pinch of salt. Instead, take a look at the existing users responses through their main Twitter and status accounts. Some might even have status pages. This will hopefully give you a more unbiased view on their operation and approach to resolving past issues.


    Update - 26/04/2019

    I have asked A2 Hosting for some form of compensation, especially since I purchased 2 years up front. Awaiting their response to the exact amount. I am hoping they will add some additional compensation as a goodwill gesture for misleading on their Kentico host offering.

    Update - 27/04/2019

    As of 27/04/2019 8pm (GMT), I managed to log back into A2 Hosting Plesk Administration to get a more recent backup of my hosting. Noticed there were some database errors in the process.

    Update - 01/05/2019

    Not looking good. I think there is a very slim chance in getting any form of reimbursement from A2 Hosting as they have decided to delete my support ticket. Not "close", but actually delete. I thought this was probably a mistake and after delving into the mass of responses from many other unhappy users, it seems I am not the only one.
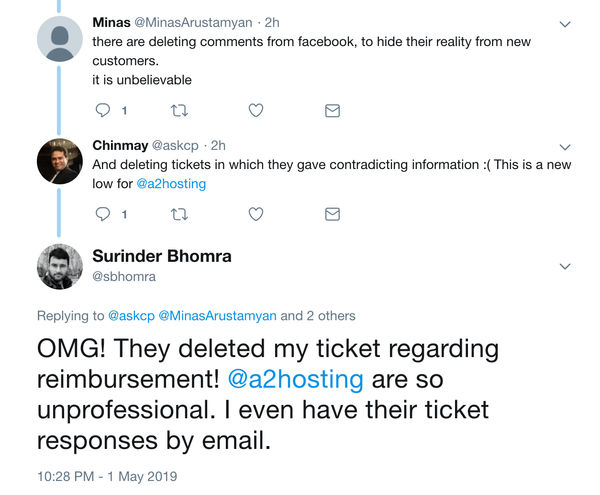
    Tweet - A2 Hosting Deleting Tickets

    One can only assume that A2 Hosting are wiping their hands of any form of user correspondence. There hasn't been any further considerable updates or timescales to when services will resume. I am still awaiting for the ability to carry out a proper backup.

  • A picture tag allows us to serve different sized images based on different viewport breakpoints or pixel-ratios, resulting in better page load performance. Google's Pagespeed Insights negatively scores your site if responsive images aren't used. Pretty much all modern browsers support this markup and on the off chance it doesn't, an image fallback can be set.

    Using the picture markup inside page templates is pretty straight-forward, but when it comes to CMS related content where HTML editors only accommodate image tags, it's really difficult to get someone like a client to add this form of markup. So the only workaround is to transform any image tag into a picture tag at code-level.

    Code: ConvertImageToPictureTag Extension Method

    The ConvertImageToPictureTag method will perform the following tasks:

    1. Loop through all image tags.
    2. Get the URL of the image from the "src" attribute.
    3. Get other attributes such as "alt" and "style".
    4. Generate picture markup and add as many source elements based on the viewport breakpoints required, apply the URL of the image, style and alt text.
    5. Replace the original image tag with the new picture tag.

    The ConvertImageToPictureTag code uses HtmlAgilityPack, making it very easy to loop through all HTML nodes and manipulate the markup. In addition, this implementation relies on a lightweight client-side JavaScript plugin - lazysizes. The lazysizes plugin will delay the loading of the higher resolution image based on the viewport rules in the picture tag until the image is scrolled into view.

    using HtmlAgilityPack;
    using Site.Common.Kentico;
    using System;
    using System.Collections.Generic;
    using System.Collections.Specialized;
    using System.Linq;
    using System.Text;
    using System.Web;
    
    namespace SurinderBhomra.Common.Extensions
    {
        public static class ContentManipulatorExtensions
        {
            /// <summary>
            /// Transforms all image tags to a picture tag inside parsed HTML.
            /// All source image URL's need to contain a "width" query parameter in order to have a resize starting point.
            /// </summary>
            /// <param name="content"></param>
            /// <param name="percentageReduction"></param>
            /// <param name="minimumWidth">The minimum width an image has to be to warrant resizing.</param>
            /// <param name="viewPorts"></param>
            /// <returns></returns>
            public static string ConvertImageToPictureTag(this string content, int percentageReduction = 10, int minimumWidth = 200, params int[] viewPorts)
            {
                if (viewPorts?.Length == 0)
                    throw new Exception("Viewport parameter is required.");
    
                if (!string.IsNullOrEmpty(content))
                {
                    //Create a new document parser object.
                    HtmlDocument document = new HtmlDocument();
    
                    //Load the content.
                    document.LoadHtml(content);
    
                    //Get all image tags.
                    List<HtmlNode> imageNodes = document.DocumentNode.Descendants("img").ToList();
                    
                    if (imageNodes.Any())
                    {
                        // Loop through all image tags.
                        foreach (HtmlNode imgNode in imageNodes)
                        {
                            // Make sure there is an image source and it is not externally linked.
                            if (imgNode.Attributes.Contains("src") && !imgNode.Attributes["src"].Value.StartsWith("http", StringComparison.Ordinal))
                            {
                                #region Image Attributes - src, class, alt, style
                                
                                string imageSrc = imgNode.Attributes["src"].Value.Replace("~", string.Empty);
                                string imageClass = imgNode.Attributes.Contains("class") ? imgNode.Attributes["class"].Value : string.Empty;
                                string imageAlt = imgNode.Attributes.Contains("alt") ? imgNode.Attributes["alt"].Value : string.Empty;
                                string imageStyle = imgNode.Attributes.Contains("style") ? imgNode.Attributes["style"].Value : string.Empty;
    
                                #endregion
    
                                #region If Image Source has a width query parameter, this will be used as the starting size to reduce images
    
                                int imageWidth = 0;
    
                                UriBuilder imageSrcUri = new UriBuilder($"http://www.surinderbhomra.com{imageSrc}");
                                NameValueCollection imageSrcQueryParams = HttpUtility.ParseQueryString(imageSrcUri.Query);
    
                                if (imageSrcQueryParams?.Count > 0 && !string.IsNullOrEmpty(imageSrcQueryParams["width"]))
                                    imageWidth = int.Parse(imageSrcQueryParams["width"]);
    
                                // If there is no width parameter, then we cannot resize this image.
                                // Might be an older non-responsive image link.
                                if (imageWidth == 0 || imageWidth <= minimumWidth)
                                    continue;
    
                                // Clear the query string from image source.
                                imageSrc = imageSrc.ClearQueryStrings();
    
                                #endregion
    
                                // Create picture tag.
                                HtmlNode pictureNode = document.CreateElement("picture");
    
                                if (!string.IsNullOrEmpty(imageStyle))
                                    pictureNode.Attributes.Add("style", imageStyle);
    
                                #region Add multiple source tags
    
                                StringBuilder sourceHtml = new StringBuilder();
    
                                int newImageWidth = imageWidth;
                                for (int vp = 0; vp < viewPorts.Length; vp++)
                                {
                                    int viewPort = viewPorts[vp];
    
                                    // We do not not want to apply the percentage reduction to the first viewport size.
                                    // The first image should always be the original size.
                                    if (vp != 0)
                                        newImageWidth = newImageWidth - (newImageWidth * percentageReduction / 100);
    
                                    sourceHtml.Append($"<source srcset=\"{imageSrc}?width={newImageWidth}\" data-srcset=\"{imageSrc}?width={newImageWidth}\" media=\"(min-width: {viewPort}px)\">");
                                }
    
                                // Add fallback image.
                                sourceHtml.Append($"<img src=\"{imageSrc}?width=50\" style=\"width: {imageWidth}px\" class=\"{imageClass} lazyload\" alt=\"{imageAlt}\" />");
    
                                pictureNode.InnerHtml = sourceHtml.ToString();
    
                                #endregion
    
                                // Replace the image node with the new picture node.
                                imgNode.ParentNode.ReplaceChild(pictureNode, imgNode);
                            }
                        }
    
                        return document.DocumentNode.OuterHtml;
                    }
                }
    
                return content;
            }
        }
    }
    

    To use this extension, add this to any string containing HTML markup, as so:

    // The HTML markup will generate responsive images using based on the following parameters:
    // - Images to be resized in 10% increments.
    // - Images have to be more than 200px wide.
    // - Viewport sizes to take into consideration: 1000, 768, 300.
    string contentWithResponsiveImages = myHtmlContent.ConvertImageToPictureTag(10, 200, 1000, 768, 300);
    

    Sidenote

    The code I've shown doesn't carry out any image resizing, you will need to integrate that yourself. Generally, any good content management platform will have the capability to serve responsive images. In my case, I use Kentico and can resize images by adding a "width" and/or "height" query parameter to the image URL.

    In addition, all image URL's used inside an image tags "src" attribute requires a width query string parameter. The value of the width parameter will be the size the image in its largest form. Depending on the type of platform used, the URL structure to render image sizes might be different. This will be the only place where the code will need to be retrofitted to adapt to your own use case.

  • The title of this post might seem a tad extreme, but I just feel so strongly about it! Ever since I started learning ASP.NET those many years ago, I've never been a fan of using "Eval" in data-bound controls I primarily use, such as GridViews, Repeaters and DataList. When I see it still being used regularly in web applications I cringe a little and I feel I need to express some reasons to why it should stop being used.

    I think working on an application handed down to me from an external development agency pushed me to write this post... Let's call it a form of therapy! I won't make this post a rant and will "try" to be constructive and concise. My views might come across a little one-sided, but I promise I will start with at least one good thing to say about our evil friend Eval.

    Postive: Quick To Render Simple Data

    If the end goal is to list out some string values as is from the database with some minor manipulation from a relatively small dataset, I almost have no problem with that, even though I still believe it can be used and abused by inexperienced developers.

    Negative: Debugging


    The main disadvantage of embedding code inside your design file (.aspx or .ascx) is that it's not very easy to view the output during debugging. This causes a further headache when your Eval contains some conditional statements to alter the output on a row-by-row basis.

    Negative: Difficult To Carry Out Complex HTML Changes

    I wouldn't recommend using Eval in scenario's where databound rows require some form of HTML change. I've seen some ugly implementations where complex conditional statements were used to list out data in a creative way. If the HTML ever had to be changed through design updates, it would be a lot more time consuming to carry when compared to moving around some form controls that are databound through a RowDataBound event.

    Negative: Ugly To Look At

    This point will come across very superficial. Nevertheless, what I find painful to look at is when Eval is still used to carry out more functionality by calling additional methods and potentially repeating the same functionality numerous times.

    Performance/Efficiency

    From my research, it's not clear if there specifically is a performance impact in using Eval alone, especially with the advances in the .NET framework over the years. A post from 2012 on StackExchange brought up a very good point:

    Eval uses reflection to get the value of the relevant property/field, and using Reflection to get values from object members is very slow.

    If the type of an object can be determined at runtime, you're better off explicitly declaring this. After all, it's good coding standards. In the real world, the performance impact is nominal depending on the number of records you are dealing with. Not recommended for building scalable applications. I generally notice a slow down (in milliseconds) when outputting 500 rows of data.

    I have read that reflection is not as much of an issue in the most recent versions of the .NET framework when compared to say, .NET 1.1. But I am unable to find any concrete evidence of this. Regardless, I'd always prefer to use the faster approach, even if I am happening to shave off a few milliseconds in the process.

    Conclusion

    Just don't use Eval. Regardless of the size of the dataset I am dealing with, there would only be two approaches I'd ever use:

    1. RowDataBoundEvent: A controls RowDataBoundEvent event is triggered every time a row is databound with data. This approach enables us to modify the rows appearance and structure in a specific way depending on the type of rules we have in place.
    2. Start From Scratch: Construct the HTML markup by hand based on the datasource and render to the page.

    If I were to be building a scalable application dealing with thousands of rows of data, I am generally inclined to go for option 2. As you're not relying on a .NET control, you won't be contributing to the page viewstate.

    Even though I have been working on a lot more applications using MVC where I have more control on streamlining the page output, I still have to dabble with Web Forms. I feel with Web Forms, it's very easy to make a page that performs really bad, which makes it even more important to ensure you are taking all necessary steps to ensure efficiency.

  • Being a web developer I am trying to become savvier when it comes to factoring additional SEO practices, which is generally considered (in my view) compulsory.

    Ever since Google updated its Search Console (formally known as Webmaster Tools), it has opened my eyes to how my site is performing in greater detail, especially the pages Google deems as links not worthy for indexing. I started becoming more aware of this last August, when I wrote a post about attempting to reduce the number "Crawled - Currently not indexed" pages of my site. Through trial and error managed to find a way to reduce the excluded number of page links.

    The area I have now become fixated on is the sheer number of pages being classed as "Duplicate without user-selected canonical". Google describes these pages as:

    This page has duplicates, none of which is marked canonical. We think this page is not the canonical one. You should explicitly mark the canonical for this page. Inspecting this URL should show the Google-selected canonical URL.

    In simplistic terms, Google has detected there are pages that can be accessed by different URL's with either same or similar content. In my case, this is the result of many years of unintentional neglect whilst migrating my site through different platforms and URL structures during the infancy of my online presence.

    Google Search Console has marked around 240 links as duplicates due to the following two reasons:

    1. Pages can be accessed with or without a ".aspx" extension.
    2. Paginated content.

    I was surprised to see paginated content was classed as duplicate content, as I was always under the impression that this would never be the case. After all, the listed content is different and I have ensured that the page titles are different for when content is filtered by either category or tag. However, if a site consists of duplicate or similar content, it is considered a negative in the eyes of a search engine.

    Two weeks ago I added canonical tagging across my site, as I was intrigued to see if there would be any considerable change towards how Google crawls my site. Would it make my site easier to crawl and aid Google in understanding the page structure?

    Surprising Outcome

    I think I was quite naive about how my Search Console Coverage statistics would shift post cononicalisation. I was just expecting the number of pages classed as "Duplicate without user-selected canonical" to decrease, which was the case. I wasn't expecting anything more. On further investigation, it was interesting to see an overall positive change across all other coverage areas.

    Here's the full breakdown:

    • Duplicate without user-selected canonical: Reduced by 10 pages
    • Crawled - Currently not indexed: Reduced by 65 pages
    • Crawl anomaly: Reduced by 20 pages
    • Valid : Increased by 60 pages

    The change in figures may not look that impressive, but we have to remember this report is based only on two weeks after implementing canonical tags. All positives so far and I'm expecting to see further improvements over the coming weeks.

    Conclusion

    Canonical markup can often be overlooked, both in its implementation and importance when it comes to SEO. After all, I still see sites that don't use them as the emphasis is placed on other areas that require more effort to ensure it meets Google's search criteria, such as building for mobile, structured data and performance. So it's understandable why canonical tags could be missed.

    If you are in a similar position to me, where you are adding canonical markup to an existing site, it's really important to spend the time to set the original source page URL correctly the first time as the incorrect implementation can lead to issues.

    Even though my Search Console stats have improved, the jury's still out to whether this translates to better site visibility across search engines. But anything that helps search engines and visitors understand your content source can only be beneficial.

  • My day to day version control system is Bitbucket. I never got on with their own Git GUI offering - Sourcetree. I always found using TortoiseGit much more intuitive to use and a flexible way to interact with my git repository. If anyone can change my opinion on this, I am all ears!

    I work with large projects that are around a couple hundred megabytes in size and if I were to clone the same project over different branches, it can use up quite a bit of hard disk space. I like to quickly switch to my master branch after carrying out a merge for testing before carrying out a release.

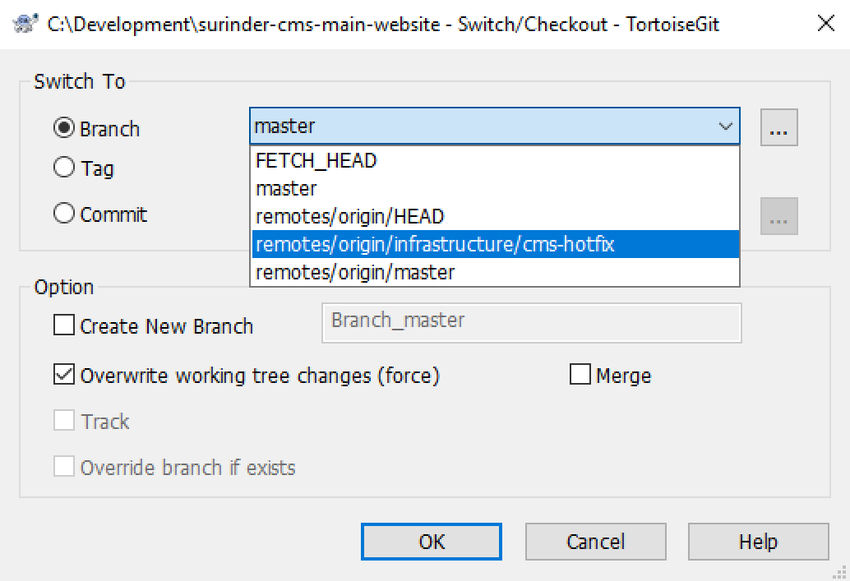
    Luckily TortoiseGit makes switching branches a cinch in just a few clicks:

    • Right-click in your repository
    • Go to TortoiseGit context menu
    • Click Switch/Checkout
    • Select the branch you wish to switch to and select "Overwrite working tree changes (force)"

    TortoiseGit Switch Branches

    Selecting the "Overwrite working tree changes (force)" tick box is important to ensure all files in your working directory is overwritten with the files directly from your branch. We do not want remnants of files left from the branch we had previously switched from kicking around.

  • Regardless of any site you have worked on, there is always a potential problem of a page rendering broken images. This is more likely to happen when images are served from external sources or through accidental deletion within content management platforms.

    The only way I found a way to deal with this issue, is to provide a fallback alternative if the image to be served cannot be found. I've created a FallbackImage() extension method that can be applied to any string variable that contains a path to an image.

    public static class ImageExtensions
    {
        /// <summary>
        /// Creates a fallback image if the image requested does not exist.
        /// </summary>
        /// <param name="imageUrl"></param>
        /// <returns></returns>
        public static string FallbackImage(this string imageUrl)
        {
            string cachedImagePath = CacheEngine.Get<string>(imageUrl);
    
            if (string.IsNullOrEmpty(cachedImagePath))
            {
                string sanitiseImageUrl = string.Empty;
    
                if (!imageUrl.IsExternalLink())
                    sanitiseImageUrl = $"{HttpContext.Current.GetCurrentDomain()}{imageUrl.Replace("~", string.Empty)}";
    
                // Attempt to request the image.
                WebRequest request = WebRequest.Create(sanitiseImageUrl);
    
                try
                {
                    WebResponse response = request.GetResponse();
                    cachedImagePath = imageUrl;
                }
                catch (Exception ex)
                {
                    cachedImagePath = "/resources/images/placeholder.jpg";
                }
    
                // Add image path to cache.
                CacheEngine.Add(cachedImagePath, imageUrl, 5);
            }
    
            return cachedImagePath;
        }
    }
    

    To ensure optimum performance to minimise any unnecessary checks for the same image, the request is stored in cache for 5 minutes.

    The method is using some functionality that I have developed within my own website, which will only work when referenced in your own codebase:

    • GetCurrentDomain - get the full URL of the current domain including any protocols and ports.
    • CacheEngine - provides a bunch of helper methods to interact with .NET cache provider easily.