Blog

Tagged by 'google'

  • I've had a Spotify music membership for as long as I can remember. Many other subscriptions held throughout my life have come and gone, but Spotify has stood the test of time.

    A seed of doubt was planted when Spotify began raising the prices of their plans multiple times over a short period of time, beginning in April 2021. Even then, I was relatively unconcerned; it was annoying, but I felt content knowing there were no better music providers that could compete with what Spotify provided. Spotify made music very accessible to me in every way.

    During the first price hike, I trialled Apple Music during a brief period of insanity only to quickly come running back to the safety of Spotify.

    The penny dropped in May 2024, during the third price hike, when I began to question whether my Spotify usage was worth paying £11.99 per month. Even though I listen to music, I occasionally go through periods where I only listen to podcasts, which are freely available online and podcasting platforms.

    First Steps To Considering YouTube Music As A Viable Replacement

    Before making any hasty decisions, I audited all subscriptions both my wife and I use to if there is any possibility of making cost savings... Just like a Conservative party government imposing austerity measures, except my actions wouldn't lead to a Liz Truss level economic crises.

    It wasn't until I discovered my wife's YouTube Premium subscription, which she had purchased through the Apple App Store for an absurdly high price. A word to the wise: Never buy subscriptions through Apple's App Store because Apple charges a commission on top. My wife was paying around £18 per month compared to £12.99 if purchased directly from the YouTube website.

    I digress...

    This was enough to get me thinking about upgrading to the Family tier that included:

    • Ad-free videos
    • Offline downloads
    • YouTube Music
    • Add up to 5 members to the subscription

    All this costing £19.99 per month. At this price, we would be making savings if we moved away from our individual YouTube and Spotify plans. I was already sold on ad-free videos (those advertisements are so annoying!) and if I could be persuaded to subscribe to YouTube Music, this would end up being a very cost-effective option.

    The writing was on the wall. My Spotify days were numbered. I looked into what was involved (if possible) in migrating all my playlists over to YouTube Music.

    Requirements and Initial Thoughts of YouTube Music

    Prior to carrying out any form of migration, I opted for a 30 day free trial of YouTube Music as I wanted to see if it met as many key requirements as possible.

    Requirement Requirement Met?
    Availability of all songs from artists I listen to including the obscure ones Yes
    Podcasts Big yes
    Native MacOS app Room for improvement
    Ability to cast music to my speakers on my network Yes
    Quality new music suggestions Yes

    Overall, YouTube Music met majority of my requirements. As expected, it does take a little while to familiarise one self with the interface but there are similarities when compared with Spotify.

    YouTube Music - The Extension of YouTube

    YouTube Music is really an extension of YouTube in how it is able to pull in specific YouTube content, whether that is music videos, podcasts or shows. All the audio related content in video form you would normally view in YouTube is encompassed here. In most cases, this is seen as an advantage, however the only aspect where the lines between music and video get blurred is in the auto-generated "Liked music" playlist.

    You may find the "Liked music" playlist is already prefilled with videos you have liked on YouTube. If YouTube Music deems a liked video as music, it will also be shown here, which isn't necessarily accurate. For example, it automatically listed a Breaking Bad Parody video I liked from 9 years ago. If you prefer your randomly liked videos to stay in solely in YouTube, you have to manually disable the "Show your liked music from YouTube" feature in the settings.

    The Music Catalog and New Music Recommendations

    The music catalog size is on par with Spotify and there hasn't been a time where a track wasn't available. In fact, there were 3-4 tracks in my Spotify playlist that was no longer accessible, but this was not the case on YouTube Music, which was a surprise.

    During times when I am in the search for new music, I found the recommendation algorithm far better than Spotify and after a couple weeks of using YouTube Music I was compiled some really good personalised mixes - something that will get even better in time. Due to its link with YouTube, I was recommended even more options of live performances, remixes and cover tracks.

    What surprised me the most is the a feature I didn't even think I needed: The Offline Mixtape. There are times when I don't actually know what tracks I want to listen to when on the road and the Offline Mixtape compiles a list of tracks consisting of a combination of my liked songs and similar tracks for added variation. All automatically synchronised to my devices.

    Podcasts

    From the podcasts I listen to on Spotify I didn't have any issues in finding on YouTube Music. There is an added benefit of playing a podcast as audio or video (if the podcast offers this format), which is a nice touch. I was also recommended new types of podcasts that I would have never been exposed to based on what I listen to. I am sure (and correct me if I am wrong) Spotify didn't make recommendations as visible as what I am seeing in YouTube Music where podcasts are categorised. For example, the categories offered to me are: Wealth, Finances, Health, Mysteries, etc

    Lack of Native Desktop App

    The lack of a native desktop app detracts from my otherwise glowing review of YouTube Music. I was surprised to find that there isn't one, given that this is the norm among other music providers.

    Even though Chrome allows you to download it as a Progressive Web App, it's better than nothing. It just doesn't seem integrated enough. I keep accidentally closing the YouTube Music app on my MacOS by clicking the "close" button when all I want to do is hide the window.

    It can also be laggy at times, especially when Chromecasting to a smart speaker. When I change tracks, my speaker takes a few seconds to catch up.

    Overall, it's good but not great. Does not have the same polish as the Spotify app. But it's definitely manageable. The lack of a native desktop app has not dissuaded me from using it. If needed, I can always use the YouTube Music app on my Pixel or iPad.

    The Migration

    After a satisfactory trial period using YouTube Music, I looked for ways to move all my Spotify playlists. There are many options through online services and software that can aid the migration process, which can be used for free (sometimes with limitations) or at a cost.

    After carrying out some research on the various options available to me, I opted for a free CLI tool built in Python: spotify_to_ytmusic. It has received a lot of good reviews from a Reddit post and received positive feedback where users were able to migrate thousands of their songs spanning multiple playlists with ease. The only disadvantage with free options that provide unlimited migration is that they aren't necessarily straight-forward for the average user and some technical acumen is required.

    The installation, setup and familiarising yourself with the CLI commands to use the spotify_to_ytmusic application is the only part that takes some time. But once you have generated API Keys in both Spotify and Google, followed the instructions as detailed in the Github repo, the migration process itself doesn't take long at all.

    Conclusion

    When I told one of my coworkers that I had switched to YouTube Music, I received a sceptical look and a response to confirm I am of sane mind. This exemplifies how we have simply accepted Spotify as the only acceptable music platform, blinded to alternatives.

    YouTube Premium, which includes YouTube Music in one package, is an extremely good deal. Not only can you watch YouTube videos ad-free, but you also get a music library comparable to Spotify at a similar price.

    If you have been questioning whether YouTube Music is worth a try. Question no more and make the move.

  • The Google Maps Distance Matrix API gives us the capability to calculate travel distance and time between multiple locations across different modes of transportation, such as driving walking, or cycling. This is just one of the many other APIs Google provides to allow us to get the most out of location and route related data.

    I needed to use the Google Distance Matrix API (GDMA) to calculate the distance of multiple points of interests (destinations) from one single origin. The dataset of destinations consisted of sixty to one-hundred rows of data containing the following:

    • Title
    • Latitude
    • Longitude

    This dataset would need to be parsed to the GDMA as destinations in order get the information on how far each item was away from the origin. One thing came to light during integration was that the API is limited to only outputting 25 items of distance data per request.

    The limit posed by the GDMA would be fine for the majority of use-cases, but in my case this posed a small problem as I needed to parse the whole dataset of destinations to ensure all points of interests were ordered by the shortest distance.

    The only way I could get around the limits posed by the GDMA was to batch my requests 25 destinations at a time. The dataset of data I would be parsing would never exceed 100 items, so I was fairly confident this would be an adequate approach. However, I cannot be 100% certain what the implications of such an approach would be if you were dealing with thousands of destinations.

    The code below demonstrates a small sample-set of destination data that will be used to calculate distance from a single origin.

    /*
    	Initialise the application functionality.
    */
    const initialise = () => {
    	const destinationData = [
                        {
                          title: "Wimbledon",
                          lat: 51.4273717,
                          long: -0.2444923,
                        },
                        {
                          title: "Westfields Shopping Centre",
                          lat: 51.5067724,
                          long: -0.2289425,
                        },
                        {
                          title: "Sky Garden",
                          lat: 51.3586154,
                          long: -0.9027887,
                        }
                      ];
                      
    	getDistanceFromOrigin("51.7504091", "-1.2888729", destinationData);
    }
    
    /*
    	Processes a list of destinations and outputs distances closest to the origin.
    */
    const getDistanceFromOrigin = (originLat, originLong, destinationData) => {
      const usersMarker = new google.maps.LatLng(originLat, originLong);
      let distanceInfo = [];
      
      if (destinationData.length > 0) {
      	// Segregate dealer locations into batches.
        const destinationBatches = chunkArray(destinationData, 25);
    
        // Make a call to Google Maps in batches.
        const googleMapsRequestPromises = destinationBatches.map(batch => googleMapsDistanceMatrixRequest(usersMarker, batch));
    
        // Iterate through all the aynchronous promises returned by Google Maps batch requests.
        Promise.all(googleMapsRequestPromises).then(responses => {
          const elements = responses.flatMap(item => item.rows).flatMap(item => item.elements);
    
          // Set the distance for each dealer in the dealers data
          elements.map(({ distance, status }, index) => {
            if (status === "OK") {
              destinationData[index].distance = distance.text;
              destinationData[index].distance_value = distance.value;
            }
          });
          
          renderTabularData(destinationData.sort((a, b) => (a.distance_value > b.distance_value ? 1 : -1)));
        })
        .catch(error => {
          console.error("Error calculating distances:", error);
        });
      }
    }
    
    /*
    	Outputs tabular data of distances.
    */
    renderTabularData = (destinationData) => {
    	let tableHtml = "";
      
        tableHtml = `<table>
                        <tr>
                            <th>No.</th>
                            <th>Destination Name</th>
                            <th>Distance</th>
                        </tr>`;
    
    	if (destinationData.length === 0) {
            tableHtml += `<tr colspan="2">
                            <td>No data</td>
                        </tr>`;
      }
      else {
            destinationData.map((item, index) => {
      		        tableHtml += `<tr>
                                    <td>${index+1}</td>
                                    <td>${item.title}</td>
                                    <td>${item.distance}</td>
                                </tr>`;
                });
      }
      
      tableHtml += `</table>`;
      
      document.getElementById("js-destinations").innerHTML = tableHtml;
    }
    
    /*
    	Queries Google API Distance Matrix to get distance information.
    */
    const googleMapsDistanceMatrixRequest = (usersMarker, destinationBatch) => {
      const distanceService = new google.maps.DistanceMatrixService();
      let destinationsLatLong = [];
      
      if (destinationBatch.length === 0) {
      	return;
      }
      
      destinationBatch.map((item, index) => {
        destinationsLatLong.push({
          lat: parseFloat(item.lat),
          lng: parseFloat(item.long),
        });
      });
      
      const request = 
            {
              origins: [usersMarker],
              destinations: destinationsLatLong,
              travelMode: "DRIVING",
            };
    
      return new Promise((resolve, reject) => {
        distanceService.getDistanceMatrix(request, (response, status) => {
          if (status === "OK") {
            resolve(response);
          } 
          else {
            reject(new Error(`Unable to retrieve distances: ${status}`));
          }
        });
      });
    };
    
    /*
    	Takes an array and resizes to specified size.
    */
    const chunkArray = (array, chunkSize) => {
      const chunks = [];
    
      for (let i = 0; i < array.length; i += chunkSize) {
        chunks.push(array.slice(i, i + chunkSize));
      }
    
      return chunks;
    }
    
    /*
    	Load Google Map Distance Data.
    */
    initialise();
    

    The getDistanceFromOrigin() and googleMapsDistanceMatrixRequest() are the key functions that take the list of destinations, batches them into chunks of 25 and returns a tabular list of data. This code can be expanded further to be used alongside visual representation to render each destination as pins on an embedded Google Map, since we have the longitude and latitude points.

    The full working demo can be found via the following link: https://jsfiddle.net/sbhomra/ns2yhfju/. To run this demo, a Google Maps API key needs to be provided, which you will be prompted to enter on load.

  • While manually importing data into a Google Sheet to complete the boring chore of data restructuring, I wondered if there was any way that the initial import might be automated. After all, it would be much more efficient to link directly to an external platform to populate a spreadsheet.

    Google App Scripts provides a UrlFetchApp service giving us the ability to make HTTP POST and GET requests against an API endpoint. The following code demonstrates a simple API request to a HubSpot endpoint that will return values from a Country field by performing a GET request with an authorization header.

    function run() {
      apiFetch();
    }
    
    function apiFetch() {
      // API Endpoint options, including header options.
      var apiOptions = {
         "async": true,
         "crossDomain": true,
         "method" : "GET",
         "headers" : {
           "Authorization" : "Bearer xxx-xxx-xxxxxxx-xxxxxx-xxxxx",
           "cache-control": "no-cache"
         }
       };
    
      // Fetch contents from API endpoint.
      const apiResponse = UrlFetchApp.fetch("https://api.hubapi.com/crm/v3/properties/contact/country?archived=false", apiOptions);
      
      // Parse response as as JSON object.
      const data = JSON.parse(apiResponse.getContentText());
    
      // Populate "Sheet1" with data from API.
      if (data !== null && data.options.length > 0) {
          // Select the sheet.
          const activeSheet = SpreadsheetApp.getActiveSpreadsheet();
          const sheet = activeSheet.getSheetByName("Sheet1");
    
          for (let i = 0; i < data.options.length; i++) {
            const row = data.options[i];
    
            // Add value cells in Google sheet.
            sheet.getRange(i+1, 1).setValue(row.label);
          }
      }
    }
    

    When this script is run, a request is made to the API endpoint to return a JSON response containing a list of countries that will populate the active spreadsheet.

    The Google App Script official documentation provides even more advanced options for configuring the UrlFetchAppservice to ensure you are not limited in how you make your API requests.

    In such little code, we have managed to populate a Google Sheet from an external platform. I can see this being useful in a wide variety of use cases to make a Google Sheet more intelligent and reduce manual data entry.

    In the future, I'd be very interested in trying out some AI-related integrations using the ChatGPT API. If I manage to think of an interesting use case, I'd definitely write a follow-up blog post.

  • I've been delving further into the world of Google App Scripts and finding it my go-to when having to carry out any form of data manipulation. I don't think I've ever needed to develop a custom C# based import tool to handle the sanitisation and restructuring of data ever since learning the Google App Script approach.

    In this post, I will be discussing how to search for a value within a Google Sheet and return all columns within the row the searched value resides. As an example, let's take a few columns from a dataset of ISO-3166 Country and Region codes as provided by this CSV file and place them in a Google Sheet named "Country Data".

    The "Country Data" sheet should have the following structure:

    name alpha-2 alpha-3 country-code
    Australia AU AUS 036
    Austria AT AUT 040
    Azerbaijan AZ AZE 031
    United Kingdom of Great Britain and Northern Ireland GB GBR 826
    United States of America US USA 840

    App Script 1: Returning A Single Row Value

    Our script will be retrieving the two-letter country code by the country name - in this case "Australia". To do this, the following will be carried out:

    1. Perform a search on the "Country Data" sheet using the findAll() function.
    2. The getRow() function will return single row containing all country information.
    3. A combination of getLastColumn() and getRange() functions will output values from the row.
    function run() {
      var twoLetterIsoCode = getCountryTwoLetterIsoCode("Australia"); 
    }
    
    function getCountryTwoLetterIsoCode(countryName) {
      var activeSheet = SpreadsheetApp.getActiveSpreadsheet();
      var countryDataSheet = activeSheet.getSheetByName('Country Data');
    
      // Find text within sheet.
      var textSearch = countryDataSheet.createTextFinder(countryName).findAll();
    
      if (textSearch.length > 0) {
        // Get single row from search result.
        var row = textSearch[0].getRow();    
        // Get the last column so we can use for the row range.
        var rowLastColumn = countryDataSheet.getLastColumn();
        // Get all values for the row.
        var rowValues = countryDataSheet.getRange(row, 1, 1, rowLastColumn).getValues();
    
        return rowValues[0][1]; // Two-letter ISO code from the second column.
      }
      else {
        return "";
      }
    }
    

    When the script is run, the twoLetterIsoCode variable will contain the two-letter ISO code: "AU".

    App Script 2: Returning Multiple Row Matches

    If we had a dataset that contained multiple matches based on a search term, the script from the first example can be modified using the same fundamental functions. In this case, all we need to do is use a for loop and pass all row values to an array.

    The getCountryTwoLetterIsoCode() will look something like this:

    function getCountryTwoLetterIsoCode(countryName) {
      var activeSheet = SpreadsheetApp.getActiveSpreadsheet();
      var countryDataSheet = activeSheet.getSheetByName('Country Data');
    
      // Find text within sheet.
      var textSearch = countryDataSheet.createTextFinder(countryName).findAll();
    
      // Array to store all matched rows.
      var searchRows = [];
    
      if (textSearch.length > 0) {
        // Loop through matches.
        for (var i=0; i < textSearch.length; i++) {
          var row = textSearch[i].getRow();  
          // Get the last column so we can use for the row range.
          var rowLastColumn = countryDataSheet.getLastColumn();
          // Get all values for the row.
          var rowValues = countryDataSheet.getRange(row, 1, 1, rowLastColumn).getValues(); 
    
          searchRows.push(rowValues);
        }
      }
    
      return searchRows;
    }
    

    The searchRows array will contain a collection of matched rows as well as the column data. To carry out a similar output as shown in the first App Script example - the two-letter country code, the function can be called in the following way:

    // Get first match.
    var matchedCountryData = getCountryTwoLetterIsoCode("Australia")[0];
    
    // Get the second column value (alpha-2).
    var twoLetterIsoCode = matchedCountryData[0][1];
    

    Conclusion

    Both examples have demonstrated different ways of returning row values of a search term. The two key lines of code that allows us to do this are:

    // Get the last column so we can use for the row range.
    var rowLastColumn = countryDataSheet.getLastColumn();
    
    // Get all values for the row.
    var rowValues = countryDataSheet.getRange(row, 1, 1, rowLastColumn).getValues();
    
  • Whenever there is a need to restructure an Excel spreadsheet to an acceptable form to be used for a SaaS platform or custom application, my first inclination is to build something in C# to get the spreadsheet into a form I require.

    This week I felt adventurous and decided to break the mundane job of formatting a spreadsheet using an approach I've been reading up on for some time but just never got a chance to apply in a real-world scenario - Google App Scripts.

    What Is A Google App Script?

    Released in 2009, Google App Scripts is a cloud-based platform that allows you to automate tasks across Google Workspace products such as Drive, Docs, Sheets, Calendar, Gmail, etc. You could think of App Scripts as similar to writing a macro in Microsoft Office. They both can automate repeatable tasks and extend the standard features of the application.

    The great thing about Google App Script development is being able to use popular web languages (HTML/CSS/JavaScript) to build something custom. Refreshing when compared to the more archaic option of using VBA in Microsoft Office.

    Some really impressive things can be achieved using App Scripts within the Google ecosystem.

    Google Sheets App Script

    The Google App Script I wrote fulfils the job of taking the contents of cells in a row from one spreadsheet to be copied into another. The aim is to carry out automated field mapping, where the script would iterate through each row from the source spreadsheet and create a new row in the target spreadsheet where the cell value would be placed in a different column.

    This example will demonstrate a very simple approach where the source spreadsheet will contain five columns where each row contains numbers in ascending order to then be copied to the target spreadsheet in descending order.

    Before we add the script, we need to create two spreadsheets:

    • Source sheet: Source - Numbers Ascending
    • Target sheet: Destination - Numbers Descending

    The source sheet should mirror the same structure as the screenshot (below) illustrates.

    Google Sheet - Source

    The target sheet just needs to contain the column headers.

    The App Script can be created by:

    1. Navigating to Extensions > App Scripts from the toolbar. This will open a new tab presenting an interface to manage our scripts.
    2. In the "Files" area, press the "+" and select "Script".
    3. Name the script file: "export-cells-demo.gs".

    Add the following code:

    // Initialiser.
    function run() {
      sendDataToDestinationSpreadSheet();
    }
    
    // Copies values from a source spreadsheet to the target spreadsheet.
    function sendDataToDestinationSpreadSheet() {
      var activeSheet = SpreadsheetApp.getActiveSpreadsheet();
    
      // Get source spreadsheet by its name.
      var sourceSheet = activeSheet.getSheetByName('Source - Numbers Ascending');
    
      // Select the source spreadsheet cells.
      var sourceColumnRange = sourceSheet.getRange('A:E');
      var sourceColumnValues = sourceColumnRange.getValues();
    
      // Get target spreadsheet by its name..
      var targetSheet = activeSheet.getSheetByName('Destination - Numbers Descending');
    
      // Iterate through all rows from the source sheet.
      // Start index at 1 to ignore the column header.
      for(var i = 1; i < sourceColumnValues.length; i++) {
        // Get the cell value for the row.
        var column1 = sourceColumnValues[0,i][0];
        var column2 = sourceColumnValues[0,i][1];
        var column3 = sourceColumnValues[0,i][2];
        var column4 = sourceColumnValues[0,i][3];
        var column5 = sourceColumnValues[0,i][4];
        
        // Use getRange() to get the value position by declaring the row and column number.
        // Use setValue() to copy the value into target spreadsheet column.
        targetSheet.getRange(i+1, 1).setValue(column5);
        targetSheet.getRange(i+1, 2).setValue(column4);
        targetSheet.getRange(i+1, 3).setValue(column3);
        targetSheet.getRange(i+1, 4).setValue(column2);
        targetSheet.getRange(i+1, 5).setValue(column1);
      }
    }
    

    The majority of this script should be self-explanatory with the aid of comments. The only part that requires further explanation is where the values in the target sheet are set, as this is where we insert the numbers for each row in descending order:

    ...
    ...
    targetSheet.getRange(i+1, 1).setValue(column5);
    targetSheet.getRange(i+1, 2).setValue(column4);
    targetSheet.getRange(i+1, 3).setValue(column3);
    targetSheet.getRange(i+1, 4).setValue(column2);
    targetSheet.getRange(i+1, 5).setValue(column1);
    ...
    ...
    

    The getRange function accepts two parameters: Row Number and Column Number. In this case, the row number is acquired from the for loop index as we're using the same row position in both source and target sheets. However, we want to change the position of the columns in order to display numbers in descending order. To do this, I set the first column in the target sheet to contain the value of the last column from the source sheet and carried on from there.

    All the needs to be done now is to run the script by selecting our "run()" function from the App Scripts toolbar and pressing the "Run" button.

    The target spreadsheet should now contain the numbered values for each row in descending order.

    Google Sheet - Target

    Voila! You've just created your first Google App Script in Google Sheets with simple field mapping.

    Conclusion

    Creating my first Google App Script in a real-world scenario to carry out some data manipulation has opened my eyes to the possibilities of what can be achieved without investing additional time developing something like a Console App to do the very same thing.

    There is a slight learning curve involved to understand the key functions required to carry out certain tasks, but this is easily resolved with a bit of Googling and reading through the documentation.

    My journey into Google App Scripts has only just begun and I look forward to seeing what else it has to offer!

  • The older I get, the more obsessed I have become with preserving life’s memories through photos and video. With so many companies offering their storage solutions, we’re living in an age where storage is no longer something that comes at a premium. There are a wide variety of pricing and feature tiers for all, benefiting us as consumers. If you have full trust in the service provider, they are suited particularly well for the majority of consumer needs. But as a consumer, you need to be prepared to shift with potential service changes that may or may not work in your favour.

    For many years, I have always been conscious that I’m a photo hoarder and believe that there isn’t a bad photo one can take with the help of advancements in phone camera technology. If you ask any of my work colleagues, they’d probably tell you I have a problem. When we go on any of our socials, I’m the first person to whip out my phone and take pictures as they make nice mementoes to look back on and share.

    On a more personal note, during last years Diwali I came to the sudden realisation as we all sat down to my mum belting out her prayers that this will not last forever and it dawned on me that these are truly special moments. Being an Indian who is culturally inept in all the senses and cannot speak his native tongue, I would be comforted knowing that I'll have photos and video to look back on many years to come. From that moment, I decided to make an active effort to capture smaller moments like these. Maybe the pandemic has shown me not take things for granted and appreciate time with family more.

    I got a little serious in my crusade and took things a step further by acquiring as many family photos as possible by purchasing a photo scanner to digitise all prints for safekeeping. Prints fade in time, not in the digital world.

    Photo Backup Strategy

    Whether I take photos on my phone or my FujiFilm X100F camera, the end destination will always be my Synology NAS where I have the following redundancies in place:

    • RAID backup on all hard disks.
    • Nightly backups to the cloud using BackBlaze.
    • Regular backup to an external disk drive and stored off-site.

    As expected, my phone gets the most use and everything by default is stored within my Google Photos account using free unlimited storage. I then use Synology Moments that acts as my local Google Photos where my photos are automatically stored to my Synology in original quality.

    My camera gets mostly used for when I go on holiday and events. I store the RAW and processed photos on my Synology. I still upload the processed photos to Google Photos as I love its AI search capability and makes sharing easy.

    At the end of the day, the layers of redundancy you put in place depend on how important specific photos are to you. I like the idea of controlling my own backups. I take comfort knowing my data is stored in different places:

    • Synology
    • Backblaze
    • Google Photos
    • Offsite Hard Drive

    Cloud Storage and Shifting Goalposts

    The fear I had pushed to the back of my head finally came to the forefront when Google changed its storage policy.

    The recent news regarding the changes in Google Photos service gives me a sense of resolve knowing I already have my local storage solution that is already working in parallel with Google Photos. But I can’t help but feel disappointed by the turn of events though. Even though I can to some extent understand Google's change in their service, I can't help but feel slightly cheated. After all, they offered us all free unlimited storage in exchange to allow them to apply data mining and analysis algorithms to improve their services. That's the price you pay for using a free service. You are the product (this I have no grievances with)!

    Now they have enough of our data, they can feel free to cut the cord. We all know Google has a history of just killing products. Google Photos may not be killed, but life has certainly been sucked out of it.

    It may come across as if I’m solely bashing Google Photos, when in fact this is a clear example of how companies can change their service conditions for their benefit and face no repercussions. We as users have no say on the matter and just have to roll with the punches. It just seems wrong that a company would entice so many users with a free service to then strip it away. This is a classic monopolistic strategy to grab market share by pricing out its competitors to now demand money from its users.

    For me, Google Photos provided a fundamental part of the photo storage experience by making things easily accessible to family and friends. No longer will I be able to invite friends/family to contribute to shared albums unless they opt for the paid plan. Now when you’re surrounded by iPhone users, this creates another barrier of entry.

    This has cemented my stance more so to ensure have control of my assets and service, which is something I have been doing.

    Final Thoughts

    If I have carried out my photo archival process correctly, they should be accessible to future generations for many years to come and continue to live on even after I’ve expired. This should be achievable as I’ll continue to maintain this time-capsule as technology continues to evolve.

    The most important take-away: If you strip down my approach to the barebones, I’m not giving in to the monopolistic behaviour of the tech giants - Google, Apple or Microsoft. Just using them as a secondary thought to compliment my process. It’s just my NAS doing the heavy-lifting where I set the rules.

    These priceless heirlooms are a legacy and my gift for future generations to come.

  • I love my Google Nest and it truly is a revolutionary piece of kit. Not only does it display my photos but it also forms a key part of some basic smart-home automation. I really have no gripes. But there is one small area I feel it's lacking. The Radio Alarm. I'm the type of person who detests alarm sounds and prefer my sleep cycle to be shattered by something a little softer, like a radio station.

    How difficult is it for Google to add a feature that will allow one to wake up to their favourite radio station? I would have thought this key feature would be very easy to put in place, after all, the Nest Hub can carry out much more complex operations. There are varying reports that this feature is available only within the US, which I find very odd to why this is the case. Does Google not know here in the UK we also would find this feature useful?

    In the meantime, whilst I await an official release (that may not come anytime soon!) I managed to concoct a somewhat preposterous way to get some form of radio alarm automation. You will require the following:

    • An Android phone with Google Assistant capability
    • Google Nest Hub (standard or max)
    • Phone stand to sit next to your Nest Hub (optional)

    The premise of the approach I detail is to get an Android phone to fire off the alarm at the desired time and when the alarm is dismissed manually, the phone will utter a phrase that will be picked up by your Google Nest Hub and play your radio station.

    If you’re still here and intrigued by this approach, let's get to it!

    The first thing we need to do is set up a “Good Morning” routine on the Google Nest Hub, which can be done through the Google Home app on your phone. It is here where we will carry out the following:

    1. Assistant will section: Adjust media volume to 40%.
    2. And then play section: Select Play radio and enter the name of a radio station.
    3. Save the routine.

    Now when you utter the magic phrase “Good morning”, the Google Nest Hub will do exactly what we set up in our routine. Now we need to add some automation to do this for us and this is where the alarm feature on your Android phone comes into play.

    I cannot be sure if the alarm feature on all newish Android phones gives the ability to define a Google Assistant routine. If it does, you should see this as an option when setting the alarm. We need to carry out a similar process as we carried out (above) when setting a “Good Morning” routine on the Google Nest Hub:

    1. When I dismiss my alarm: Adjust media volume to 50%.
    2. Select the “Add action” button and under the “Enter command” tab, enter the following text: Hey Google. Good Morning.
    3. Leave the “And then play” section to do nothing.
    4. Save the routine.

    Your phone will ideally be placed in close proximity of your Google Nest Hub for the “Hey Google. Good Morning” utterance to be heard. In my case, I have my phone right next to the Nest Hub on my bedside cabinet to make it easy to dismiss the alarm.

    I have to concede the approach I have to take comes across quite lame. It just seems ridiculous that you have to rely on a phone to fire off a process to allow one to have the radio to play automatically. Why can’t routines be more flexible at Nest Hub level?

    I’m unable to determine whether my approach comes across naive or clever. Maybe it's somewhere in between.

  • I’ve been looking for a tablet for quite some time and doing some in-depth research on the best one to get. I am always a stickler for detail and wanting to get best for the time based on budget and specification.

    Only having ever owned two tablets in the past - an iPad 2 and Nexus 7. Being someone who has semented himself in the Android/Google ecosystem, I automatically got along with the Nexus and quickly became my daily driver for web browsing and reading the vast variety of books from Amazon and Google Books. That was 5-6 years ago. The tablet game has changed... No longer is it just about viewing information, watching videos with some minor swipe gestures and basic gaming. It’s more!

    Ever since Microsoft released the first version of their Surface tablet computer, it shifted the industry standards to what we should now expect from a tablet, which then led to more innovation such as:

    • Keyboard support
    • Writing with palm rejection (not that old school stylus from yesteryear!)
    • Multitasking with the ability to view multiple apps in one screen, which is only getting better by the day!
    • Near laptop replacement - We’ll go into this a little later

    I wasn’t so quick to jump on the new iterations of tablets entering the market as I was waiting to see the proof in the pudding and for prices to go down. I just don’t think its worth spending over £600 on a tablet - looking at you iPad Pro! Nevertheless, from initially piquing my interest, it now got my full attention. For the first in a long time, I could see how having a tablet be useful in my day to day activities again.

    Do I Really Need A Tablet?

    Short answer: Yes.

    If you asked me this question last year I would have more than likely have said no. My Pixel 2 smartphone fit the bill for for my portable needs. Tablet life was soon being relegated to just holidays and long weekends away.

    The only thing that has changed is the increased amount of blogging and writing I now do. Typing on a smartphone really made my thumbs tired for long periods of time for when I didn’t have a computer to hand. On the other hand, I found lugging around my MacBook Pro 15" just for writing was a little excessive and lacking all day battery life.

    I could see myself buying a tablet along with a Bluetooth keyboard for easy quick note taking for when going to conferences and for writing something a little more indepth. For anyone who writes, they will probably tell you when you have a sudden spark of inspiration you need to just write it down.

    Conundrum: To Android or Not To Android

    There seems to be a real lack of good Android tablets going around that has good build quality, vanilla OS with accessories to match. It’s guaranteed that if you go for an Android tablet, you’ll be subjected to inferior cheap cases and hardware. This was indeed the case when looking for a nice flip case for my old Nexus 7.

    One would be forgiven for being given the impression accessory manufacturers don’t give Android tablets the light of day - very annoying. I still love the nice leather Kavaj case I purchased soon after getting my iPad 2. My iPad 2 may not be getting used, but still looks the part resting on the bookshelf! I guess it’s understandable why accessory manufacturers are not providing the goods for where there is limited demand. It all comes down to a lack of flagship Android devices and I was hoping the Pixel Slate would change this. Not a chance! I really wanted to go for the Pixel Slate but the main unknown factor for me is the longevity of a device that starts at £749.

    The only choice was to consider an iPad.

    What About The Microsoft Surface?

    The Microsoft Surface is a computer powerhouse and if I needed another laptop, this would have been a great purchase. I look forward to owining one in the future. Again, it all comes down to price. You have to take into consideration the cost of the computer itself as well as the added type cover. Plus I feared I would be greeted with a long Windows Update when I have a sudden spark of writing inspiration.

    Choosing An iPad

    Apple’s have positioned their iPad lineup that should meet all demand:

    I opted for the iPad Air for the 10.5” screen, A12 Bionic processor and Smart connector. The Smart connector was something previously available to the Pro series only and it was a welcome addition to their mid range tablet as this will give me the ability to connect a keyboard cover and any further peripherals that maybe on the horizon. Future proof!

    The performance and multi-tasking support is pretty good as well. I am writing this very post with Evernote in one window, Chrome in another whilst listening to Spotify.

    Near Laptop Replacement and iPad OS

    I have no expectation to make the iPad a laptop replacement. But it’s the nearest experience to it. In all honesty, I don’t understand how some even find the iPad Pro a complete replacement. Would someone enlighten me?

    I found using Jump Desktop to remote onto my laptop a really good way to get a laptop experience on my iPad. Very useful when I need to use applications I’d never be able to run on a tablet like VMWare. Jump Desktop is one of the best remote desktop applications you can use on an iPad.

    Jump Desktop features one of the fastest RDP rendering engines on the planet. Built in-house and hand tuned for high performance on mobile devices. Jump’s RDP engine also supports audio streaming, printer and folder sharing, multi-monitors, touch redirection, RD Gateway and international keyboards.

    I am really looking forward to the release of iPad OS as it might lead to a more immersive experience that bridges the gap closer to the basic features we expect from a laptop. I always felt iOS still lacks some of features currently present in Android, such as widgets to see app activity at a glance and more control over your files.

    Conclusion

    If you’re looking for a tablet that has the capability to do a lot of wonderful things with a lot of nice supported accessories, you can’t go wrong with an iPad Air.

    Update (21/06/2019): Android Abandoning The Tablet Market

    Well this totally caught me off guard. The Verge reported on 20th June that Android are exiting the tablet market and concentrating their efforts on building laptops. This further validates my purchase and choosing an iPad was indeed the right decision.

  • Being a web developer I am trying to become savvier when it comes to factoring additional SEO practices, which is generally considered (in my view) compulsory.

    Ever since Google updated its Search Console (formally known as Webmaster Tools), it has opened my eyes to how my site is performing in greater detail, especially the pages Google deems as links not worthy for indexing. I started becoming more aware of this last August, when I wrote a post about attempting to reduce the number "Crawled - Currently not indexed" pages of my site. Through trial and error managed to find a way to reduce the excluded number of page links.

    The area I have now become fixated on is the sheer number of pages being classed as "Duplicate without user-selected canonical". Google describes these pages as:

    This page has duplicates, none of which is marked canonical. We think this page is not the canonical one. You should explicitly mark the canonical for this page. Inspecting this URL should show the Google-selected canonical URL.

    In simplistic terms, Google has detected there are pages that can be accessed by different URL's with either same or similar content. In my case, this is the result of many years of unintentional neglect whilst migrating my site through different platforms and URL structures during the infancy of my online presence.

    Google Search Console has marked around 240 links as duplicates due to the following two reasons:

    1. Pages can be accessed with or without a ".aspx" extension.
    2. Paginated content.

    I was surprised to see paginated content was classed as duplicate content, as I was always under the impression that this would never be the case. After all, the listed content is different and I have ensured that the page titles are different for when content is filtered by either category or tag. However, if a site consists of duplicate or similar content, it is considered a negative in the eyes of a search engine.

    Two weeks ago I added canonical tagging across my site, as I was intrigued to see if there would be any considerable change towards how Google crawls my site. Would it make my site easier to crawl and aid Google in understanding the page structure?

    Surprising Outcome

    I think I was quite naive about how my Search Console Coverage statistics would shift post cononicalisation. I was just expecting the number of pages classed as "Duplicate without user-selected canonical" to decrease, which was the case. I wasn't expecting anything more. On further investigation, it was interesting to see an overall positive change across all other coverage areas.

    Here's the full breakdown:

    • Duplicate without user-selected canonical: Reduced by 10 pages
    • Crawled - Currently not indexed: Reduced by 65 pages
    • Crawl anomaly: Reduced by 20 pages
    • Valid : Increased by 60 pages

    The change in figures may not look that impressive, but we have to remember this report is based only on two weeks after implementing canonical tags. All positives so far and I'm expecting to see further improvements over the coming weeks.

    Conclusion

    Canonical markup can often be overlooked, both in its implementation and importance when it comes to SEO. After all, I still see sites that don't use them as the emphasis is placed on other areas that require more effort to ensure it meets Google's search criteria, such as building for mobile, structured data and performance. So it's understandable why canonical tags could be missed.

    If you are in a similar position to me, where you are adding canonical markup to an existing site, it's really important to spend the time to set the original source page URL correctly the first time as the incorrect implementation can lead to issues.

    Even though my Search Console stats have improved, the jury's still out to whether this translates to better site visibility across search engines. But anything that helps search engines and visitors understand your content source can only be beneficial.

  • Every few weeks, I check over the health of my site through Google Search Console (aka Webmaster Tools) and Analytics to see how Google is indexing my site and look into potential issues that could affect the click-through rate.

    Over the years the content of my site has grown steadily and as it stands it consists of 250 published blog posts. When you take into consideration other potential pages Google indexes - consisting of filter URL's based on grouping posts by tag or category, the number of links that my site consists is increased considerably. It's to the discretion of Google's search algorithm to whether it includes these links for indexing.

    Last month, I decided to scrutinise the Search Console Index Coverage report in great detail just to see if there are any improvements I can make to alleviate some minor issues. What I wasn't expecting to see is the large volume of links marked as "Crawled - Currently not indexed".

    Crawled Currently Not Indexed - 225 Pages

    Wow! 225 affected pages! What does "Crawled - Currently not indexed" mean? According to Google:

    The page was crawled by Google, but not indexed. It may or may not be indexed in the future; no need to resubmit this URL for crawling.

    Pretty self-explanatory but not much guidance on the process on how to lessen the number of links that aren't indexed. From my experience, the best place to start is to look at the list of links that are being excluded and to form a judgement based on the page content of these links. Unfortunately, there isn't an exact science. It's a process of trial and error.

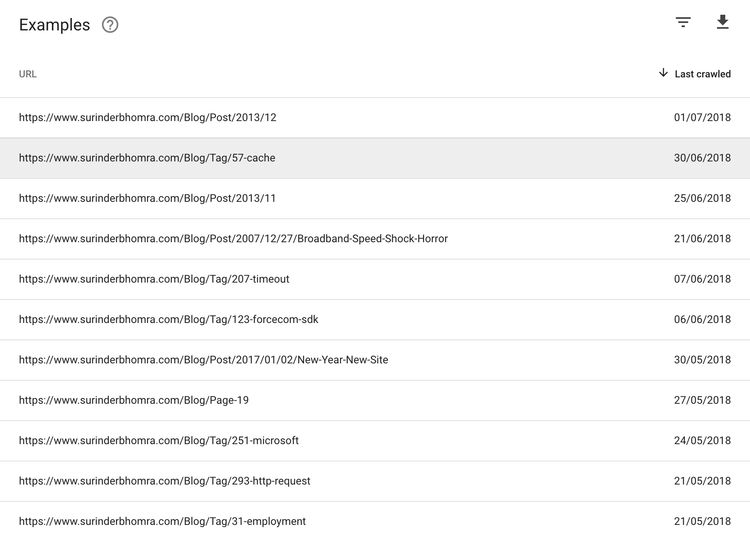
    Let's take a look at the links from my own 225 excluded pages:

    Crawled Currently Not Indexed - Non Indexed Links

    On initial look, I could see that the majority of the URL's consisted of links where users can filter posts by either category or tag. I could see nothing content-wise when inspecting these pages for a conclusive reason for index exclusion. However, what I did notice is that these links were automatically found by Google when the site gets spidered. The sitemap I submitted in the Search Console only list out blog posts and content pages.

    This led me to believe a possible solution would be to create a separate sitemap that consisted purely of links for these categories and tags. I called it metasitemap.xml. Whenever I added a post, the sitemap's "lastmod" date would get updated, just like the pages listed in the default sitemap.

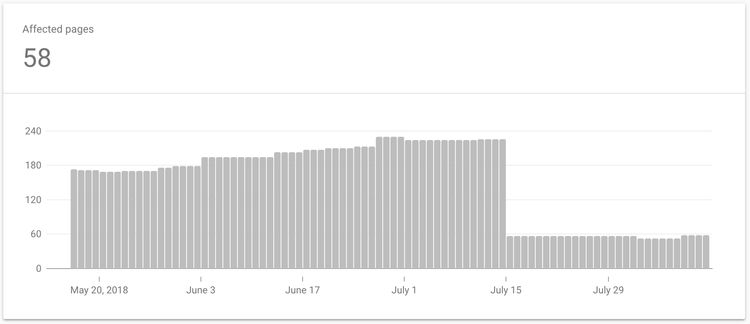
    I created and submitted this new sitemap around mid-July and it wasn't until four days ago the improvement was reported from within the Search Console. The number of non-indexed pages was reduced to 58. That's a 74% reduction!

    Crawled Currently Not Indexed - 58 Pages

    Conclusion

    As I stated above, there isn't an exact science for reducing the number of non-indexed pages as every site is different. Supplementing my site with an additional sitemap just happened to alleviate my issue. But that is not to say copying this approach won't help you. Just ensure you look into the list of excluded links for any patterns.

    I still have some work to do and the next thing on my list is to implement canonical tags in all my pages since I have become aware I have duplicate content on different URL's - remnants to when I moved blogging platform.

    If anyone has any other suggestions or solutions that worked for them, please leave a comment.