Blog

Categorised by 'General Development'.

  • For one of my side projects, I was asked to use Butter CMS to allow for basic blog integration using JavaScript. I have never heard or used Butter CMS before and was intrigued to know more about the platform.

    Butter CMS is another headless CMS variant that allows a developer to utilise API endpoints to push content to an application via an arrange of approaches. So nothing new here. Just like any headless CMS, the proof is in the pudding when it comes to the following factors:

    • Quality of features
    • Ease of integration
    • Price points
    • Quality of documentation

    I haven't had a chance to properly look into what Butter CMS fully has to offer, but from what I have seen from working on the requirements for this side project I was pleasently surprised. Found it really easy to get setup with minimal amount of fuss! For this project I used Butter CMS's Blog Engine package, which does exactly what it says on the tin. All the fields you need for writing blog posts are already provided.

    JavaScript Code

    My JavaScipt implementation is pretty basic and provides the following functionality:

    • Outputs a list of posts consisting of title, date and summary text
    • Pagination
    • Output a single blog post

    All key functionality is derived from the "ButterCMS" JavaScript file:

    /*****************************************************/
    /*                    Butter CMS                                 */
    /*****************************************************/
    var ButterCMS =
    {
        ButterCmsObj: null,
    
        "Init": function () {
            // Initiate Butter CMS.
            this.ButterCmsObj = new ButterCmsBlogData();
            this.ButterCmsObj.Init();
        },
        "GetBlogPosts": function () {
            BEButterCMS.ButterCmsObj.GetBlogPosts(1);
        },
        "GetSinglePost": function (slug) {
            BEButterCMS.ButterCmsObj.GetSinglePost(slug);
        }
    };
    
    /*****************************************************/
    /*                Butter CMS Data                         */
    /*****************************************************/
    function ButterCmsBlogData() {
        var apiKey = "<Enter API Key>",
            baseUrl = "/",
            butterInstance = null,
            $blogListingContainer = $("#posts"),
            $blogPostContainer = $("#post-individual"),
            pageSize = 10;
    
        // Initialise of the ButterCMSData object get the data.
        this.Init = function () {
            getCMSInstance();
        };
    
        // Returns a list of blog posts.
        this.GetBlogPosts = function (pageNo) {
            // The blog listing container needs to be cleared before any new markup is pushed.
            // For example when the next page of data is requested.
            $blogListingContainer.empty();
    
            // Request blog posts.
            butterInstance.post.list({ page: pageNo, page_size: pageSize }).then(function (resp) {
                var body = resp.data,
                    blogPostData = {
                        posts: body.data,
                        next_page: body.meta.next_page,
                        previous_page: body.meta.previous_page
                    };
    
                for (var i = 0; i < blogPostData.posts.length; i++) {
                    $blogListingContainer.append(blogPostListItem(blogPostData.posts[i]));
                }
    
                //----------BEGIN: Pagination--------------//
    
                $blogListingContainer.append("<div>");
    
                if (blogPostData.previous_page) {
                    $blogListingContainer.append("<a class=\"page-nav\" href=\"#\" data-pageno=" + blogPostData.previous_page + " href=\"\">Previous Page</a>");
                }
    
                if (blogPostData.next_page) {
                    $blogListingContainer.append("<a class=\"page-nav\" href=\"#\" data-pageno=" + blogPostData.next_page + " href=\"\">Next Page</a>");
                }
    
                $blogListingContainer.append("</div>");
    
                paginationOnClick();
    
                //----------END: Pagination--------------//
            });
        };
    
        // Retrieves a single blog post based on the current URL of the page if a slug has not been provided.
        this.GetSinglePost = function (slug) {
            var currentPath = location.pathname,
                blogSlug = slug === null ? currentPath.match(/([^\/]*)\/*$/)[1] : slug;
    
            butterInstance.post.retrieve(blogSlug).then(function (resp) {
                var post = resp.data.data;
    
                $blogPostContainer.append(blogPost(post));
            });
        };
    
        // Renders the HTML markup and fields for a single post.
        function blogPost(post) {
            var html = "";
    
            html = "<article>";
    
            html += "<h1>" + post.title + "</h1>";
            html += "<div>" + blogPostDateFormat(post.created) + "</div>";
            html += "<div>" + post.body + "</div>";
            
            html += "</article>";
    
            return html;
        }
    
        // Renders the HTML markup and fields when listing out blog posts.
        function blogPostListItem(post) {
            var html = "";
    
            html = "<h2><a href=" + baseUrl + post.url + ">" + post.title + "</a></h2>";
            html += "<div>" + blogPostDateFormat(post.created) + "</div>";
            html += "<p>" + post.summary + "</p>";
    
            if (post.featured_image) {
                html += "<img src=" + post.featured_image + " />";
            }
    
            return html;
        }
    
        // Set click event for previous/next pagination buttons and reload the current data.
        function paginationOnClick() {
            $(".page-nav").on("click", function (e) {
                e.preventDefault();
                var pageNo = $(this).data("pageno"),
                    butterCmsObj = new ButterCmsBlogData();
    
                butterCmsObj.Init();
                butterCmsObj.GetBlogPosts(pageNo);
            });
        }
    
        // Format the blog post date to dd/MM/yyyy HH:mm
        function blogPostDateFormat(date) {
            var dateObj = new Date(date);
    
            return [dateObj.getDate().padLeft(), (dateObj.getMonth() + 1).padLeft(), dateObj.getFullYear()].join('/') + ' ' + [dateObj.getHours().padLeft(), dateObj.getMinutes().padLeft()].join(':');
        }
    
        // Get instance of Butter CMS on initialise to make one call.
        function getCMSInstance() {
            butterInstance = new Butter(apiKey);
        }
    }
    
    // Set a prototype for padding numerical values.
    Number.prototype.padLeft = function (base, chr) {
        var len = (String(base || 10).length - String(this).length) + 1;
    
        return len > 0 ? new Array(len).join(chr || '0') + this : this;
    };
    

    To get a list of blog posts:

    // Initiate Butter CMS.
    BEButterCMS.Init();
    
    // Get all blog posts.
    BEButterCMS.GetBlogPosts();
    

    To get a single blog post, you will need to pass in the slug of the blog post via your own approach:

    // Initiate Butter CMS.
    BEButterCMS.Init();
    
    // Get single blog post.
    BEButterCMS.GetSinglePost(postSlug);
    
  • A website can tell the public a lot about you, from the things you want people to see and other things you probably would not. HTTP Headers can divulge things about your website that you wouldn't necessarily want to make public and its up to the individual to make a decision on what headers they're willing to expose. But what I would recommend is to at least analyse any site prior to moving to a production environment.

    Why all of a sudden am I talking about questioning your website HTTP Headers?

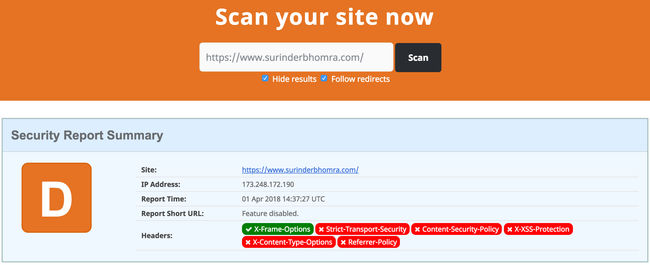
    It was only by chance when perusing StackOverflow I came across a question about securing HTTP headers, I was directed to a site called securityheaders.io. I immediately entered this very site for scanning, thinking it would fare quite well. But boy oh boy was I wrong!:

    Security Headers (Before)

    Based on this result, does this make my website vulnerable? To a certain extent yes. By default you're exposing some key information to potential hackers about how your website is built. For example, here is a simple list of HTTP Headers that could be returned from the server:

    • Web server
    • Framework version
    • Cache handling
    • Cross-site scripting access
    • Referrer policies

    Now based on that list alone, what HTTP headers would you hide? From having my eyes opened by the report generated by securityheaders.io, as a minimum I would hide anything that shows what technology, framework and server platform I am using. If there happens to be an exploit on the very server or technology you are using, we don't want the whole world to know that especially if you happen to be hosting a high traffic website.

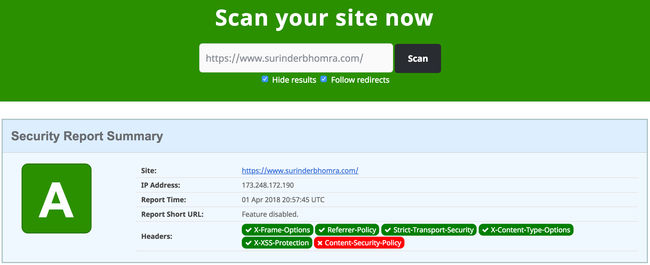
    I decided to correct all the issues highlighted by securityheaders.io and spent additional time obfuscating some additional headers. Now I can proudly say I've passed. There is just one blemish against the report to do with the "Content-Security-Policy" header, which defines approved sources of content that the browser may load.

    Security Headers (After)

    I been tweaking around with the rules for this header and I'll be honest when I say it shafted the administration dashboard of my the content management system I use for my site - Kentico CMS. So before I reinstate the header, I need a little more time tweaking.

    Another great site to use to analyse the security of your site (.NET sites only) is ASafaWeb, which scans for common configuration vulnerabilities.

    Recommended Links

  • ...and I think I know why...

    Out of all the issues Google PageSpeed Insights seems to have when analysing my site, there are two specific things crop up that annoy me:

    1. ​Reduce server response time
    2. ​Leverage browser caching (due to Google Analytics JavaScript file)

    The Google Analytics issue is something I will have to live with since (as far as I'm aware) there's nothing I can do. It would be nice if Google wouldn't penalise you for using a product they have developed. However, the "Reduce server response time" was something that perplexed me. My site is relatively simple and not doing anything over-the-top.

    Due to the nature of my hosting setup (shared), I didn't have all the capabilities to make my website respond any better. The only way I could think of improving server response time was to move my hosting to another region and purchasing a VPS to get more control.

    Now, I think I have resolved the server response time issue...It has something to do with a Web Statistics service called AWStats that was enabled by default as an "addon" service on my hosting. Once disabled through my Plesk Management Portal, Google PageSpeed didn't seem to have any issue with my server response.

    I cannot 100% confirm if by disabling the Web Statistics service is a permanent solution and will work for everyone else. But there might be some truth behind this. Web Statistic services like AWStats store all analytical data in log files directly on the server, so this must have some affect on the time a request is made. I could be talking complete nonesense.

    If you have experienced the same problem as me, check your own hosting setup and it's "addon" services. You never know, it may give you that extra Google PageSpeed point. :-)

  • There are many roads and avenues a tech-head can take to either get a grasp on new technology or prepare for certification. Unfortunately, some methods to get the knowledge on a subject can come at a great cost...especially when it comes to anything Microsoft.

    Generally, Microsoft has always had some great forum and blogging communities to enable developers to get the expertise they require. I've always found them to be somewhat divided and looked rough around the edges. Now Microsoft has reworked its community and provided learners with a wide variety of courses freely available to anyone!

    While MVA courses are not specifically meant to focus on exam preparation. They should be used as an addition to paid courses, books and online test exams to prepare for a certification. But it definitely helps. It takes more than just learning theory to pass an exam.

    So if you require some extra exam training or just want to brush up your skills, give a few topics a go. I myself decided to test my skills by starting right from the beginning and covering courses that relate to my industry. In this case, to name a few:

    • Database Fundamentals
    • Building Web Apps with ASP.NET Jump Start
    • Developing ASP.NET MVC 4 Web Applications Jump Start
    • Programming In C# Jump Start
    • Twenty C# Questions Explained

    I can guarantee you'll be stumped by some of the exam questions after covering each topic. Some questions can be quite challenging!

    I've been a .NET developer for around 7 years and even I had to go through the learning content more than once. Just because you've been in the technical industry for a lengthy period of time, we are all susceptible to forget things or may not be aware of different coding techniques.

    One of the great motivations of using MVA is the ranking system that places you against a leaderboard of other avid learners and seeing yourself progress as you complete each exam. All I can advise is that don't let the ranking system be your sole motivation to just "show-off" your knowledge. The important part is learning. What's the point in making a random attempt to answer each exam without a deep understanding on why you got the answer correct or incorrect.

    You can see how far I have progressed by viewing my MVA profile here: http://www.microsoftvirtualacademy.com/Profile.aspx?alias=2181504

    All in all: Fantastic resource and fair play to Microsoft for offering some free training!

  • C# In Depth Third EditionWhen working as a programmer, it's really easy to continue coding in the same manner you have done since you picked up a language and made your first program.
    The saying: "Why fix it if it ain't broken?" comes to mind...

    I for one sometimes fail to move with the times (unknowingly to me) and find new and better ways of coding. It's only on the off chance I get introduced to different approaches through my work colleague or whilst Googling for an answer to one of my coding queries.

    After reading some rave reviews on C# In Depth, written by the one and only Stackoverflow god: Jon Skeet. I decided to part with my hard earned money and make a purchase.

    C# In Depth is different from other programming books I've read on C#. In fact it's really good and don't let the title of the book deter you. The contents is ideal for novice and semi-experienced programmers.

    Firstly, you start off by being shown code samples on how C# has evolved through its iterations (v1 - v4). In most cases I gave myself a gratifying pat on the back when I noticed the approaches I've taken in my own projects utilised practises and features of the current language. ;-)

    Secondly, unlike some programming books I've read in the past, it's not intimidating to read at all. Jon Skeet really has a great way to talk about some concepts I find difficult to comprehend in a clear a meaningful way, so I could utilise these concepts within my current applications.

    The only minor niggle I have is that there were a few places where I would have liked specific chapters to go into more detail. On the other hand, it gave me the opportunity to research the nitty-gritty details for myself.

    Since I purchased this book, I found myself referencing it many times and appreciating what C# has to offer along with it misconstrued and underused features.

    All in all, the author truly has a gift in clearly demonstrating his understanding on the subject with finesse and if I am able to comprehend even one-tenth of his knowledge, I will be a happy man.

  • Even though my programming weapon of choice is .NET C#, there are times (unfortunate times!) where I need to dabble in a bit if PHP. Being a .NET developer means I do not have the setup to run PHP based sites such as Apache and MySQL.

    In the past I have tried to create an Apache configured server but I could never get it running 100% - possibly because I didn't have the patience or could justify the additional time required for setup when I could be working on a PHP site once in a blue moon...

    Last year, I came across a program called EasyPHP that allowed me to install a local instance of Apache and MySQL altogether in just one installation. It made it really to get up and running without all the setup and configuration hassle.

    Once installed you can create numerous websites and MySQL instances in a version of your own choosing. Wicked! I never been so excited about PHP in my life!

    I have only scratched the surface on the features EasyPHP provides and whenever I did need to use it, there has always been great improvements. Take a look at their site for more information:http://www.easyphp.org.

    So if you're a Windows man who needs to carry out PHP odds and ends, can't recommend EasyPHP enough.

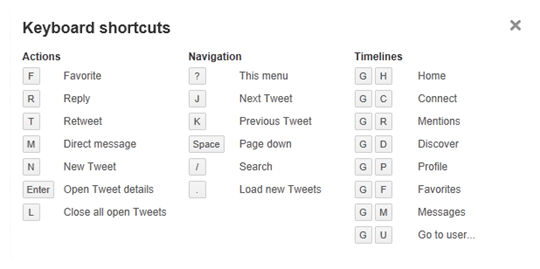
  • During the latter-end of 2010, Twitter overhauled their somewhat simplistic website to compete with client-side offerings (e.g. TweetDeck, Seesmic). What I found really impressive was a hidden bit of functionality that allowed the user to navigate around the site using keyboard shortcuts (or hot keys). If you haven't tried it, take a look at the list of shortcuts below and try them out.

    Twitter Keyboard Shortcuts

    Some people I know in the industry think it's a pointless feature. But I believe something so simple automatically enhances the users experience when accessing a site. In fact, you could think of hotkeys as an additional web accessibility requirement for those who don’t have a mouse or just prefer the more direct approach in navigating through a site. Many sites have been utilising hotkeys to get their sites to act like locally installed software programmes, for example Google Docs.

    I was very keen on replicating hotkey functionality on my next project. Not surprising, there are a lot of custom jQuery plugins that allowed you to implement some basic keyboard shortcut functionality. The best one I found through trial and error is Mousetrap. I found Mousetrap to be the most flexible plugin to fire your own custom JavaScript events by binding a single, sequence or combination key press.

    Using Mousetrap, I could replicate a simple Twitter-style shortcut to take a user back to the homepage by pressing the following keys in sequence: “G H”:

    Mousetrap.bind("g h",
        function () { 
            window.location = "/Home.aspx"; 
        }
    );
    
  • Published on
    -
    1 min read

    HTTP Request Script

    In one of my website builds, I needed to output around a couple thousand records from a database permanently into the .NET cache. Even though I set the cache to never expire, it will get cleared whenever the application pool recycles (currently set to every 24 hours). As you can expect, if a user happens to visit the site soon after the cache is cleared, excess page loading times will be experienced.

    The only way I could avoid this from happening is by setting up a Scheduled Task that would run a script that would carry out a web request straight after the application pool was set to recycle.

    Luckily, I managed to find a PowerShell script on StackOverflow that will do exactly that:

    $request = [System.Net.WebRequest]::Create("")
    $response = $request.GetResponse()
    $response.Close()
    
  • I found there is an issue when implementing AddThis to a site that uses Selectivizr. Selectivizr (for those who don't know), is a JavaScript utility that emulates CSS3 pseudo-classes and attribute selectors for Internet Explorer 6-8.

    I noticed that my AddThis widget was not functioning correctly in Internet Explorer versions 6-8. So whenever Selectivizr was required, I encountered two issues:

    • Social bookmark buttons were not displaying.

    AddThis Issue No Icons

    • The AddThis popup to select more social bookmarking sites did not render correctly. It outputs all the popup contents to the bottom of the page.

    AddThis Issue Popup

    Just as I have experienced two problems with AddThis, there are two ways to resolve:

    1) Use custom buttons with AddThis

    Using custom buttons will get AddThis to display properly in your page. However, you will still experience viewing AddThis popup. So if you are not too fussed with viewing additional social bookmarking sites, then this will suffice.

    <!-- AddThis Button BEGIN -->
    <div class="addthis_toolbox addthis_default_style ">
    <a class="addthis_button_facebook"><img src="/images/facebook.png" height="16" width="16" /></a>
    <a class="addthis_button_twitter"><img src="/images/twitter.png" height="16" width="16" /></a>
    <a class="addthis_button_email"><img src="/images/email.png" height="16" width="16" /></a>
    <a class="addthis_button_reddit"><img src="/images/reddit.png" height="16" width="16" /></a>
    </div>
    <script type="text/javascript" src="http://s7.addthis.com/js/250/addthis_widget.js#pubid=xa-4f0b42500b47b860"></script>
    <!-- AddThis Button END -->
    

    2) Modify Script tag in AddThis code snippet

    To get AddThis to work 100% alongside Selectivizr will require you to modify the script tag and add bit of jQuery. A user on Google Groups suggested this fix and resolved my issues.

    <!-- AddThis Button BEGIN -->
    <div class="addthis_toolbox addthis_default_style ">
    <a class="addthis_button_preferred_1"></a>
    <a class="addthis_button_preferred_2"></a>
    <a class="addthis_button_preferred_3"></a>
    <a class="addthis_button_preferred_4"></a>
    <a class="addthis_button_compact"></a>
    <a class="addthis_counter addthis_bubble_style"></a>
    </div>
    
    <script type="text/javascript">
    $(function()
    {
        $('head').append('<script type="text/javascript" src="http://s7.addthis.com/js/250/addthis_widget.js#pubid=xa-4f0b42500b47b860"><\/script>');
    }); 
    </script>
    <!-- AddThis Button END -->
    
  • I stated in my last post that when I got better knowledge of using Google Checkout, I will show a full example on how to implement Google’s payment provider.

    What I wanted to achieve within my own Google Checkout implementation was the ability to ensure I was retrieving sufficient information from the payment provider. So the transaction data stored within my own database would match exactly what is happening within Google. For example, if a payment was accepted/declined some internal processes need to be carried out. The best way of achieving this was by using a call-back page to process notifications from Google synchronously.

    Before we get into the call-back code, we need to login to our Google Checkout account as a merchant and carry out some basic configuration setup. My example’s will be based on a sandbox environment.

    Google Account Setup

    Integration (Settings > Integration)

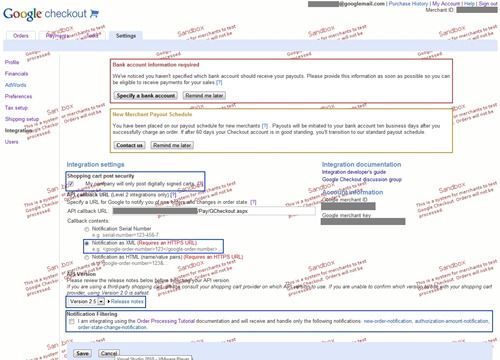
    The Integration configuration is the most important page since it contains the basis to how we would like Google Checkout to work.

    Google Checkout - Integration

    As you can see, we have specified a call-back URL that will point to a page in our site. The call-back page is what Google uses to let our site know what’s happening with our transactions and if required, we can create our own internal actions to deal with events that are thrown to us. I have set the notifications to be sent in XML format.

    Next, we want to ensure the correct API version is used. Issues are bound to occur is the incorrect version is selected. In this case, I am using the most recent API version: 2.5.

    I have unselected Notification Filtering because we want to receive all types of notifications. Google Checkout document states:

    Google Checkout responds with a <charge-amount-notification> synchronously after a charge-order request. If you have not selected the option to only receive new order notifications, authorization amount notifications and order state change notifications, Google Checkout will also send you a charge-amount-notification anytime an order has been charged.”

    We want to receive a “charge amount notification” to allow us to know if the transaction was charged successfully. This is an actual confirmation to state we have received the money. We shouldn’t assume anything until this is received.

    Preferences (Settings > Preferences)

    Google Checkout - Preferences

    I have setup our order processing to automatically authorise the buyers card for an order. You might be thinking: “This is a bit of manual process…” and you’d be right. If we selected the second option to automatically authorise and charge the buyers card, this would leave a big hole in setting up our internal website processes. By authorising a buyers card gives us more flexibility on how to handle the transaction.

    It’s not compulsory for the email option to be selected.

    Other Setup

    You should be good to go on starting to mess around with implementing your site with Google Checkout. What I haven’t covered is the financial settings such as adding Banking information. This should be a straight-forward process. My main aim is to make sure the basics of Google Merchant account setup is complete.

    One really useful page that will help you with investigating problematic transactions is the “Integration Console” (Tools > Integration Console). Generally, this should be empty but any issues will be logged here. This has helped me over the course of integrating Google Checkout in my site.

    Call-back Page

    Ok. We have Google Merchant Account setup. Now we need to concentrate on our call-back page. My call-back page is based on a customer purchasing a News subscription. We are going to capture all the data Google sends us (excluding refunds) and store them in our own database.

    using System;
    using System.Collections.Generic;
    using System.Linq;
    using System.Web;
    using System.Web.UI;
    using System.Web.UI.WebControls;
    using System.IO;
    using GCheckout;
    using GCheckout.AutoGen;
    using GCheckout.Util;
    using GCheckout.OrderProcessing;
    using System.Xml;
    
    public partial class Pay_GCheckout : System.Web.UI.Page
    {
        public string SerialNumber = "";
    
        void Page_Load(Object sender, EventArgs e)
        {
            // Extract the XML from the request.
            Stream RequestStream = Request.InputStream;
            StreamReader RequestStreamReader = new StreamReader(RequestStream);
            string RequestXml = RequestStreamReader.ReadToEnd();
            
            RequestStream.Close();
    
            // Act on the XML.
            switch (EncodeHelper.GetTopElement(RequestXml))
            {
                case "new-order-notification":
                    NewOrderNotification N1 = (NewOrderNotification)EncodeHelper.Deserialize(RequestXml, typeof(NewOrderNotification));
                    SerialNumber = N1.serialnumber;
                    string OrderNumber1 = N1.googleordernumber;
                    string ShipToName = N1.buyershippingaddress.contactname;
                    string ShipToAddress1 = N1.buyershippingaddress.address1;
                    string ShipToAddress2 = N1.buyershippingaddress.address2;
                    string ShipToCity = N1.buyershippingaddress.city;
                    string ShipToState = N1.buyershippingaddress.region;
                    string ShipToZip = N1.buyershippingaddress.postalcode;
    
                    CustomerSubscription cs = new CustomerSubscription();
                    cs.TransactionNumber = OrderNumber1;
                    cs.Address1 = ShipToAddress1;
                    cs.Address2 = ShipToAddress2;
                    cs.Address3 = ShipToCity;
                    cs.Region = ShipToState;
                    cs.PostCode = ShipToZip;
                    cs.TransactionType = CustomerSubscription.TransTypeOnline;
                    cs.FinancialOrderState = N1.ordersummary.financialorderstate.ToString();
    
                    foreach (Item ThisItem in N1.shoppingcart.items)
                    {
                        string Name = ThisItem.itemname;
                        int Quantity = ThisItem.quantity;
                        decimal Price = ThisItem.unitprice.Value;
                    }
                    
                    if (N1.shoppingcart.merchantprivatedata != null && N1.shoppingcart.merchantprivatedata.Any != null && N1.shoppingcart.merchantprivatedata.Any.Length > 0)
                    {
                        foreach (XmlNode node in N1.shoppingcart.merchantprivatedata.Any) 
                        { 
                            if (node.LocalName.Trim() == "customer-id")
                            { 
                                cs.CustomerID = int.Parse(node.InnerText);
                            }
    
                            if (node.LocalName.Trim() == "subscription-id")
                            {
                                cs.SubscriptionID = int.Parse(node.InnerText);
                            }
                        }
                    }
    
                    CustomerSubscription.AddOnlineSubscription(cs);
    
                    break;
                case "risk-information-notification":
                    RiskInformationNotification N2 = (RiskInformationNotification)EncodeHelper.Deserialize(RequestXml, typeof(RiskInformationNotification));
                    // This notification tells us that Google has authorized the order and it has passed the fraud check.
                    // Use the data below to determine if you want to accept the order, then start processing it.
                    SerialNumber = N2.serialnumber;
                    string OrderNumber2 = N2.googleordernumber;
                    string AVS = N2.riskinformation.avsresponse;
                    string CVN = N2.riskinformation.cvnresponse;
                    bool SellerProtection = N2.riskinformation.eligibleforprotection;
                    break;
                case "order-state-change-notification":
                    OrderStateChangeNotification N3 = (OrderStateChangeNotification)EncodeHelper.Deserialize(RequestXml, typeof(OrderStateChangeNotification));
                    // The order has changed either financial or fulfillment state in Google's system.
                    SerialNumber = N3.serialnumber;
                    string OrderNumber3 = N3.googleordernumber;
                    string NewFinanceState = N3.newfinancialorderstate.ToString();
                    string NewFulfillmentState = N3.newfulfillmentorderstate.ToString();
                    string PrevFinanceState = N3.previousfinancialorderstate.ToString();
                    string PrevFulfillmentState = N3.previousfulfillmentorderstate.ToString();
                    break;
                case "charge-amount-notification":
                    ChargeAmountNotification N4 = (ChargeAmountNotification)EncodeHelper.Deserialize(RequestXml, typeof(ChargeAmountNotification));
                    // Google has successfully charged the customer's credit card.
                    SerialNumber = N4.serialnumber;
                    string OrderNumber4 = N4.googleordernumber;
                    decimal ChargedAmount = N4.latestchargeamount.Value;
    
                    int customerID = 0;
    
                    if (N4.ordersummary.shoppingcart.merchantprivatedata != null && N4.ordersummary.shoppingcart.merchantprivatedata.Any != null && N4.ordersummary.shoppingcart.merchantprivatedata.Any.Length > 0)
                    {
                        foreach (XmlNode node in N4.ordersummary.shoppingcart.merchantprivatedata.Any) 
                        { 
                            if (node.LocalName.Trim() == "customer-id")
                            { 
                                customerID = int.Parse(node.InnerText);
                            }
                        }
                    }
    
                    if (N4.ordersummary.financialorderstate == FinancialOrderState.CHARGED)
                    {
                        CustomerSubscription.UpdateFinancialOrderState(OrderNumber4, N4.ordersummary.financialorderstate.ToString());
    
                        //Make user paid member
                        CustomerHelper.UpgradeCustomerToPaid(customerID);
                    }
    
                    break;
                case "refund-amount-notification":
                    RefundAmountNotification N5 = (RefundAmountNotification)EncodeHelper.Deserialize(RequestXml, typeof(RefundAmountNotification));
                    // Google has successfully refunded the customer's credit card.
                    SerialNumber = N5.serialnumber;
                    string OrderNumber5 = N5.googleordernumber;
                    decimal RefundedAmount = N5.latestrefundamount.Value;
                    break;
                case "chargeback-amount-notification":
                    ChargebackAmountNotification N6 = (ChargebackAmountNotification)EncodeHelper.Deserialize(RequestXml, typeof(ChargebackAmountNotification));
                    // A customer initiated a chargeback with his credit card company to get her money back.
                    SerialNumber = N6.serialnumber;
                    string OrderNumber6 = N6.googleordernumber;
                    decimal ChargebackAmount = N6.latestchargebackamount.Value;
    
                    break;
                case "authorization-amount-notification":
                    AuthorizationAmountNotification N7 = (AuthorizationAmountNotification)EncodeHelper.Deserialize(RequestXml, typeof(AuthorizationAmountNotification));
                    SerialNumber = N7.serialnumber;
                    string OrderNumber7 = N7.googleordernumber;
                    
                    // Charge Order If Chargeable
                    if (N7.ordersummary.financialorderstate == FinancialOrderState.CHARGEABLE)
                    {
                        GCheckout.OrderProcessing.ChargeOrderRequest chargeReq = new GCheckout.OrderProcessing.ChargeOrderRequest(OrderNumber7);
    
                        GCheckoutResponse oneGCheckoutResponse = chargeReq.Send();
    
                    }
    
                    CustomerSubscription.UpdateFinancialOrderState(OrderNumber7, N7.ordersummary.financialorderstate.ToString());
    
                    break;
                default:                
                    break;
            }
        }
    }
    

    N.B: The code snippet (above) is shown purely as a simple example for you to build on. It is based on the “notification_handshake.aspx” sample code that is downloadable here.

    So what’s going on here? Well the events are processed in the following order:

    1. “new-order-notification” - A new order has been received. Details of the News Subscription along with the customer who ordered it will be stored in our database.

    2. “authorization-amount-notification” - Google tells us that the amount has successfully be authorised. If the order state is “chargeable”, we can go ahead charge the order and update the order state. The customer order state will consist of the following statuses: Cancelled, Chargeable, Charged, Charging, Payment Declined and Reviewing. I think it’s a good to store this information because it will allow a site administrator to view statuses of all orders and act on them, if needed.

    3. “charge-amount-notification” – Google verifies the order was successful. If the order state is marked as charged, the customer will be upgraded to a paid News Subscriber.

    Outcome

    You have successfully setup Google Checkout payment with basic notifications. If you already have Google Checkout code in place where a user can add one or more items to the shopping cart this code can stay. All you need to do is carry out the changes described in this post.