Blog

Categorised by 'Hardware & Tech'.

  • I thought I should write a quick post for those who may also experience lost internet connection on a Sony TV (running Android OS) as my parents encountered a couple weeks ago. My parents have had their TV for a few years now and never experienced connection issues... unless the Internet was truly down.

    The TV is connected to the internet modem via an ethernet cable. Even though the network status was marked as "connected" there was no Internet connection. Other household devices were connected to the Internet successfully, which confirmed there was solely an issue with the Sony TV. Luckily, after a lot of fumbling around the settings and a lot of Googling, there was in fact a simple solution requiring no technical knowledge.

    The issue occurs when the date-time is incorrect. This needs to be corrected by carrying out the following steps:

    1. Press the Home button on the remote control.
    2. Select Settings (cog icon) found on the top right.
    3. Go to System Settings and select Date and Time.
    4. In Date and Time, select Automatic date & time set to Use network time.
    5. Carry out a hard reboot by pressing and holding down the Power button on the remote.

    I’d also recommend checking if there are any OS updates at the same time just to see if Sony has released any fixes for the issue. At the time of writing, it doesn’t look like this issue has been resolved. I can confirm I checked for any outstanding updates to which there were none.

    Even now I don’t understand how the date-time on the TV shifted out of sync. This shouldn’t happen again as we have now set the date-time to be set automatically via the network.

    So why are there Internet issues if the date-time isn't correct on a device? Ensuring the correct time on a device is more important than you might think. If the clock on a device manages to diverge too far from the correct time (more than a few hours), the Operating System and applications that are dependent on Internet-based services and authorisation will be rejected. As a result, either cause issues where some applications do not function, or on a wider scale where connection to the Internet is dropped in its entirety.

  • Ever since I’ve been forced to work from home over the last 3 months, I noticed in the first few weeks of the coronavirus lockdown my network performance has been subpar. Not ideal when a stable internet connection is ones only gateway to the outside world and enable you to work from home.

    My current network setup is quite simple and consists of:

    • ISP router - set to modem mode
    • Billion 7800DXL wireless router
    • Synology 4-bay NAS
    • Wireless Access Point
    • Wireless Security Camera

    The bottle-neck out of the whole setup is the Billion router. It’s not a basic router by any means and it has served me well since I last upgraded my network back in 2014. After being in use 24/7 over the last 6 years, signs of wear were starting to show. My internet connection would just randomly drop or wind to a halt. Carrying out a factory reset did not resolve the connection stability. Next step was to check for the latest firmware, but it seems that Billion has a really short firmware release cycle - not something you’d expect for a router costing just under £200. The last firmware was released in 2015, which I had already installed.

    I had to make a decision to either waste time on faffing around with the Billion router or look for a replacement. I decided on the latter.

    UniFi Dream Machine Router

    UniFi Dream Machine Boxed

    I knew straight-away what router I wanted to purchase - UniFi Dream Machine by Ubiquiti. I was sold on the name alone!

    Ubiquiti are known for making high-quality network solutions that are suitable for consumers and businesses alike. You can start off with a small setup based on your infrastructure needs knowing at a later point (if needed) you have the option to purchase additional hardware and upscale your network. From the reviews I’ve read online, the company really makes nice hardware that can seamlessly integrate with one another - part of the Ubiquiti eco-system.

    I was so tempted to go overkill on my new network set up just so I could do some additional tinkering, but the Dream Machine Router provides all the functionality I need and more.

    Form Factor

    The Dream Machine isn’t like any other router I’ve purchased previously where the form factor has been a boring horizontal slab with two or three antennae poking out - a piece of hardware I would always hide away in my cabinet. But the Dream Machine is a nice looking piece of kit and even comes across very applesque. It can stand proud and upright in full view for all to see. Plus it has has a really cool blue ring light.

    It’s definitely heavier than any of my previous routers, which isn’t surprising from the amount of tech being crammed into this oversized mint tic tac, containing:

    • ARM Cortex Processor
    • Cooling Fan
    • 4 Port Gigabit Switch
    • Integrated Wireless Antenna 2.4/5GHz

    Setup

    I love the fact that from the moment you take the router out the box and connect to mains, you can literally get online and everything set up in no longer than 10 mins all from within the UniFi Network Controller mobile app. I don’t think I’ve ever been so excited to go through setting up a network device before. The mobile app makes things really simple that even my parents wouldn’t have a problem in carrying out the setup steps. I think I spent more time thinking about what I should call my wireless network. :-)

    I won’t go into too much detail here on the setup steps, but they consist of the following:

    • Find and connect to the device via Bluetooth.
    • Create a UI.com account, or login using your existing credentials.
    • Set auto-optimise settings.
    • Setup Wi-Fi network.
    • Set a firmware update schedule.
    • Perform network speed test to dial in with the speeds provided by your ISP.

    Once those steps are carried out, you just need to let the device go through its configuration process. Once complete, you can join the network wirelessly.

    If in the future, you decide to expand your network with additional UniFi devices, the setup process will be the same.

    “Prosumer” Configuration/Monitoring

    For a device that costs around £300, don’t think for one second the UniFi mobile app is the only route to making configuration changes. The mobile app is a protective bubble for the standard consumer who just wants a secure and reliable wireless setup without being too exposed to the inner workings. If I didn’t have a home NAS and didn’t feel the need to control how certain wireless access points could connect to devices, the mobile app would have more than sufficed.
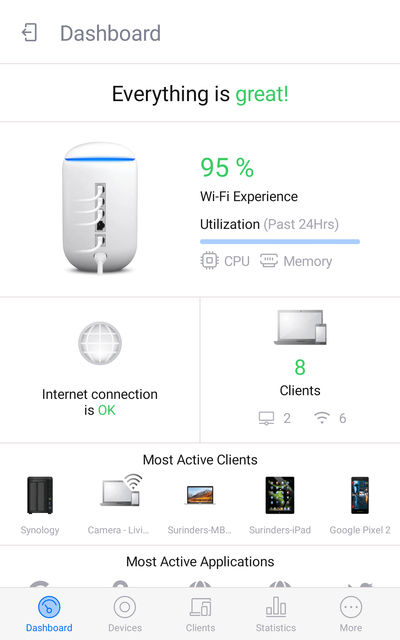
    UniFi Network Controller App Home Screen

    Phew! The UniFi Network Controller App is telling me "Everything is great!".

    I get a real kick out of seeing the vast array of network analytics and see how my internet usage has increased since working from home. You have at your disposal overall statistics on hardware performance, internet speed, threat maps, device and application usage to name a few.
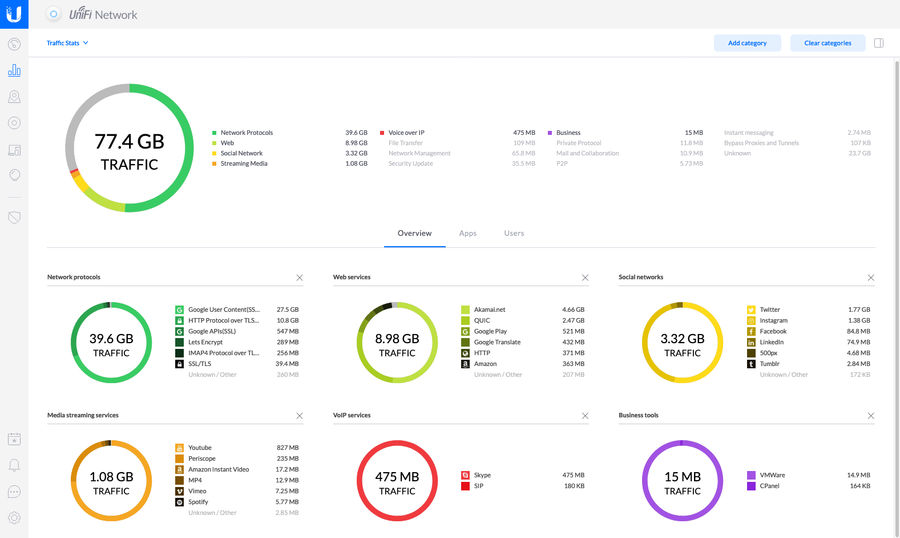
    UniFi Traffic Stats

    If like me, you require more control over your network, this can be done by logging into the web interface, which is just as intuitive as the mobile app. Here I was able to configure port forwarding, network groups, firewall and guest network. Trust me, there is a tonne more configuration options you can change really easily making you feel like a network pro!
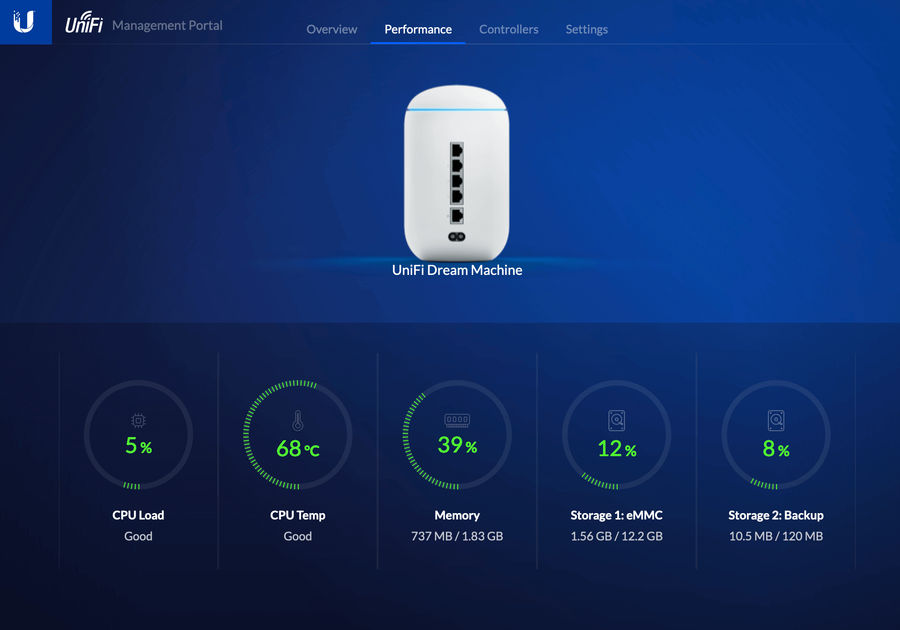
    UniFi Web Interface

    Security

    In addition to wanting a more stable and reliable network device, security also played a big factor in the reason why I purchased a Ubiquiti device.

    Unlike all the routers I’ve had in the past that probably only received 2-3 updates in their lifetime, Ubiquiti has turned that on its head. By just looking at their software release page, it’s a hive on activity. Up-to-date firmware enhances the longevity of the device by fixing any possible vulnerabilities as well as ensuring the device continues to function at its optimum level. To ensure you are always running the most up-to-date firmware, Ubiquiti have made the process very easy. The device will automatically install newly released firmware automatically based on your set schedule.

    There is also an option to enable Threat Management (currently in beta) that will protect your network from attacks, malware and malicious activity. Does this feature slow down the incoming traffic? The answer is no. The device has a whopping 850Mbps throughput limit. Amazing!

    Conclusion

    I purchased the Ubiquiti Dream Machine a couple of weeks into the start of the Covid-19 lockdown and I’m happy to report my network is more speedy then I could’ve hoped for. This is something you immediately notice when performing large file downloads/uploads. In fact, my parents log onto my Synology remotely and even they have noted an improvement.

    I’ll admit even after numerous research before making the purchase, I was still questioning whether spending such a large amount on a wireless router was worth it. But this concern was soon quashed knowing I have a piece of hardware that is more future-proof than what its competitors are currently offering and can later tie into a larger network architecture when needed.

    By buying this router you’ll be living the network dream!

  • Making the transition in moving photos from physical to digital form can be quite an undertaking depending on the volume of photos you have to work with. Traditional flat-bed scanning and Photoshop combinations aren’t really up to the task if you want a process that requires minimal manual intervention. It can all be quite cumbersome, from placing the photo correctly on the scanner to then carrying out any photo enhancements, cropping and exporting. Yes, you get a fantastic digital print but it comes at a cost - time.

    If you are really serious in digitising a bulk load of photos, there are a couple viable options:

    1. Photo-scanning service where you post all the photos you wish to digitise. The costs can be relatively low (around 1p per photo) and is good if you have a specific number of photo’s to digitise.
    2. Purchase a photo scanner where photos are scanned manually in a document feeding process, which makes for a less intensive job.

    Due to the large number of photos that have accumulated over the years, I preferred to purchase a photo scanner. Sending off photos to a photo-scanning service didn’t seem viable and could prove quite costly. I also had the fear of sending over photos via post where I do not have the original negatives. They could be lost in transit or handled incorrectly by the photo-scanning service. Not a risk I was willing to take. Photos are precious memories - a snapshot of history.

    The most ideal photo scanner for a job of this undertaking needs to be sheet-fed, where the photos are fed through a scanning mechanism. There are quite a number of these type of scanners, mostly being document scanners, which isn’t the type of scanner you want. From personal experience I found document scanners lack the resolution required and the feeding mechanism can be quite rough on photos.

    I decided to go for the Plustek ePhoto Z300 as it seems to fit the bill at a really good price (at time to writing £170).

    Initial Impressions

    The Plustek scanner doesn’t look like a scanner you’ve ever seen and almost looks other worldly. Due to its upright position, it requires very little real-estate on your desk when compared to a flat-bed scanner.

    All functions are performed from the software you can download from the Plustek site or via the CD provided in the box. Once the software is installed and scanner calibrated you’re good to go.

    Software

    I’m generally very reluctant to install software provided directly by hardware manufacturers as they encompass some form of bloatware and prefer a minimum install of just the drivers. The software provided by Plustek is very minimal and does exactly what it says on the tin - no thrills!

    Just to be sure you’re running the most up-to-date software, head over to the Plustek site.

    When your photos are scanned you’ll be presented with thumbnails in the interface where you can export a single or group selection of images to the following formats:

    • JPG
    • PDF
    • PNG
    • TIFF
    • Bitmap

    I exported all my scans to JPEG in high quality.

    There is a slight bug-bare with the Mac OS version of the software as it doesn't seem to be as stable as its Windows counterpart. This only became apparent after installing the software on my Dad’s computer running on Windows. I noticed when you have collected quite a few scans, the Mac OS version seems to lag and crash randomly, something that doesn’t seem to occur on a Windows machine. This is very annoying after you’ve been scanning over a 100 photos.

    The hardware specifications on both machines are high running on i7 processors and 16GB of RAM, so the only anomaly is the software itself. A more stable Mac OS version of the scanning software would be welcome. In the meantime, I would recommend Mac users to regularly save small batches of their scans.

    The Scanning Process

    The speed of scanning varies depending on the resolution set from within the software, where you have either 300 or 600 dpi to choose from. I scanned all my prints at 600 dpi, which taken around 15 seconds to scan each 4x6 photo, whereas 300 dpi was done in a matter of seconds. I wanted to get to the best resolution for my digitised photos and thought it was worth the extra scanning time opting for 600 dpi.

    Even though Plustek ePhoto Z300 is a manually fed scanner, I was concerned that I would have to carry out some form of post-editing in the software. By enabling "Auto crop and auto deskew” and “Apply quick fix” within the scan settings, all my photos were auto-corrected very well even when accidentally feeding a photo a that wasn’t quite level.

    To save time in correcting the rotation of your images post-scan, just always ensure you feed the photos top first.

    Conclusion

    The Plustek Scanner performs very well both on price and performance. I have been pretty happy with the quality when scanning photos in either black and white or colour.

    The only thing that didn’t come to mind at time of purchase is scanning is a very manual process, especially when churning through hundreds of photos. It would be great if Plustek had another version of the Z300 that encompassed an automatic feeding mechanism. There were times when I would feed in the next photo before the currently scanned photo had finished, resulting in two photos scanned into one. This didn’t become a regular occurrence once you have got into the flow of the scanning process.

    Not having an automatic feeding mechanism is not at all a deal breaker at this price. You get a more than adequate photo scanner that makes the tedious job of digitising batches of photos somewhat surmountable.

  • Following up on my previous post about the joy that is using my new iPad Air, I thought I’d write about what I deem are essential accessories and applications. It’s only been a couple of weeks since making my purchase and has surprisingly found the transition from Android to iOS not too much of a pain. It’s fast becoming part of my daily workflow for creative writing and note-taking.

    Here are some applications and accessories I use…

    Accessories

    Keyboard Case

    Apple’s own Smart Keyboard Cover felt very unnatural to use and didn’t provide enough protection for my nice new tablet. The Inateck Keyboard Case is an absolute pleasure to use and the keys have a very nice responsive rebound. I can literally use this anywhere and feels just as stable on my lap as it is when being used on a desk.

    The only downside is the connectivity relies on Bluetooth rather than Apple’s own Smart connector which would normally power the keyboard. Nevertheless, the pairing has no latency and the battery lasts weeks even with daily usage.

    Apple Pencil

    The iPad Air is only compatible with the first generation pencil and has a really ridiculous way to charge using the lightning connector. Apple could have quite easily made the iPad Air work with the second generation pencil. If the iPad Pro was a cracker, then the second generation pencil would be the caviar.

    Regardless of the design, it’s refreshing to scribble away notes to store electronically. Previously to keep track of my written notes, I would write on paper (oh how old fashioned!?) and then scan digitally using Evernote on my phone.

    Draw Screen Protector

    Writing on glass using the Apple Pencil is a little slippery and need something that gives the texture to almost simulate the friction you would get when writing on paper. There are a handful of screen protectors that provide this with varying degrees of success. The most popular being is Paperlike, which I plan on putting an order for when I’ve worn out my current screen protector.

    My current screen protector is Nillkin and isn’t too bad. It provides adequate protection as well as giving enough texture with enough anti-reflection qualities that doesn’t hinder screen visibility. Added bonus: a nice light scratchy sound as you'd expect if writing with an old-fashioned pencil!

    Applications

    I'm deliberately leaving out the most obvious and well-known apps that we are well aware of such as YouTube, Netflix, Gmail, Kindle, Twitter, Spotify etc.

    Jump Desktop

    I wrote about this very briefly in my previous post. If you want a link to your laptop/workstation from your iPad, Jump Desktop is your best option. Once you have the application installed on your iPad and host machine you are up and running in minutes. Judging by past updates, it’s getting better with every release.

    Evernote

    I don’t think I can speak about Evernote highly enough. I am a premium member and is one of my most highly used applications across all mediums. Worth every penny! It organises my notes, scribbles and agendas with little effort.

    Evernote is effectively my brain dump of ideas.

    Notes haven’t looked so good with the use of a recent feature - Templates. On creation of a new note, you have the option to select a predefined template based from the many Evernote provides from their own Template Gallery.

    Grammarly

    Grammarly is a must for all writers to improve the readability of your content. I myself had only started using Grammarly since last year and now can't think of writing a post without it. In the iPad form, Grammarly forms part of the keyboard that carries out checks as you type. This works quite well with my writing workflow when using Evernote.

    Autodesk Sketchbook

    If the Apple Pencil has done anything for me, is to allow me to experiment more with what it can do and in the process allowing me to try things I don’t generally do. In this case, sketch! I would be lying if I said Autodesk Sketchbook is the best drawing apps out there as I haven’t used any others. For an app that is free, it has a wide variety of features that will accommodate both novice and experts alike.

    1.1.1.1

    Developed by the team who brought you the Cloudflare CDN infrastructure comes 1.1.1.1, an app for providing faster and more private internet. This is something I always have running in the background to have a form or protection using public hotspots and to stop my ISP from snooping where I go on the internet.

    When compared to other DNS directory services, Cloudflare touts 1.1.1.1 as the fastest. As everything you do on the internet starts with a DNS request, choosing the fastest DNS directory will accelerate the online experience.

  • I’ve been looking for a tablet for quite some time and doing some in-depth research on the best one to get. I am always a stickler for detail and wanting to get best for the time based on budget and specification.

    Only having ever owned two tablets in the past - an iPad 2 and Nexus 7. Being someone who has semented himself in the Android/Google ecosystem, I automatically got along with the Nexus and quickly became my daily driver for web browsing and reading the vast variety of books from Amazon and Google Books. That was 5-6 years ago. The tablet game has changed... No longer is it just about viewing information, watching videos with some minor swipe gestures and basic gaming. It’s more!

    Ever since Microsoft released the first version of their Surface tablet computer, it shifted the industry standards to what we should now expect from a tablet, which then led to more innovation such as:

    • Keyboard support
    • Writing with palm rejection (not that old school stylus from yesteryear!)
    • Multitasking with the ability to view multiple apps in one screen, which is only getting better by the day!
    • Near laptop replacement - We’ll go into this a little later

    I wasn’t so quick to jump on the new iterations of tablets entering the market as I was waiting to see the proof in the pudding and for prices to go down. I just don’t think its worth spending over £600 on a tablet - looking at you iPad Pro! Nevertheless, from initially piquing my interest, it now got my full attention. For the first in a long time, I could see how having a tablet be useful in my day to day activities again.

    Do I Really Need A Tablet?

    Short answer: Yes.

    If you asked me this question last year I would have more than likely have said no. My Pixel 2 smartphone fit the bill for for my portable needs. Tablet life was soon being relegated to just holidays and long weekends away.

    The only thing that has changed is the increased amount of blogging and writing I now do. Typing on a smartphone really made my thumbs tired for long periods of time for when I didn’t have a computer to hand. On the other hand, I found lugging around my MacBook Pro 15" just for writing was a little excessive and lacking all day battery life.

    I could see myself buying a tablet along with a Bluetooth keyboard for easy quick note taking for when going to conferences and for writing something a little more indepth. For anyone who writes, they will probably tell you when you have a sudden spark of inspiration you need to just write it down.

    Conundrum: To Android or Not To Android

    There seems to be a real lack of good Android tablets going around that has good build quality, vanilla OS with accessories to match. It’s guaranteed that if you go for an Android tablet, you’ll be subjected to inferior cheap cases and hardware. This was indeed the case when looking for a nice flip case for my old Nexus 7.

    One would be forgiven for being given the impression accessory manufacturers don’t give Android tablets the light of day - very annoying. I still love the nice leather Kavaj case I purchased soon after getting my iPad 2. My iPad 2 may not be getting used, but still looks the part resting on the bookshelf! I guess it’s understandable why accessory manufacturers are not providing the goods for where there is limited demand. It all comes down to a lack of flagship Android devices and I was hoping the Pixel Slate would change this. Not a chance! I really wanted to go for the Pixel Slate but the main unknown factor for me is the longevity of a device that starts at £749.

    The only choice was to consider an iPad.

    What About The Microsoft Surface?

    The Microsoft Surface is a computer powerhouse and if I needed another laptop, this would have been a great purchase. I look forward to owining one in the future. Again, it all comes down to price. You have to take into consideration the cost of the computer itself as well as the added type cover. Plus I feared I would be greeted with a long Windows Update when I have a sudden spark of writing inspiration.

    Choosing An iPad

    Apple’s have positioned their iPad lineup that should meet all demand:

    I opted for the iPad Air for the 10.5” screen, A12 Bionic processor and Smart connector. The Smart connector was something previously available to the Pro series only and it was a welcome addition to their mid range tablet as this will give me the ability to connect a keyboard cover and any further peripherals that maybe on the horizon. Future proof!

    The performance and multi-tasking support is pretty good as well. I am writing this very post with Evernote in one window, Chrome in another whilst listening to Spotify.

    Near Laptop Replacement and iPad OS

    I have no expectation to make the iPad a laptop replacement. But it’s the nearest experience to it. In all honesty, I don’t understand how some even find the iPad Pro a complete replacement. Would someone enlighten me?

    I found using Jump Desktop to remote onto my laptop a really good way to get a laptop experience on my iPad. Very useful when I need to use applications I’d never be able to run on a tablet like VMWare. Jump Desktop is one of the best remote desktop applications you can use on an iPad.

    Jump Desktop features one of the fastest RDP rendering engines on the planet. Built in-house and hand tuned for high performance on mobile devices. Jump’s RDP engine also supports audio streaming, printer and folder sharing, multi-monitors, touch redirection, RD Gateway and international keyboards.

    I am really looking forward to the release of iPad OS as it might lead to a more immersive experience that bridges the gap closer to the basic features we expect from a laptop. I always felt iOS still lacks some of features currently present in Android, such as widgets to see app activity at a glance and more control over your files.

    Conclusion

    If you’re looking for a tablet that has the capability to do a lot of wonderful things with a lot of nice supported accessories, you can’t go wrong with an iPad Air.

    Update (21/06/2019): Android Abandoning The Tablet Market

    Well this totally caught me off guard. The Verge reported on 20th June that Android are exiting the tablet market and concentrating their efforts on building laptops. This further validates my purchase and choosing an iPad was indeed the right decision.

  • I decided it was time for my trusted Nexus 5 and I to part ways. We had many good times over the last few years we had known each other. But as things sometimes unfortunately turn out, our time together finally came to an end. The battery life was starting to wane and I really need a phone with a larger capacity - more than 16GB.

    Enough with the sentimentality...

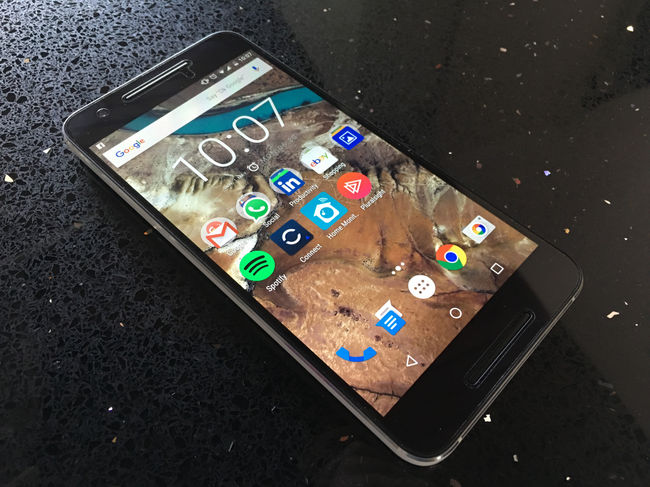
    I am now the proud owner of a Nexus 6P.

    My Nexus 6P

    And what a beauty she is!

    In getting the Nexus 6P, I am about to sell my dear Nexus 5 on eBay, so that it may grace someone elses life in a positive way just as it had done mine. It's in very good condition and still looks brand-spanking new. The only thing that I need to ensure is that the phone is wiped clean - inside and out. Even though I carried out a factory reset, I read doing this alone is not enough to make your previously stored information fully un-recoverable.

    To be completely sure that the device has had a complete wipe down, you need to ensure the Android device is encrypted prior to carrying out the factory reset. You can check if the phone is set to be encrpyted by going into Settings > Security > Encryption. By doing this, the encryption process will scramble your data and if some data is left after the factory reset, a key would be required to unecrypt it. For the general user, this should suffice.

    I decided to take things a step further, just to be 100% sure. I found a very good post on StackExchange Security that states the following:

    Factory resets reset your phone to a stock like state but does not remove your data, just applications. This leaves some data behind. The best way to prevent this data from being recovered is to encrypt the phone, and use wipe data/factory reset from the recovery menu. This way you don't have to download a ton of data and you can be fairly certain your things are secure.


    If you're not that worried, encrypting, and data/factory reset from the recovery menu is probably enough.


    Forgot to mention why the recovery mode data/factory reset. It formats the user data areas as well as the application area, and is far more thorough/secure than the one inside of the android OS and will prevent you from download junk data. It just flat out gets rid of it.


    To get to the recovery console on the Nexus 5 for resetting:

    1. If your phone is on, turn it off.
    2. Press and hold the Volume Down and Volume Up buttons, and then press and hold the Power button at the same time until the phone turns on. You'll see the word "Start" with an arrow around it.
    3. Press the Volume Down button twice to highlight "Recovery."
    4. Press the Power button to start Recovery mode. You'll see an image of an Android robot with a red exclamation mark and the words "No command."
    5. While holding the Power button, press and release the Volume Up button once.
    6. Press the Volume Down button twice to highlight "wipe data/factory reset" and press the Power button to select it.
    7. Press the Volume Down button seven times to highlight "Yes - erase all user data" and press the Power button to select it.
    8. After the reset is complete, press the Power button to select the option to reboot your device.

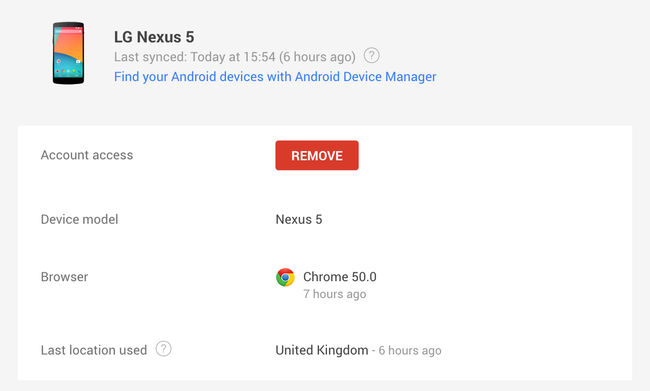
    Don't forget to also revoke account access as an extra measure by logging into your Google Account and clicking the "Remove" button (https://security.google.com/settings/security/activity).

    Disconnecting Nexus 5 from Google Account

  • Crucial 480GB SSDThe plan originally was to ditch my current laptop, Alienware M11x R3 for something a little more recent with a better build quality. Even though my Alienware is an amazing workhorse for the type of work I do (with a very high spec), I started to get annoyed with the common issue these laptop's have: screen touching the keyboard when closed.
    I wanted to get an Apple MacBook Pro Retina. But that got thrown completely out the window when I decided to go on the path of getting a property! Eek! So I had to make do with what I currently have on a very modest budget.

    As of late, I started noticing that my laptop was getting very sluggish and kept freezing every so often. This continued even after carrying a full factory format to give my Operating System a fresh install. The only thing I could amount this to was that my hard drive was on its way out.

    Luckily for me, at the same time, Amazon had some great offers in their computer components section and managed to get a Crucial 480GB Solid State Drive at a price that was an absolute steal!

    I've heard online and from a few friends of mine that once you go SSD, you definitely won't go back...and this truly is the case. I wasn't expecting to see so much of a performance increase. My laptop has never performed this well.

    At the same time, I decided to upgrade my current Operating System to Windows 8. I was getting a little bored of Windows 7. Plus, I quite like the new tiles interface. Very pretty! I don't understand the complaints or negativity. Some are obviously scared of change...but that's for a future blog post.

    Here are a few things I've noticed since my upgrade:

    • Boot times have minimised substantially.
    • My laptop always used to feel very warm during long-term usage. Now it always feels cool.
    • I'm sure battery times have improved.
    • Virtual Machines load in seconds, rather than minutes.

    Upgrading to a SSD is a very cheap and easy way to get more out of your machine. Highly recommended!

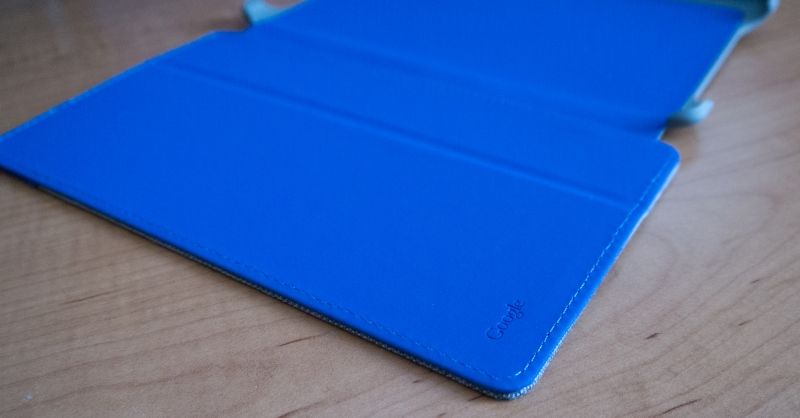
  • Nexus 7 Case Google LabelEver since I purchased my Nexus 7 last year. I've been trying to find a nice case for it. Failing, I settled for a cheap and cheerful folio case from eBay, which (still to this day) has served me well. But I was dying to have a case that looked different and oozed some unique design elements.

    When I noticed Google selling their own collection of Nexus 5 and 7 cases, I purchased one straight away. The Grey/Blue colour scheme caught my eye. It seemed that Google's offering ticked all the boxes. What could they possibly do wrong? It's an official product designed and manufactured by the very people who made the Nexus 7. If anyone could make a case without fault, it would have to be Google....right?

    Sadly no.

    For starters, the case lacks magnet technology allowing automatic power on/off feature when opening the case. Secondly, there was no type of latch that would keep the case closed and found that the case opened whilst it was moving around in my backpack. Maybe I just had high expectations since my current offering already had these features.

    Yes. These might be small things. But I found myself getting increasingly agitated (maybe an overstatement!) whilst using my Nexus 7, especially for a case that cost four times the price of the case I previously used.

    Nexus 7 Case - Outside

    Nexus 7 Case - Inside

    It wasn't all doom and gloom. There were things I did like about Google's case offering. I loved that the case looked and felt very different to what is available on the market currently. Outside was covered with hard wearing fabric with an inner lining of suede. Definitely high quality stuff!

    Unfortunately, Google just seemed to miss the mark by not including a few key features, mainly being the magnetic sensor.

    Back to Google it goes.

    Update - 11/02/2014

    I was expecting to pay for all postage costs to return the case. But after contacting Google Support regarding the reasons to why I wanted to return the item, they sent me a prepaid shipping package and were very helpful throughout the return process. Quick and easy!

  • A few weeks ago my Dad gave me my first mechanical keyboard. Knowing that I have a major fondness for anything that "lights up", he got me the "Ducky DK9008 Shine 2".

    The manufacturer wasn't kidding when they called their keyboard range "Shine 2". Soon as the keyboard is plugged in, things come to life and you are blinded by the most immensly bright blue light. Images on the internet will not truly justify how bright these LED's are! Thankfully, you have full control over the level of brightness and lighting modes.

    I'd be lying if I said that I've heard of the "Ducky" range of hardware peripherals until this point. Alas, I haven't. If the internet reviews are anything to go by, "Ducky" is well known in the mechanical keyboard market, providing a wide range of high quality and customisable keyboards. Nice!

    What's even better is the fact that I have the flagship model! I dread to think how much this thing costs...

    One thing I noticed after unboxing is the sheer weight. It's definitely one of the bulkiest keyboards I've ever handled. But this piece of hardware exudes quality and workmanship. Well this is something you'd expect from a top of the range keyboard that is on the higher end of the price spectrum.

    There has always been a misconception that mechanical keyboards are known for being stiff and produce a loud clacking noise. This couldn't be further from the truth with DK9008 Shine 2. This particular model uses the Cherry MX Brown switches, which produce a sharp response whether you are the kind of person that is a "heavy hitter" or who has the "lighter touch". Either way, the keys feel light to press with minimum effort and produce a nice satisfying "click".

    I've tried this keyboard for both standard typing and gaming. It's a great all rounder.

    One things for sure. Once you go mechanical you will never want to go back to the traditional membrane switch keyboard.

    For more info on the Ducky DK9008 Shine 2, take a look at their website: http://www.duckychannel.com.tw/en/DK9008_shine2.html

    And yes. This blog post was typed up using the Ducky DK9008 and I forsee all future posts will be typed up in the same manner. :-)

  • You have to see it to believe it. The inner geek in me want to purchase this.

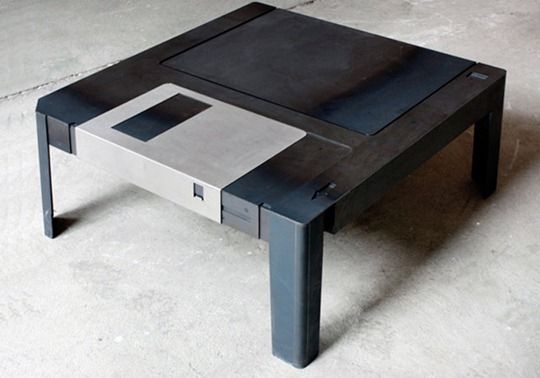
    Floppy Disk Coffee Table

    The guys who made this have managed to put in an impressive amount of detail (as much detail as you can get from a floppy disk!).

    Floppy Disk’s were well-known for their lack of storage space, thankfully, there’s a adequate sized secret compartment that is revealed by simply moving the metal shutter.

    More images of this beauty can be seen over at Design Boom: http://www.designboom.com/design/floppy-disk-table-by-axel-van-exel-marian-neulant/

    And whoever said the Floppy Disk is dead!? Smile