Blog

Blogging on programming and life in general.

  • It's not often you happen to stumble across a piece of code written around nine or ten years ago with fond memories. For me, it's a jQuery Countdown timer I wrote to be used in a quiz for a Sky project called The British at my current workplace - Syndicut.

    It is only now, all these years later I've decided to share the code for old times sake (after a little sprucing up).

    This countdown timer was originally used in quiz questions where the user had a set time limit to correctly answer a set of multiple-choice questions as quickly as possible. The longer they took to respond, the fewer points they received for that question.

    If the selected answer was correct, the countdown stopped and the number of points earned and time taken to select the answer was displayed.

    Demonstration of the countdown timer in action:
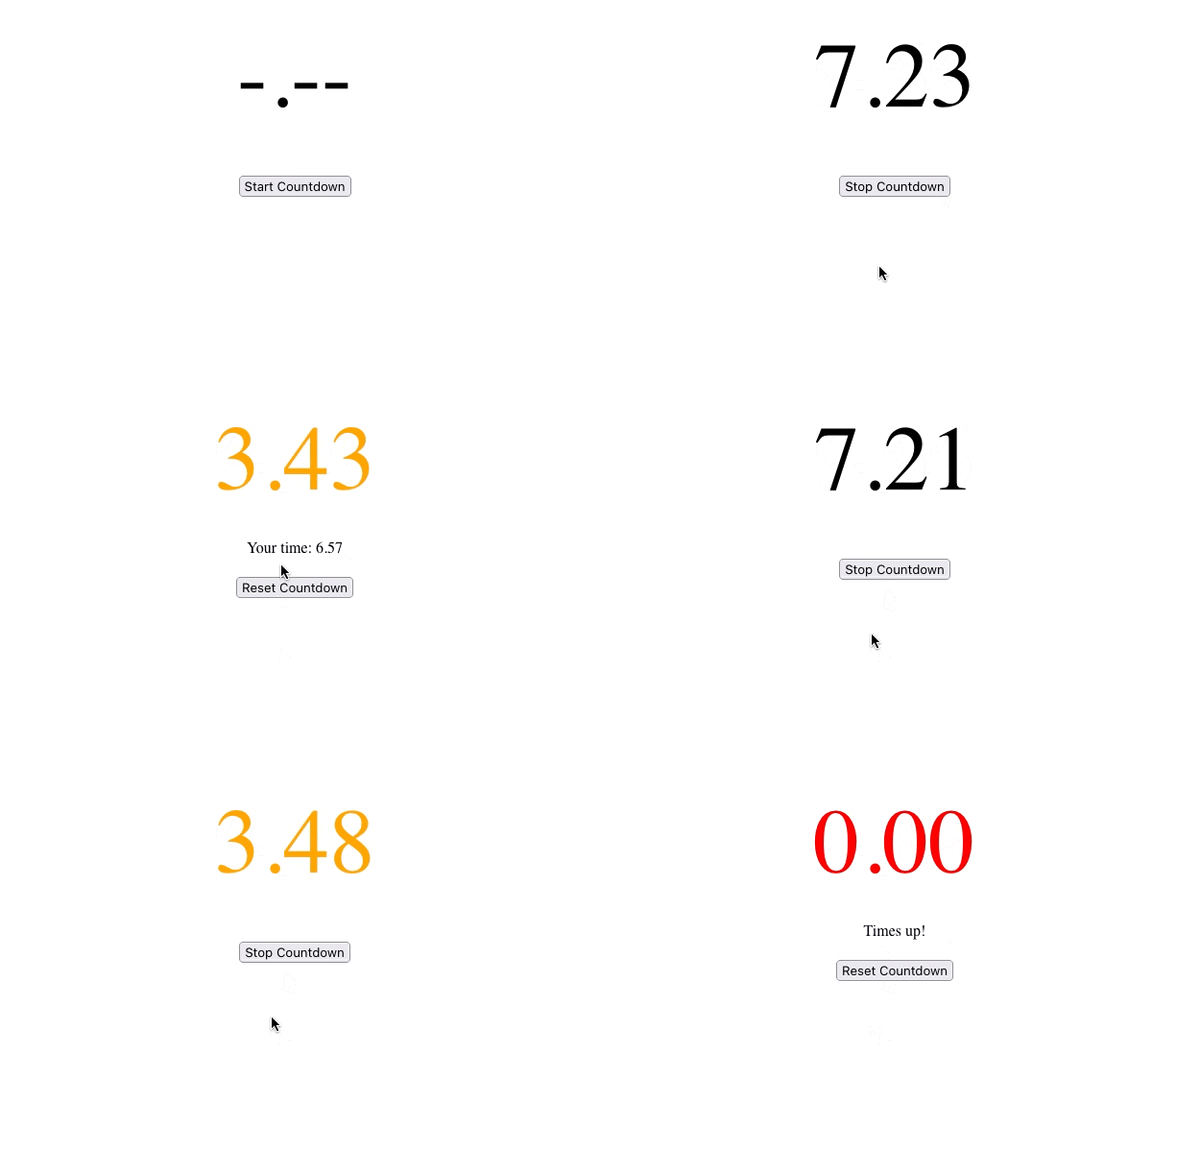
    Quiz Countdown Demo

    Of course, the version used in the project was a lot more polished.

    Code

    JavaScript

    const Timer = {
        ClockPaused: false,
        TimerStart: 10,
        StartTime: null,
        TimeRemaining: 0,
        EndTime: null,
        HtmlContainer: null,
    
        "Start": function(htmlCountdown) {
            Timer.StartTime = (new Date()).getTime() - 0;
            Timer.EndTime = (new Date()).getTime() + Timer.TimerStart * 1000;
    
            Timer.HtmlContainer = $(htmlCountdown);
    				
            // Ensure any added styles have been reset.
            Timer.HtmlContainer.removeAttr("style");
    
            Timer.DisplayCountdown();
            
            // Ensure message is cleared for when the countdown may have been reset.
            $("#message").html("");     
            
            // Show/hide the appropriate buttons.
            $("#btn-stop-timer").show();
            $("#btn-start-timer").hide();
            $("#btn-reset-timer").hide();
        },
        "DisplayCountdown": function() {
            if (Timer.ClockPaused) {
                return true;
            }
    
            Timer.TimeRemaining = (Timer.EndTime - (new Date()).getTime()) / 1000;
    
            if (Timer.TimeRemaining < 0) {
                Timer.TimeRemaining = 0;
            }
    
            //Display countdown value in page.
            Timer.HtmlContainer.html(Timer.TimeRemaining.toFixed(2));
    
            //Calculate percentage to append different text colours.
            const remainingPercent = Timer.TimeRemaining / Timer.TimerStart * 100;
            if (remainingPercent < 15) {
                Timer.HtmlContainer.css("color", "Red");
            } else if (remainingPercent < 51) {
                Timer.HtmlContainer.css("color", "Orange");
            }
    
            if (Timer.TimeRemaining > 0 && !Timer.ClockPaused) {
                setTimeout(function() {
                    Timer.DisplayCountdown();
                }, 100);
            } 
            else if (!Timer.ClockPaused) {
                Timer.TimesUp();
            }
        },
        "Stop" : function() {
            Timer.ClockPaused = true;
            
            const timeTaken = Timer.TimerStart - Timer.TimeRemaining;
            
            $("#message").html("Your time: " + timeTaken.toFixed(2));
            
            // Show/hide the appropriate buttons.        
            $("#btn-stop-timer").hide();
            $("#btn-reset-timer").show();
        },
        "TimesUp" : function() {
            $("#btn-stop-timer").hide();
            $("#btn-reset-timer").show();
            
            $("#message").html("Times up!");        
        }
    };
    
    $(document).ready(function () {
        $("#btn-start-timer").click(function () {
        	Timer.Start("#timer");
        });
        
        $("#btn-reset-timer").click(function () {
        	Timer.ClockPaused = false;
        	Timer.Start("#timer");
        });
        
        $("#btn-stop-timer").click(function () {
            Timer.Stop();
        });
    });
    

    HTML

    <div id="container">
      <div id="timer">
        -.--
      </div>
      <br />
      <div id="message"></div>
      <br />  
      <button id="btn-start-timer">Start Countdown</button>
      <button id="btn-stop-timer" style="display:none">Stop Countdown</button>
      <button id="btn-reset-timer" style="display:none">Reset Countdown</button>
    </div>
    

    Final Thoughts

    When looking over this code after all these years with fresh eyes, the jQuery library is no longer a fixed requirement. This could just as easily be re-written in vanilla JavaScript. But if I did this, it'll be to the detriment of nostalgia.

    A demonstration can be seen on my jsFiddle account.

  • If you haven't noticed (and I hope you have), back in June I finally released an update to my website to look more pleasing to the eye. This has been a long time coming after being on the back-burner for a few years.

    Embarrassingly, I’ve always stated in my many year in reviews that I planned on redeveloping this site over the next coming year, but never came to fruition. This is partly down to time and deciding to make content a priority. If I’m honest, it’s mostly down to lacking the skills and patience in carrying out the front-end development work.

    Thankfully, I managed to knuckle down and decided to become acquainted and learnt enough about HTML and CSS to get the site where it currently stands, with the help of Tailwind CSS and an open-source base template to act as a good starting point for a novice front-end developer.

    Tailwind CSS

    Very early on, I knew the only hope I had to give this site a new look was to use a front-end framework like Tailwind CSS, requiring a minimal learning curve to produce quick results. It’s definitely not a front-end framework to be sniffed at as more than 260000 developers have used it for their design system. So it’s a framework that is here to stay - a worthwhile investment to learn.

    Tailwind CSS is predominantly a CSS framework consisting of predefined classes to build websites directly within the markup without having to write a single line of custom CSS.

    As you’re styling directly within the markup, at first glance it can be overwhelming, especially where multiple classes need to be declared on a single HTML block. A vast difference when compared to the cleanliness of builds carried out by the very skilful team from where I work.

    It’s a small trade-off in an otherwise solid framework that gives substantial benefits in productivity. Primarily because Tailwind CSS classes aren’t very specific and gives a high level of customisability without you having to concoct CSS styles.

    Even though there are many utility classes to get acquainted with, once you have an understanding of the core concepts, front-end builds become less of an uphill battle. Through rebuilding my site, I managed to quite quickly get familiarity with creating different layouts based on viewport size and modifying margins and padding.

    I found it to be a very modular and component-driven framework, helping avoid repetition. There are UI kits on the market that give good examples of the power of Tailwind CSS that you can use to help speed up development:

    Using Tailwind CSS took away my fear of front-end development without having to think about Bootstrap, BEM, SASS mix-ins, custom utility classes, purge processing, etc.

    Base Template

    I gave myself a 3-week target (not full-time) to get the new site released and this couldn't have been done without getting a head start from a base theme. I found an open-source template built by Timothy Lin on Tailwind Awesome website that suited my key requirements:

    • Clean
    • Simple
    • Elegant
    • Maintainable
    • Easily customisable

    Another developer by the name of Leo, developed another variation of this already great template where I felt it met my requirements down to a tee.

    Even though the template code-base used was developed in Next.js, this did not matter as I could easily migrate the Tailwind markup into my Gatsby JS project. Getting Tailwind set up initially for Gatsby took a little tinkering to get right and to ensure the generated CSS footprint was kept relatively small.

    As you can see from the new site build, I was able to make further modifications to suit my requirements. This in itself is a testament to the original template build quality and the power of Tailwind CSS.

    Improvements

    As well as changing the look of my site, I thought it would be an opportune time to make a few other small enhancements.

    Google Ads

    Removing Google Ads had been on the forefront of my mind ever since I moved over to Netlify to host my website. Previously, it was a way to contribute to the yearly hosting cost. Now, this is no longer of any relevance (as I'm on the free Netlify free hosting plan), especially when weighing the importance of a meagre monetary return over improving the overall website look and load times of the site.

    In its place, I have a Buy Me A Coffee profile for those who would like to support the content I write.

    Updated Version of Gatsby JS

    It seemed natural to upgrade the version of Gatsby JS from version 2 to 4 during the reworking of my site to keep up-to-date with the latest changes and remove any deprecated code.

    Upgrading from version 2 to 4 took a little longer than I'd hoped as other elements required updating such as Node and NPM packages. This resulted in a lot of breaking changes within my code-base that I had to rectify.

    The process was arduous but worth doing as I found site builds in Netlify reduced significantly.

    Gatsby Build Caching

    I briefly spoke about improved Netlify build times (above) due to efficiencies in code changes relating to upgrading to Gatsby 4. There is one more quiver to my bow to aid further build efficiencies and that is by installing the netlify-plugin-gatsby-cache plugin within Netlify - one-click install.

    I highly recommend everyone who has a Gatsby site install this plugin as it instantly reduces build times. For a website like my own that houses over 300 posts the build minutes do start to add up.

    Features Yet To Be Implemented

    Even though the new version of my site is live, there are features I still plan on implementing.

    Algolia Site Search

    As part of getting a new version of my site released in such a short period, I had to focus on the core areas and everything else was secondary. One of the features that didn’t make the cut was the site search using Algolia.

    I do plan on reinstating the site search feature at some point as I found it helpful for me to search through my older posts and surprisingly (based on the stats) visitors to the site also made use of it.

    Short-Form Content

    I like the idea of posting smaller pieces of content that doesn't have to result in very lengthy written blog posts. Not sure what I will call this new section. There are only two names that come to mind: "Short-form" or "Bytesize". It could consist of the following types of content:

    • Small, concise code snippets.
    • Links to content I found useful online that could be useful in certain technical use-cases.
    • Book recommendations.
    • Quotes.
    • Thoughts on news articles - John Gruber style!

    At one point, I wrote blog posts I categorised as Quick Tips, till this date consists of a mere four blog posts that I never added to. I think the naming of this category wasn't quite right.

    I see this section functioning in a similar fashion to Marco Heine's Today I Learned.

    My Bookmarks

    I like the idea of having single page with a bunch of links to useful sites I keep going back to. It could be sites that you have never come across before, making all the more reason to share these links.

    Closing Thoughts

    I normally find a full-site rebuild quite trying at times. This time was different and there were two reasons for this.

    Firstly, I've already built the site in Gatsby JS and involved minimal code changes, even when taking into consideration the changes needed to update to version 4. Secondly, using Tailwind CSS as a front-end framework was a very rewarding experience especially when page builds come to fruition in such a quick turnaround.

    I hope you find the new design is more aesthetically pleasing and makes reading through blog posts a more enjoyable experience.

  • A couple of weeks ago, I encountered an issue where for no reason one of my regularly running Azure Functions stopped. One of the first things I do when such an event arises is to manually run the function through the "Code + Test" interface to give me an idea of the severity of the issue and whether I can replicate the error reported within Application Insights.

    It's only then I noticed the following message was displayed above my list of functions that were never present before:

    Your app is currently in read-only mode because you are running from a package file

    Your app is currently in read only mode because you are running from a package file. To make any changes update the content in your zip file and WEBSITE_RUN_FROM_PACKAGE app setting.

    I was unable to even start the Azure Function manually. I can't be too sure whether the above message was the reason for this. Just seemed too coincidental that everything came to a halt based on a message I've never seen before. However, in one of Christos Matskas blog posts, he writes:

    Once our Function code is deployed, we can navigate to the Azure portal and test that everything’s working as expected. In the Azure Function app, we select the function that we just deployed and choose the Code+Test tab. Our Function is read-only as the code was pre-compiled but we can test it by selecting the Test/Run menu option and hitting the Run button.

    So an Azure Function in read-only mode should have no trouble running as normal.

    One of the main suggestions was to remove the WEBSITE_RUN_FROM_PACKAGE configuration setting or update its value to "0". This had no effect in getting the function back to working form.

    Suspected Cause

    I believe there is a bigger underlying issue at play here as having an Azure Function in read-only mode should not affect the overall running of the function itself. I suspect it's from when I published some updates using the latest version of Visual Studio (2022), where there might have been a conflict in publish profile settings set by an older version. All previous releases were made by the 2019 edition.

    Solution

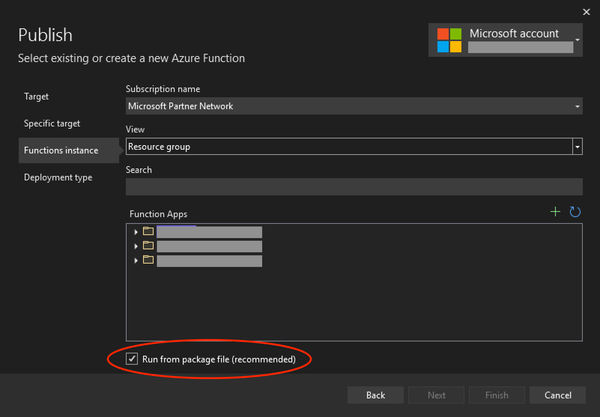
    It would seem my solution differs from the similar recommended solutions I've seen online. In my case, all I had to do is recreate my publish profile in Visual Studio and unselect the "Run from package file (recommended)" checkbox.

    Visual Studio 2022 - Azure Function Publish Profile

    When a republish was carried out using the updated publish profile, the Azure Function functioned as normal.

    Conclusion

    This post primarily demonstrates how a new publish profile may need to be created if using a newer version of Visual Studio, in addition, an approach to remove the "read only" state from an Azure Function.

    However, I have to highlight that it's recommended to use "run from package" as it provides several benefits, such as:

    • Reduces the risk of file copy locking issues.
    • Can be deployed to a production app (with restart).
    • You can be certain of the files that are running in your app.
    • May reduce cold-start times.

    I do plan on looking into this further as any time I attempted to "run from package" none of my Azure Functions ran. Next course of action is to create a fresh Azure Function instance within the Azure Portal to see if that makes any difference.

  • Published on
    -
    4 min read

    The Future of Death In A Digital Age

    I've started watching a very interesting Netflix series called "The Future Of". A documentary series exploring how new developments in technology and other innovations will change our lives in the future.

    The episode that caught my attention broached the subject of "Life After Death" and spoke about how through holograms and voice cloning, the approach to how we come to terms with death and say goodbye to our loved ones on passing will change. Some ideas presented were inspired, others not so much.

    Strangely enough, the points raised resonated with me. Probably because I've put great importance on preserving memories through photos and ensuring I will always have these throughout my lifetime to look back on and act as a time capsule about my family for generations after me.

    Life and Our Social Digital Footprint

    After death, we not only leave behind our loved ones but also a big trail of data! If you could put a number on the amount of data we collect (including collected about us unknowingly) over a lifetime, what would it amount to?

    Research conducted in 2016 by Northeastern University, estimated that 1.7 MB of data is created every second per person. This would equate to 146880 MB per day! Over a lifetime… I dare not calculate. It is these digital exhaust fumes we all produce that will remain long after we're gone.

    The biggest chunk of this is taken up through the use of social media, sucking up artefacts about us like a vacuum. To put this into some perspective, social media collects so much data, they can’t remember all the ways they surveil us.

    It’s crazy to think the amount of data we’re openly willing to share to the likes of Facebook, Instagram and TikTok. I sometimes think about what my next generation will think when it is my turn to move on to the "next life" and see the things I've posted (or lack of!) on these platforms. Will this be considered a correct representation of me as a person?

    Death and Ownership of Data

    What happens to all this data after death? - This very important point was brought up in the episode.

    Thankfully, not all is doom and gloom when it comes to having control of a deceased online profile. The majority of online platforms allow the profile to be removed or memorialised with the consent of an immediate family member. For this to be actioned, a death certificate of the deceased and proof you are the next of kin will need to be provided.

    Unfortunately, this will not always be the status quo. There will always be a question on just how many people are aware this is an option and can carry this out as a task. Regardless of whether a profile is claimed or not, there will be on a daily basis an accumulation of deceased profiles.

    Social media platforms are getting wise to this impending scenario, especially when you have the likes of Facebook and their future battle with the dead. According to academics from the University of Oxford, within the next 50 years, the dead could outnumber the living. Other online platforms could find themselves in a similar fate.

    They will need a strategy in place to make their online presence financially viable to investors for when the ad revenue dries up and will have to be creative in how this data can be of use.

    In the episode, it highlighted your data will most likely belong to the social media platform to do with as they please for their monetary gain. For example, in the future, the avatar of a deceased member of your family could be used to advertise a product that in real life would never support. - Something you could only imagine from the writers of Black Mirror.

    What about self-managed data like a personal website, photos and files stored on a computer or NAS? Unfortunately, this is where things get a little tricky as someone technical will have to be entrusted to keep things going. This has put into question all my efforts to create a time capsule storing all important photos of family past and present, painstakingly organised securely within my NAS. What will become of this?

    Conclusion

    I feel this post doesn’t lead to any conclusion and probably raised more questions than answers - thoughts on a subject that creates a great impression on me.

    It's an irrefutable fact that technology is changing the way we die, and for the living, changing the way they deal with death. Future generations will find it easier and more accessible than ever to know who their ancestors were - if they felt inclined to find out.

    Could it be considered narcissistic to invest so much effort in ensuring our digital footprint is handled in the manner we would like the next generation to see after we die? A form of digital immortality. Depends on the length you want to go to ensure how you're remembered.

    I end this post paraphrasing an apt quote from Professor Charles Isbell (featured in the episode):

    If you perceive immortality as nothing more than your great-great-grandchildren knowing your name, the type of person you were and the values you held, this is all anyone could ever ask for.

  • Whenever there is a need to restructure an Excel spreadsheet to an acceptable form to be used for a SaaS platform or custom application, my first inclination is to build something in C# to get the spreadsheet into a form I require.

    This week I felt adventurous and decided to break the mundane job of formatting a spreadsheet using an approach I've been reading up on for some time but just never got a chance to apply in a real-world scenario - Google App Scripts.

    What Is A Google App Script?

    Released in 2009, Google App Scripts is a cloud-based platform that allows you to automate tasks across Google Workspace products such as Drive, Docs, Sheets, Calendar, Gmail, etc. You could think of App Scripts as similar to writing a macro in Microsoft Office. They both can automate repeatable tasks and extend the standard features of the application.

    The great thing about Google App Script development is being able to use popular web languages (HTML/CSS/JavaScript) to build something custom. Refreshing when compared to the more archaic option of using VBA in Microsoft Office.

    Some really impressive things can be achieved using App Scripts within the Google ecosystem.

    Google Sheets App Script

    The Google App Script I wrote fulfils the job of taking the contents of cells in a row from one spreadsheet to be copied into another. The aim is to carry out automated field mapping, where the script would iterate through each row from the source spreadsheet and create a new row in the target spreadsheet where the cell value would be placed in a different column.

    This example will demonstrate a very simple approach where the source spreadsheet will contain five columns where each row contains numbers in ascending order to then be copied to the target spreadsheet in descending order.

    Before we add the script, we need to create two spreadsheets:

    • Source sheet: Source - Numbers Ascending
    • Target sheet: Destination - Numbers Descending

    The source sheet should mirror the same structure as the screenshot (below) illustrates.

    Google Sheet - Source

    The target sheet just needs to contain the column headers.

    The App Script can be created by:

    1. Navigating to Extensions > App Scripts from the toolbar. This will open a new tab presenting an interface to manage our scripts.
    2. In the "Files" area, press the "+" and select "Script".
    3. Name the script file: "export-cells-demo.gs".

    Add the following code:

    // Initialiser.
    function run() {
      sendDataToDestinationSpreadSheet();
    }
    
    // Copies values from a source spreadsheet to the target spreadsheet.
    function sendDataToDestinationSpreadSheet() {
      var activeSheet = SpreadsheetApp.getActiveSpreadsheet();
    
      // Get source spreadsheet by its name.
      var sourceSheet = activeSheet.getSheetByName('Source - Numbers Ascending');
    
      // Select the source spreadsheet cells.
      var sourceColumnRange = sourceSheet.getRange('A:E');
      var sourceColumnValues = sourceColumnRange.getValues();
    
      // Get target spreadsheet by its name..
      var targetSheet = activeSheet.getSheetByName('Destination - Numbers Descending');
    
      // Iterate through all rows from the source sheet.
      // Start index at 1 to ignore the column header.
      for(var i = 1; i < sourceColumnValues.length; i++) {
        // Get the cell value for the row.
        var column1 = sourceColumnValues[0,i][0];
        var column2 = sourceColumnValues[0,i][1];
        var column3 = sourceColumnValues[0,i][2];
        var column4 = sourceColumnValues[0,i][3];
        var column5 = sourceColumnValues[0,i][4];
        
        // Use getRange() to get the value position by declaring the row and column number.
        // Use setValue() to copy the value into target spreadsheet column.
        targetSheet.getRange(i+1, 1).setValue(column5);
        targetSheet.getRange(i+1, 2).setValue(column4);
        targetSheet.getRange(i+1, 3).setValue(column3);
        targetSheet.getRange(i+1, 4).setValue(column2);
        targetSheet.getRange(i+1, 5).setValue(column1);
      }
    }
    

    The majority of this script should be self-explanatory with the aid of comments. The only part that requires further explanation is where the values in the target sheet are set, as this is where we insert the numbers for each row in descending order:

    ...
    ...
    targetSheet.getRange(i+1, 1).setValue(column5);
    targetSheet.getRange(i+1, 2).setValue(column4);
    targetSheet.getRange(i+1, 3).setValue(column3);
    targetSheet.getRange(i+1, 4).setValue(column2);
    targetSheet.getRange(i+1, 5).setValue(column1);
    ...
    ...
    

    The getRange function accepts two parameters: Row Number and Column Number. In this case, the row number is acquired from the for loop index as we're using the same row position in both source and target sheets. However, we want to change the position of the columns in order to display numbers in descending order. To do this, I set the first column in the target sheet to contain the value of the last column from the source sheet and carried on from there.

    All the needs to be done now is to run the script by selecting our "run()" function from the App Scripts toolbar and pressing the "Run" button.

    The target spreadsheet should now contain the numbered values for each row in descending order.

    Google Sheet - Target

    Voila! You've just created your first Google App Script in Google Sheets with simple field mapping.

    Conclusion

    Creating my first Google App Script in a real-world scenario to carry out some data manipulation has opened my eyes to the possibilities of what can be achieved without investing additional time developing something like a Console App to do the very same thing.

    There is a slight learning curve involved to understand the key functions required to carry out certain tasks, but this is easily resolved with a bit of Googling and reading through the documentation.

    My journey into Google App Scripts has only just begun and I look forward to seeing what else it has to offer!

  • I’ve recently updated my website from the ground up (something I will write in greater detail in a future post) and when it came to releasing all changes to Netlify, I was greeted by the following error in the build log:

    7:39:29 PM: $ gatsby build
    7:39:30 PM: error Gatsby requires Node.js 14.15.0 or higher (you have v12.18.0).
    7:39:30 PM: Upgrade Node to the latest stable release: https://gatsby.dev/upgrading-node-js
    

    Based on the error, it appears that the Node version installed on my machine is older than what Netlify requires... In fact, I was surprised to discover that it was very old. So I updated Node on my local environment as well as all of the NPM packages for my website.

    I now needed to ensure my website hosted in Netlify was using the same versions.

    The quickest way to update Node and NPM versions is to add the following environment variables to your site:

    NODE_VERSION = "14.15.0"
    NPM_VERSION = "8.5.5"
    

    You can also set the Node and NPM versions by adding a netlify.toml file to the root of your website project before committing your build to Netlify:

    [build.environment]
        NODE_VERSION = "14.15.0"
        NPM_VERSION = "8.5.5" 
    
  • Published on
    -
    4 min read

    300th Blog Post!

    Hitting the 300th blog post milestone isn't something I could have ever imagined. But here we are. This seems like an ideal opportunity to look back and reflect on how it all started and my journey...

    Where It Started

    The year is 2007. A 22-year-old junior web developer called Surinder decided he wanted to create a blog to primarily serve as a knowledge base of all the things he learned in his career so far. Originally, built in BlogEngine - a nice open-source and lightweight .NET-based blogging platform, he made his foray into the blogging world.

    The very first post published involved a SQL matter that (at the time) he thought was very complex in nature - Implement SCOPE_IDENTITY() in Data Access Layer. It was this very post that started it all and as they say: The rest is history...

    As strange as it may sound, at the very start, my blog was a secret that I hid from my peers. Being a junior developer, I found myself lacking confidence in the very industry I was working in. What right do I have to start a blog and share any technical knowledge when those who I worked with are more experienced than me?

    After three years when I felt more confident in the type of posts my blog contained, I decided to allow search engines to index my content. It was also during this time I moved on job-wise and used my website to give my prospective employer an insight into my capability. It must have worked - I got the job!

    Identity Crisis

    In the early years, my blog had a bit of an identity crisis when it came to its domain name. It started with computing-studio.com, to surinder.computing-studio.com, then isurinder.com and lastly to what it will forever be immortalised as - surinderbhomra.com. The change in the domain name was a result of not wanting there to be an expectation that I will solely be writing about technical-related content and wanted the website to focus more on me as an individual.

    Finding My Writing Groove

    Throughout my time blogging, I've fallen in and out of love of writing and at times hit writer's block. As a consequence, there have at times been gaps in consistently outputting content. I think this is primarily due to taking a very long time to find my feet and finding a voice.

    I can honestly say that it's over the last few years I've finally found my writing groove and figured out the type of content I want to push out. Not only do I enjoy writing about all things technical, but also started garnering a fascination with writing more personal pieces where I’m not bound by any specific subject.

    Writing Is Both A Passion and A Healer

    The driving force after publishing my latest posts is the excitement of thinking about what to write next. This mentality has worked great for me as I know my next post will help me grow whatever the subject is in my next writing endeavour. I no longer feel like writing is a discipline, it's a passion.

    There is something cathartic in pounding the keys of my keyboard to output something that was once a small thought in my head to something of substance. I also found that writing acts as a coping mechanism during times of negativity and stress.

    Cringe Factor

    I do cringe looking back at some of my earlier posts. As much as I'd like to delete these posts, I leave them as they are to act as an anchor to ground me and as a reminder of how far I've come. Through the thirty pages of posts, I can see how I've changed throughout the years and grown as a person.

    In the very beginning writing was a way to make my mark in the world and if I could get some form of monetary gain or high readership for a post, I'd class that as a win. Now that I've matured this has is no longer of relevance.

    Content Syndication

    My strategy now is to make my content accessible to a wider audience by syndicating posts to other platforms. Syndication takes your content to more readers and helps boost organic and referral traffic back to your website. At the moment, I syndicate my content based on the subject matter:

    What I've learnt is that it's all about serving the right content to the right users.

    Imposter Syndrome

    Even now after 15 years of writing, I still suffer from the occasional bout of imposter syndrome where I perceive my skill set as lower than my actual skill set. There will always be someone capable of doing things better and I have to remember this shouldn't be a negative takeaway. Surrounding yourself with such people is an opportunity to learn more and become better at what I do. There have been posts where I received some good constructive criticisms that helped me approach things differently.

    Where Do I Go From Here?

    Blogging is a marathon, not a race. I've written 300 posts over 15 years, equating to 15 posts per year. If my writing groove continues on its current trajectory, this will only increase as long as I feel I have quality content to publish.

    I've noticed there are many posts stored within Evernote that don't make the cut - and this is good thing. Not every thought or idea is worth publishing.

    I hope I can continue to output content in the years to come and with any luck, I look forward to writing a post marking the next 300th blog post.

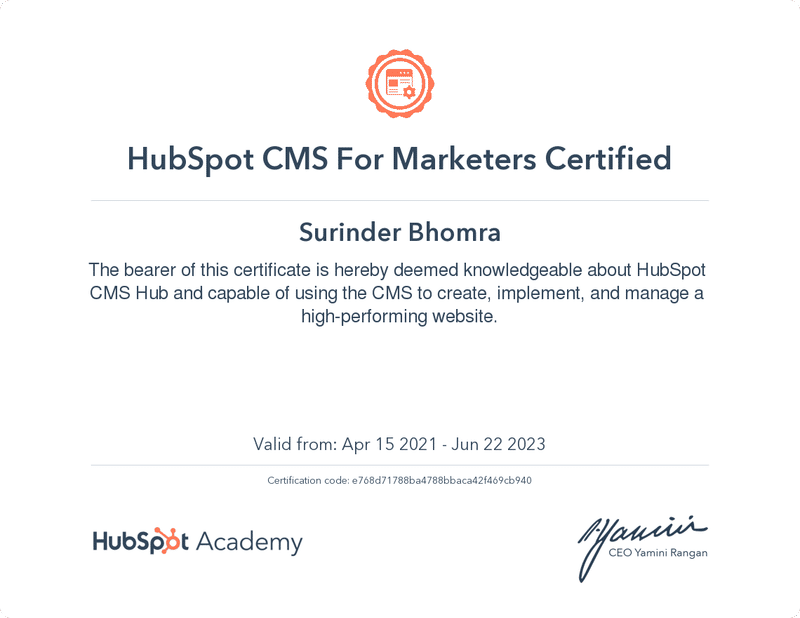
  • Last year, I completed my Hubspot CMS for Marketers Certification because I wanted to see if I could not only pass a Hubspot exam, but also gain a better understanding of the platform from a marketing standpoint.

    As a Hubspot developer, I've discovered that it's all too easy to get caught up in the technical side of things and potentially miss out on all the features Hubspot offers to offer. I found the "Hubspot CMS for Marketers" certification exam to be quite beneficial in helping me see things from a different perspective, therefore I opted to renew it.

    Hubspot CMS for Marketers Certification

    I also completed the "Hubspot CMS for Developers" certification as this is something I missed out on last year. This certification consisted of an exam and a practical piece on the core development criteria of building a theme.

    Hubspot CMS for Developers Certification

    Both these certifications compliment one another and highly recommend taking these both if you're working with the CMS side of Hubspot.

  • NOTE: This post began as a demonstration of how quickly I can create and publish blog entries on the go using Working Copy Git Client on my iPad while in India. I got 90% of the way through this post, but I didn't have time to finish it, utterly defeating the point of the post. Anyway, without further ado…

    I thought this would be the most opportune moment to try out the Working Copy Git Client app on my iPad to see if I’m able to update my blog on the go. I’m also using this time as a small test to myself to see whether I’m able to focus and write on the fly anywhere. The last time I did anything similar was on my return from Bali, where I wrote my experiences offline using Evernote on my phone to then add to my website later.

    This time, I wanted to try something different as I have a few hours to kill. So I'm writing this post sitting in the seating area of Heathrow Airport waiting to board my flight. If everything goes to plan, this very post should auto-publish on commit to my website hosted on Netlify.

    I’m off to India to experience one of the most major milestones in my life - getting married Indian style! I’d like to class this as part deux of “getting married” after performing our English ceremony during the back end of Covid restrictions last year. So this seems a great time to put the Working Copy app and my iPad writing flow to the test, where my beloved Macbook Pro is nowhere in sight to aid the publishing of this post.

    As I write this post, it looks like my core writing eco-system will remain unchanged:

    1. Write up the post in Evernote.
    2. Spelling, phrasing and grammar check using Quillbot (previously Grammarly).
    3. Add post in markdown format to my Gatsby website project.
    4. Commit website updates.

    The true test will come when I write a post that contains more than a handful of images. It's something that doesn't happen very often - only when it comes to holidays. But I can see cropping, compressing and positioning images for a blog post on an iPad a little fiddly, especially on an 10 inch iPad Air.

    So how does Working Copy fair in my very first piece of "on-the-go" writing?

    Initial Setup

    Getting up and running couldn't have been easier. After installation, I logged into my Bitbucket account and cloned my website repo, I was ready to go. For a site housing approximately 294 posts, it has a relatively small footprint (images are included): 54MB. I am so glad I decided to make the switch to GatsbyJS static-site generation and move away from the traditional server-side application connected to a database.

    Everything you'd expect from a git client is present, such as:

    • Clone
    • Pull
    • Push
    • Fetch
    • Merge
    • Branch Creation

    Editor

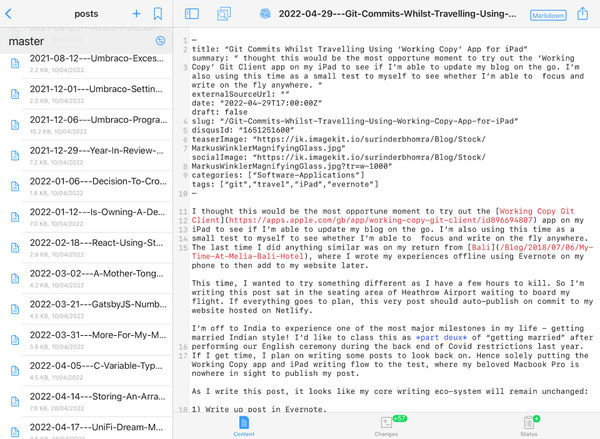
    The editor is as I would expect it to be. Simple, clear and concise with basic syntax highlight, which is something that I would expect from an app built for a tablet device. If you think this can be a replacement for your traditional coding IDE, you'd be mistaken. Anyway, why would you want to do full-on coding on a tablet device?

    Working Copy Editor

    I like how easily navigable the interface is. There is little to no learning curve when using it for the first time.

    Native Integration with iOS Files

    Now, this is where I feel I'm familiar territory. Being able to drag and drop files, such as images and text files from iOS’s Files layer into my Git repo - just like if I was working on a laptop. I’ve also seen other users write their posts outside using iA Writer or Pretext editor apps before dropping the text file into their repo.

    Working with Images

    I've never found working with image manipulation on the iPad that easy, hence why I like to use my Macbook Pro for the final finessing of my post before publishing. I have the tools I need to resize and compress images. Most photo app's on the iPad solely pull in images housed in Apple Photos. Even though I have an iPad and Macbook Pro, I don't like being locked into a single eco-system, especially when the majority of apps work well across different platforms.

    Image Size is a free app that allowed me to crop and resize photos stored in iOS Files by simply stating the dimensions I require. Added bonus: The app is free!

    Once the image is resized, I can carry out compression using TinyPNG and lastly simply perform a drag and drop into the Working Copy app.

    Conclusion

    I always wanted to have the ability to update my website on the go on a tablet device and Working Copy makes this very easy. When you add the iOS File System and Image Size app, you have everything for your writing needs.

    I never thought that I'd be comfortable publishing posts directly to my website from an iPad. Overall, I found the writing experience to be very efficient as I encountered fewer distractions when compared to working on my Macbook Pro.

    If there was anything I could change, it would be the size of my iPad. I did find Working Copy took a lot of screen real-estate, especially when having multiple windows open. The 12-inch iPad Pro looks very tempting.

    Did I manage to write and submit this post directly from my iPad? Yes.
    Would I do it again? Yes!

  • I'm writing this post simply for the purpose of reminding myself of how I built my first shell script... I'm not sure if admitting this is a positive or negative thing. Writing shell scripts has never truly been a part of my day-to-day work, but understood the core concepts and what they are able to do.

    I decided to write this shell script to perform a rather easy task: cycle through all CSS and JS files in a directory and change a string within each file with the value that was entered into the shell script. The main use of this script, for my use, is to update path references in these files.

    # Script Name: CSS/JS Path Replacer #
    # Description: Iterates through all directories to replace strings found in CSS and JS files. #
    #               Place this bash script in the directory where the files reside. #
    #               For example: /resources. #
    
    # Take the search string.
    read -p "Enter the search string: " search
    
    # Take the replace string.
    read -p "Enter the replace string: " replace
    
    FILES="./**/*.min.css ./**/*.css ./**/*.min.js ./**/*.js"
    
    for f in $FILES
    do
    	echo "Processing $f file..."
      
    	sed -i "s/${search//\//\\/}/${replace//\//\\/}/g" $f
    done
    
    $SHELL
    

    To carry out a replace within each file, I'm using the sed command:

    sed -i "s/old-value/new-value/g" filename.txt
    

    This command tells sed to find all occurrences of "old-value" and replace with "new-value" in a file called "filename.txt". As the main purpose of the script is to update path references within CSS and JS files, I had to escape forward slashes in the "search" and "replace" variables when parsed to the sed command.

    Bash script in use:

    Enter the search string: /surinder-v1/resources
    Enter the replace string: /surinder-v2/resources
    Processing ./css/site.min.css file...
    Processing ./css/site.css file...
    Processing ./css/site.min.css file...
    Processing ./css/styleguide.css file...
    Processing ./js/global.min.js file...
    Processing ./js/global.min.js file...
    

    Once the script has processed all the files, any reference to "/surinder-v1/resources" will be replaced with "/surinder-v2/resources".

    Further useful information about using the "sed" command can be found in the following post: How to use sed to find and replace text in files in Linux / Unix shell.